- Operation Epsom
-
Operation Epsom Part of Battle for Caen 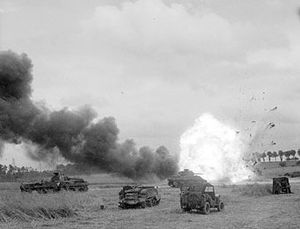
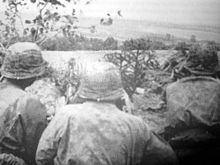
An ammunition carrier of the 11th Armoured Division explodes after it is hit by a mortar round during Operation Epsom – 26 June 1944.Date 26–30 June 1944[1] Location West of Caen, Normandy, France[2] Result Tactically indecisive[3]
Strategic Allied victory[4]Belligerents  United Kingdom
 Germany
Commanders and leaders Bernard Montgomery[5]
Miles Dempsey[5]
Richard O'Connor[6] Friedrich Dollmann[7]
Leo Geyr von Schweppenburg[8]
Sepp Dietrich[9]
Paul Hausser[10]
Willi Bittrich[7]Strength 2 Infantry Divisions[11]
1 Armoured Division[11]
1 Armoured Brigade[11]
1 Tank Brigade[11]3 SS Panzer Divisions[9]
5 ad-hoc battle groups[12]
1 SS heavy tank battalion[13]Casualties and losses 4,020[nb 1]–4,078 casualties[nb 2] Over 3,000 casualties[nb 3]
126 tanks knocked out[nb 4]
Operation Epsom Operational scope Strategic Offensive Planned by British Second Army[5] Objective Break out of the bridgehead, west of Caen, advance across the Orne River and capture the highground south of Caen near Bretteville-sur-Laize[18] Executed by VIII Corps, Second Army. Supporting attacks made by elements of XXX Corps, Second Army.[2] Operation Epsom, also known as the First Battle of the Odon, was a Second World War British offensive that took place between 26 and 30 June 1944, during the Battle of Normandy. The offensive was intended to outflank and seize the German-occupied city of Caen, a major Allied objective in the early stages of the invasion of northwest Europe.
Preceded by attacks to secure lines of advance, Operation Epsom was launched early on 26 June with units of the 15th (Scottish) Infantry Division advancing behind a rolling artillery barrage. Air cover was sporadic for much of the operation because poor weather in the United Kingdom forced the last-minute cancellation of bomber support. Accompanied by the tanks of the 31st Tank Brigade, the 15th Scottish made steady progress and by the end of the first day had overrun much of the German outpost line, although some difficulties remained in securing the flanks. In heavy fighting over the following two days, a foothold was secured across the River Odon and efforts were made to expand this by capturing strategic points around the salient and moving up the 43rd (Wessex) Infantry Division. In response to powerful German counterattacks, by 30 June some of the British forces across the river were withdrawn, bringing the operation to a close.
Military historians have widely differed in their interpretations of the intention and conduct of Operation Epsom but there is general agreement concerning its effect on the balance of forces in Normandy. Although the Germans had managed to contain the offensive, to do so they had been obliged to commit all their strength, including two panzer divisions newly arrived in Normandy and earmarked for an offensive against British and American positions around Bayeux. Casualties were heavy on both sides but, unlike General Bernard Montgomery, Field Marshal Erwin Rommel was unable to withdraw units into reserve after the battle as they were needed to hold the front line. The British retained the initiative and launched further operations over the following two weeks, eventually capturing Caen in mid-July.
Contents
Background
The historic Normandy town of Caen was a D-Day objective for the British 3rd Infantry Division that landed on Sword Beach on 6 June 1944.[19] The capture of Caen, while "ambitious", has been described by historian L F Ellis as the most important D-Day objective assigned to Lieutenant-General Crocker's I Corps.[nb 5] Operation Overlord called for Second Army to secure the city and then form a front line from Caumont-l'Éventé to the south-east of Caen, in order to acquire airfields and protect the left flank of the United States First Army while it moved on Cherbourg.[22] Possession of Caen and its surroundings would give Second Army a suitable staging area for a push south to capture Falaise, which could be used as the pivot for a swing left to advance on Argentan and then towards the Touques River.[23]
Hampered by congestion in the beachhead that delayed the deployment of its armoured support and forced to divert effort to attacking strongly held German positions along the 9.3-mile (15.0 km) route to the town, the 3rd Division was unable to assault Caen in force on D-Day and was stopped short of its outskirts by the 21st Panzer Division.[24] Immediate follow-up attacks were unsuccessful as German resistance solidified. Abandoning the direct approach, Operation Perch—a pincer attack by I and XXX Corps[25]—was launched on 7 June with the intention of encircling Caen from the east and west.[26] I Corps, striking south out of the Orne bridgehead, was halted by the 21st Panzer Division[27] and the attack by XXX Corps bogged west of Caen in front of Tilly-sur-Seulles in the face of stiff opposition from the Panzer-Lehr-Division.[26] In an effort to force Panzer Lehr to withdraw or surrender[28] and to keep operations fluid, part the 7th Armoured Division pushed through a recently created gap in the German front line and attempted to capture the town of Villers-Bocage.[29] The resulting day-long battle saw the vanguard of the 7th Armoured Division withdraw from the town,[30] but by 17 June Panzer Lehr had also been forced back and XXX Corps had taken Tilly-sur-Seulles.[31]
Although planned, a repeated attack from the 7th Armoured Division never materialised[32] and further offensive operations were abandoned when, on 19 June, a severe storm descended upon the English Channel. The storm, which lasted for three days, significantly delayed the Allied build-up.[33] Most of the convoys of landing craft and ships already at sea were driven back to ports in Britain; towed barges and other loads (including 2.5 mi/4.0 km of floating roadways for the Mulberry harbours) were lost; and 800 craft were left stranded on the Normandy beaches until the next spring tides in July.[34] Despite this setback planning began for a second offensive[35] codenamed Operation Dreadnought, to be launched out of the Orne bridgehead by VIII Corps, outflanking Caen from the east. Dreadnought was cancelled following objections from VIII Corps commanding officer Sir Richard O'Connor and instead planning for an attack towards Évrecy was considered. This too was abandoned; there is some controversy over whether Montgomery or Miles Dempsey, commanding officer of the Second Army, vetoed the idea. Dempsey, in a post-war interview with Chester Wilmot, said that he told Montgomery that he was going to cancel the proposed operation on 18 June.[36]
The weather from 19–22 June grounded Allied aircraft[37] and the Germans took advantage of the respite from air attacks to improve their defensive lines, strengthening infantry positions with minefields and posting approximately seventy 88 mm guns in hedgerows and woods covering the approaches to Caen.[33]
Planning
On 20 June Field Marshal Erwin Rommel, commanding German forces in Normandy, was ordered by Hitler to launch a counteroffensive against the Allies between the towns of Caumont and Saint-Lô. The objective was to cut a corridor between the American and British armies by recapturing the city of Bayeux (taken by the British on 7 June) and the coast beyond.[38] Four SS Panzer Divisions and one Heer Panzer Division were assigned to the task. Their assault was to be spearheaded by the 9th SS Panzer Division Hohenstaufen and 10th SS Panzer Division Frundsberg of the II SS Panzer Corps, recently arrived from Ukraine.[39] The 1st SS Panzer Division Leibstandarte SS Adolf Hitler, 2nd SS Panzer Division Das Reich,[38] and 2nd Panzer Divisions would be supporting the attack.[40] Most of the tanks used by these formations were Panzer IVs, supplemented by assault guns, Panthers and Tigers—the last two among the most lethal and well-protected German armoured vehicles of the time.[41]
On 18 June General Bernard Montgomery, commander of all Allied ground forces in Normandy, issued a directive to Lieutenant-General Miles Dempsey to launch a new pincer attack[42] with the aim of capturing Caen.[43] The initial plan called for I and XXX Corps to attack west of Caen for four days before VIII Corps launched the main attack out of the Orne bridgehead, east of Caen, on 22 June. However, it was soon realised that VIII Corps would not be able to assemble within the small perimeter of the Orne bridgehead and the following day the plan was revised.[43]
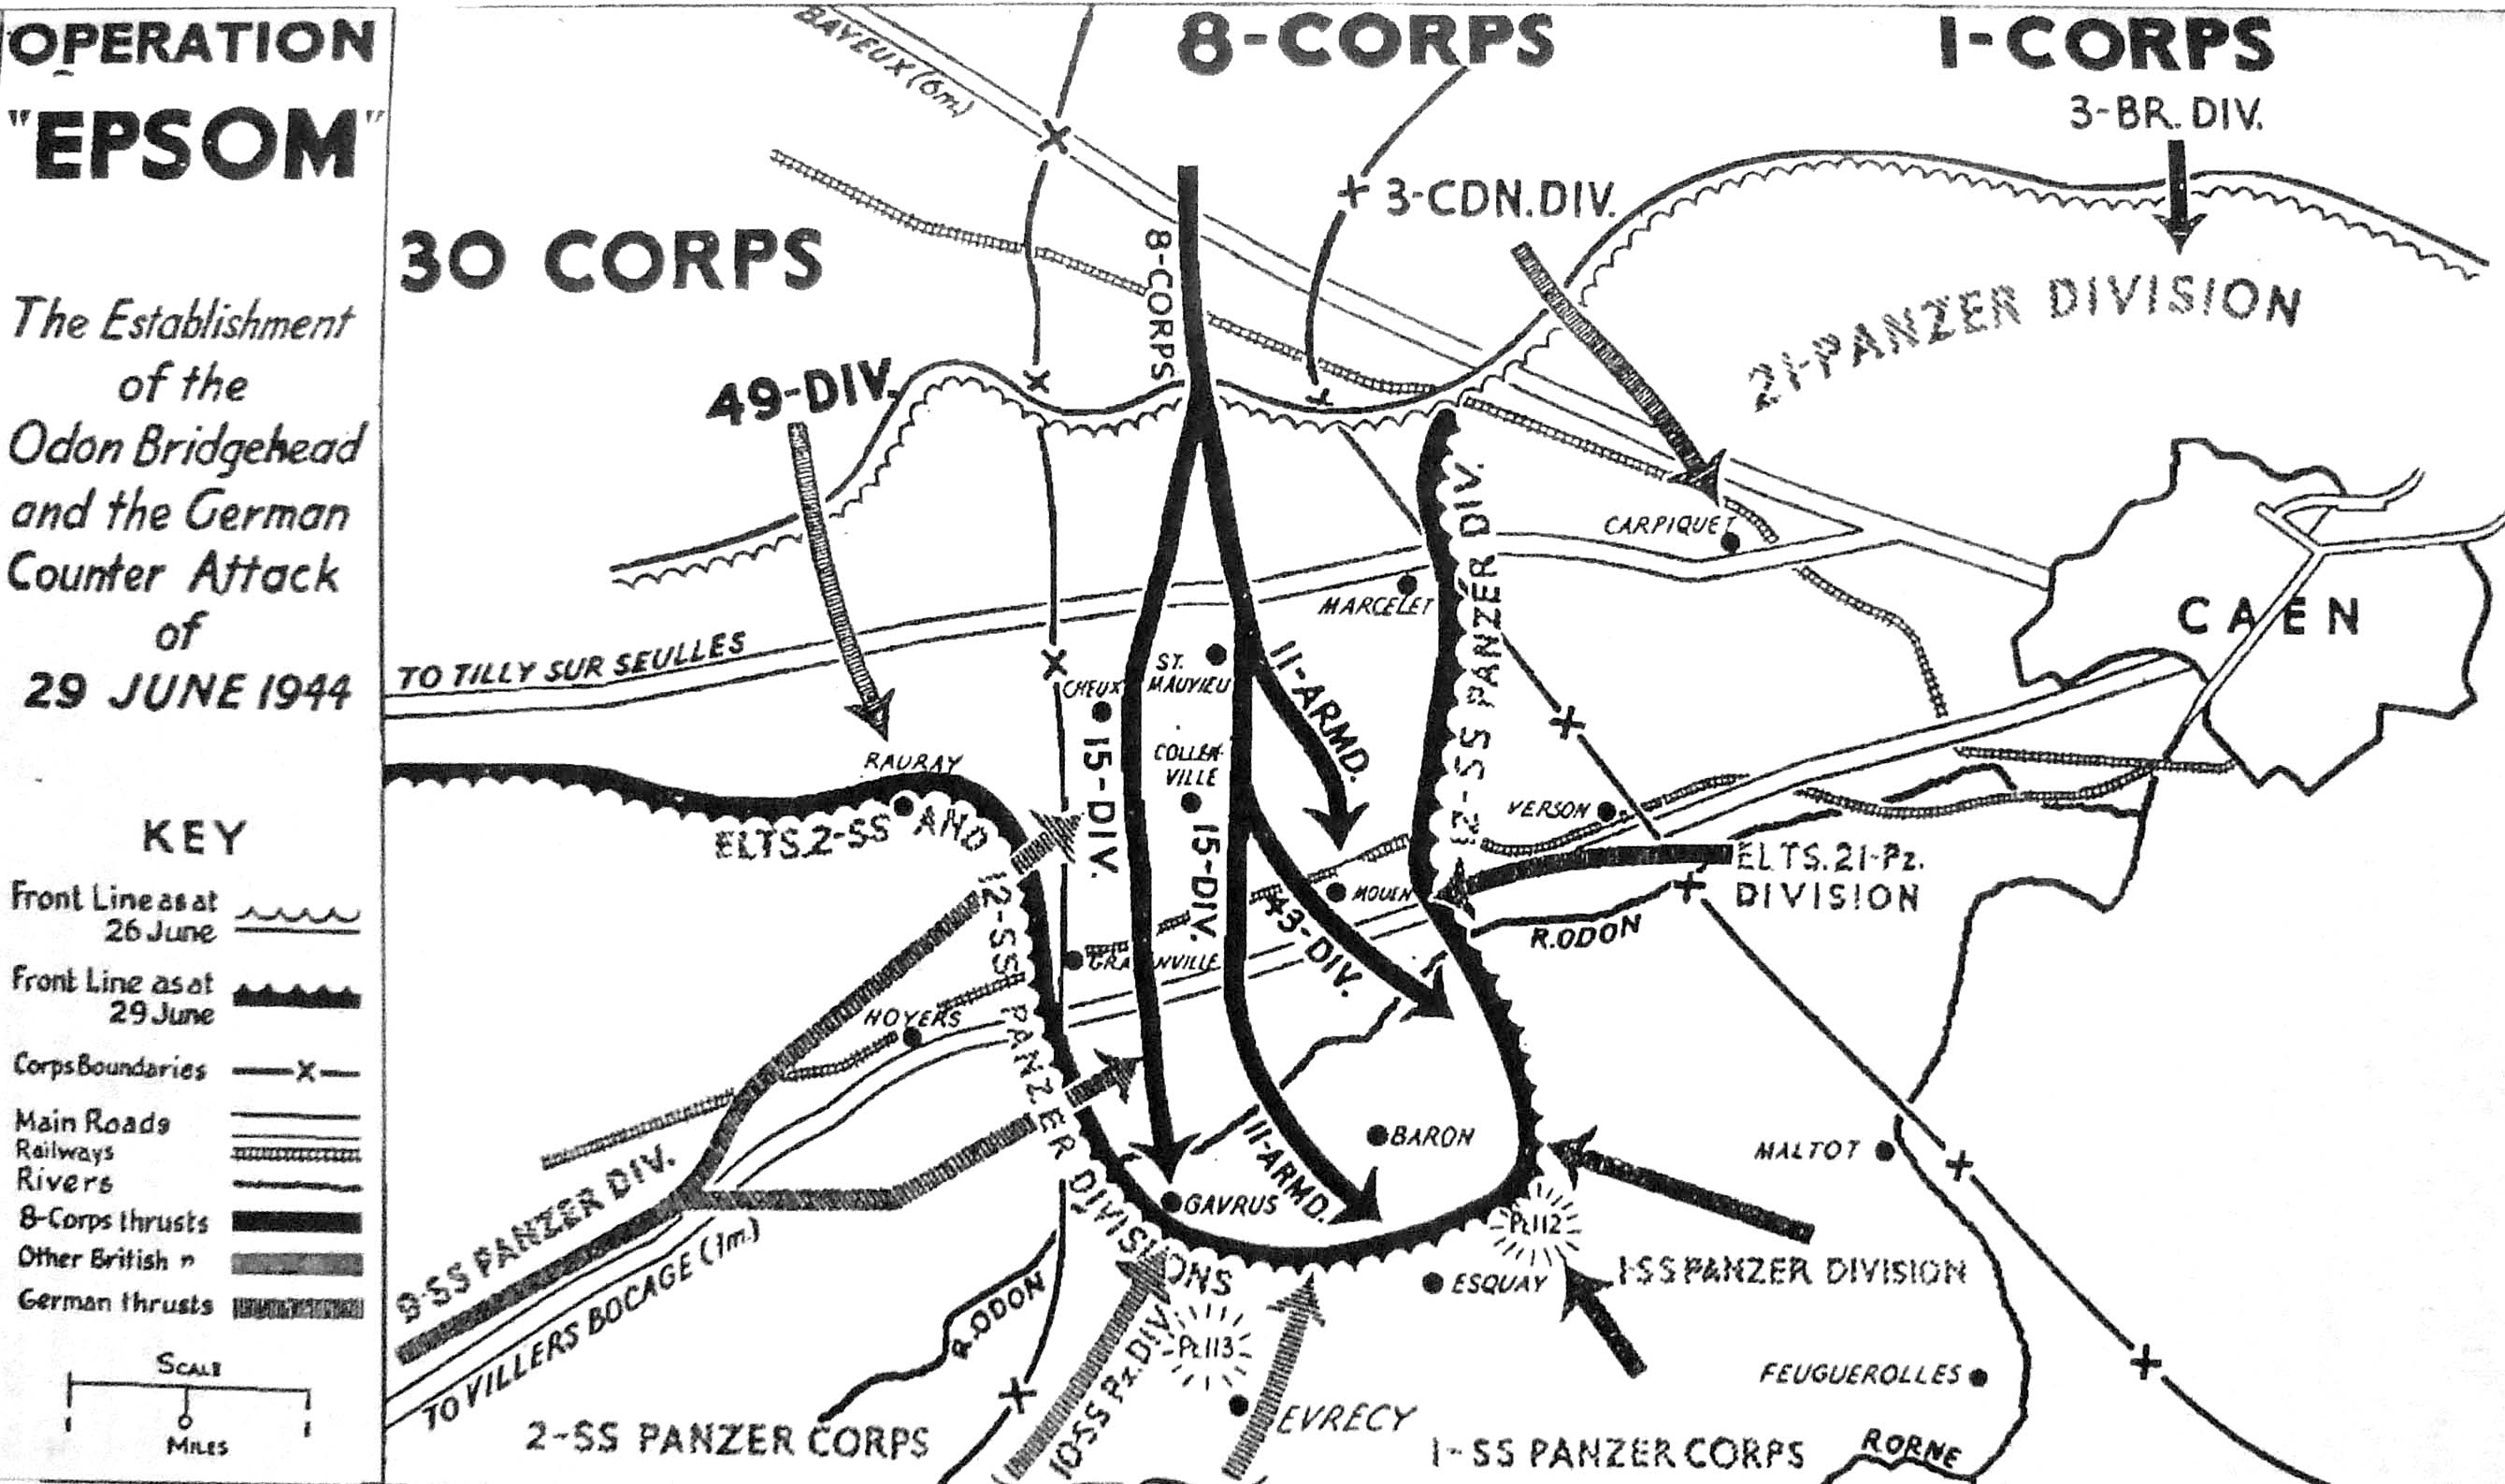
 Operation Epsom, showing the British attacks (including those planned for I Corps) and German counterattacks.
The revised plan called for a preliminary operation to take place three days before the main assault. I Corps' 51st (Highland) Infantry Division was ordered to strike south from the Orne bridgehead, pinning elements of the 21st Panzer Division into place.[43] Operation Martlet[2] was to commence one day before Epsom with XXX Corps' 49th (West Riding) Infantry Division and the 8th Armoured Brigade securing VIII Corps' flank by capturing the high ground on the right of their axis of advance.[2]
The main role in Operation Epsom was assigned to the newly arrived VIII Corps, consisting of 60,244 men under the command of Lieutenant-General Sir Richard O'Connor.[44] VIII Corps would launch their offensive from the beachhead gained by the 3rd Canadian Infantry Division. Their operation was to take place in four phases with its ultimate objective the high ground near Bretteville-sur-Laize, south of Caen.[45] VIII Corps would be supported by fire from 736 guns,[nb 6] three cruisers and the monitor HMS Roberts. The Royal Air Force was to provide a preliminary bombardment by 250 bombers and close air support thereafter.[47]
The 15th (Scottish) Infantry Division would lead the assault. During Phase I, codenamed Gout, they were to take the villages of Sainte Manvieu and Cheux.[45] In Phase II, codenamed Hangover, the division would advance to capture several crossings over the Odon River and the villages of Mouen and Grainville-sur-Odon.[45] Should resistance during the opening phase prove light, the 11th Armoured Division would seize the bridges over the Odon River by coup de main.[48] During the first two phases the 43rd (Wessex) Infantry Division—to be reinforced on 28 June with the Guards Armoured Division's infantry brigade[49]—was to remain on the start line to provide a "firm base".[46]
In Epsom's third phase, Impetigo, the 43rd Division would move forward to relieve all Scottish infantry north of the Odon.[45] The 15th Division would then assemble across the river, expanding the bridgehead by capturing several important villages. In the operation's final phase, codenamed Goitre, elements of the 43rd Division would cross the river to hold the area taken, while the 15th Division would continue to expand their bridgehead.[45] The 11th Armoured Division would attempt to force a crossing over the River Orne and advance on their final objective of Bretteville-sur-Laize.[46] The 4th Armoured Brigade, although attached to the 11th Armoured Division, was restricted to operations between the Odon and Orne to protect the Corps flank and to be in a position to attack westwards, or towards Caen, as necessary.[46]
Depending on the success of VIII Corps attack, I Corps would then launch two supporting operations codenamed Aberlour and Ottawa. In the former the 3rd Infantry Division, supported by a Canadian infantry brigade, would attack north of Caen; the latter would be a move by the 3rd Canadian Infantry Division supported by the 2nd Canadian Armoured Brigade to take the village and airfield of Carpiquet.[50]
Originally planned for 22 June,[5] Epsom was postponed until 26 June to make up deficiencies in manpower and materiel.[51] The initial opposition the British would face was expected to come from the depleted 12th SS Panzer Division Hitlerjugend ("Hitler Youth"),[37] and elements of the 21st Panzer Division and Panzer Lehr.[52]
Preliminary attacks
 A knocked out German 75mm anti-tank gun and disabled Panther tank in Fontenay-le-Pesnel during Operation Martlet. A knocked out Sherman is partially visible to the left of the Panther.
As planned, on 23 June elements of the 51st (Highland) Infantry Division's 152nd (Highland) Infantry Brigade launched a preliminary attack.[nb 7] Before daybreak and without an artillery bombardment, the Highland infantry advanced in silence towards the village of Sainte-Honorine-la-Chardronette. They took the German garrison by surprise and had control of the village before sunrise. During the morning the Highlanders were counterattacked by elements of the 21st Panzer Division's Kampfgruppe von Luck; fighting lasted all morning but by midday the village was firmly in British hands.[54] This success diverted German attention and resources away from VIII Corps front as the corps prepared for further attacks out of the Orne bridgehead.[55]
At 0415 on 25 June, the 49th (West Riding) Infantry Division supported by the 8th Armoured Brigade and 250 guns, launched Operation Martlet against part of the Panzer Lehr and 12th SS Panzer divisions.[33] The first objective, the village of Fontenay-le-Pesnel was fought over all day but stubborn German resistance prevented its capture. One infantry battalion supported by tanks, advanced around the village to the west and took Tessel Wood but was subjected to a series of German counterattacks. These were blunted by British artillery fire and close air support but by the end of the day the 49th Division had failed to reach the village of Rauray,[56] leaving the terrain dominating the right flank of VIII Corps' intended advance in German hands.[57] Operation Martlet forced I SS Panzer Corps to commit the remaining tanks of 12th SS Panzer to XXX Corps' front for a counterattack the following day.[58] During the night the Germans in Fontenay-le-Pesnel withdrew to straighten the front line and infantry from the 49th Division secured the village before dawn.[59]
Main attack
26 June
Poor weather hampered the start of Operation Epsom on 26 June, where rain over the battlefield had made the ground boggy[60] and over the United Kingdom during the early hours of the morning there was a heavy mist, resulting in aircraft being grounded and the planned bombing being called off.[61] No. 83 Group RAF, based in Normandy, were able to provide air support throughout the operation.[nb 8]
The 49th (West Riding) Infantry Division resumed Operation Martlet at 0650, although without significant artillery support as this was diverted to the main operation.[62] The Germans were able to slow the British advance and then launched an armoured riposte.[63] This initially gained ground but was stalled when British armour moved up and the two sides duelled in the confined terrain.[58] Informed during the afternoon that a big British offensive was underway further east, SS-Standartenführer Kurt Meyer of 12th SS Panzer called off the counterattack and ordered his tank companies to return to their positions south of Rauray.[64] During the rest of the day the 49th Division was able to make progress, eventually halting just north of Rauray.[60]
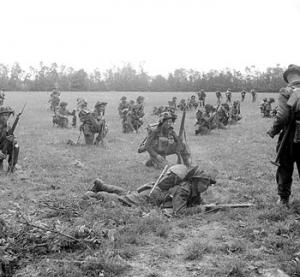
 Infantry of the 7th Seaforth Highlanders, 15th (Scottish) Infantry Division, waiting at their start line on 26 June 1944 for the signal to advance.
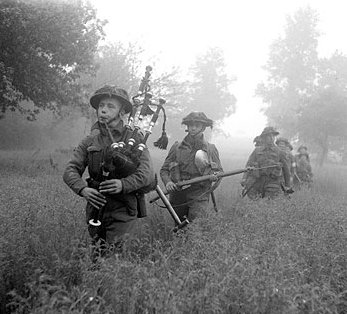
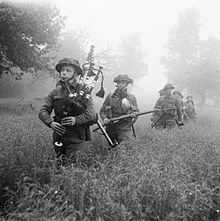 Led by their piper, men of the 7th Seaforth Highlanders advance during 26 June.
At 0730 the 44th (Lowland) Infantry Brigade and the 46th (Highland) Infantry Brigade of the 15th (Scottish) Infantry Division, supported by the 31st Tank Brigade[65] moved off their start lines behind a rolling barrage fired from 344 guns.[nb 9] The 46th Brigade initially advanced without armoured support because in bypassing the mine and booby trap-ridden village of Le Mesnil-Patry, its tanks were forced to negotiate minefields flanking the village. The infantry advance had mixed results; one battalion (2nd Battalion, Glasgow Highlanders)[68] faced only light resistance while the other (9th Battalion, The Cameronians)[68] ran into the grenadiers of the Hitler Youth Division who had allowed the barrage to pass over their positions before opening fire.[69] Reuniting with their tanks at around 1000, by midday the two battalions were fighting for control of their initial objectives; Cheux and Le Haut du Bosq.[68]
The 44th Brigade, not facing the same problems as the 46th and advancing with their tank support, encountered little opposition until coming under machine gun fire at a small stream, following which German resistance was much heavier. Between 0830 and 0930 the two leading battalions[nb 10] reached their initial objectives of Sainte Manvieu and La Gaule. After much hand to hand fighting they believed the villages to be captured just after midday although they later found that some German remnants were holding out.[70] Tanks and infantry from the 12th SS and the 21st Panzer launched two counterattacks in an attempt to regain Sainte Manvieu but both were repulsed with the aid of intensive artillery fire.[71] The main German opposition in this section of their outpost line had been from elements of the 12th SS Panzer Division's 1st Battalion 26th Panzergrenadier Regiment which had been mostly overrun and the pioneer battalion. The Germans within Rauray which had not been captured as planned the previous day, were able to subject the British brigades to observed artillery and indirect tank fire,[72] causing considerable casualties and destruction, especially within the village of Cheux.[71]
At 1250 one squadron from the 11th Armoured Division's reconnaissance regiment north of Cheux, was ordered to advance towards the Odon[73] foreshadowing an attempt by the division's armoured brigade to rush the bridges.[37] Owing to minefields near the village, debris blocking its streets and German holdouts attacking the tanks, it was not until 1400 that the regiment was able to make progress. By 1430 the squadron arrived on a ridge south of Cheux where it was engaged[73] by twenty Panzer IVs (diverted by the 12th SS Panzer Division from the Rauray area), Tiger tanks from the 3rd Battalion 101st Heavy SS Panzer Battalion and armour from the 21st Panzer Division.[74] More tanks from the 11th Armoured Division arrived but determined German resistance halted any further advance;[73] by the end of the day the division had lost twenty-one tanks.[75] At 1800 the 15th (Scottish) Infantry Division's third infantry brigade, the 227th (Highland) was committed to the battle.[71] The Highlanders were delayed by fighting in support of the rest of the division and only two companies from the 1st Battalion Gordon Highlanders made much progress. They entered the northern outskirts of Colleville by 2100 but soon found themselves cut off by German counterattacks. After heavy and confused fighting one company was able to break out and rejoin the battalion.[73]
To stop the British offensive, that evening Field Marshal Rommel ordered assistance from all available units of II SS Panzer Corps.[67]
27 June
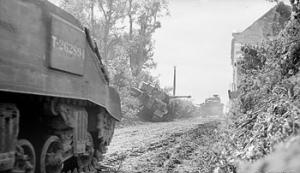
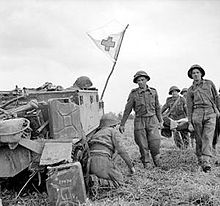 A Universal Carrier of the 49th (West Riding) Infantry Division during Operation Epsom being used to evacuate wounded.
With no attacks during the night, the German command believed that the British offensive had been contained so during the early hours of 27 June, II SS Panzer Corps was ordered to resume preparations for its counter-offensive towards Bayeux.[76]
On the right of the British advance, the I SS Panzer Corps launched a counterattack with 80 tanks,[76] this was disorganised by artillery fire before foundering on the anti-tank guns of the 49th (West Riding) Infantry Division,[77] who then resumed their attempt to secure VIII Corps flank. The village of Rauray was taken by the 49th Division at 1600 on 27 June after further heavy fighting against the 12th SS Panzer Division's panzergrenadiers. German forces had been diverted from opposing VIII Corps advance[78] and the fall of Rauray denied the Germans an important observation point, although they remained in control of an area of high ground to the south.[79]
Epsom was resumed at 0445 by the 10th Battalion Highland Light Infantry of the 227 (Highland) Infantry Brigade. With support from Churchill tanks, the battalion intended to make a bid for the Odon crossing at Gavrus. The Highlanders immediately ran into stiff opposition from elements of 12th SS Panzer and despite heavy artillery support were unable to advance all day. Casualties were heavy on both sides.[80]
At 0730 the 2nd Argyll and Sutherland Highlanders also of the 227 (Highland) Infantry Brigade, launched an attack aimed at capturing the Odon crossing at Tourmauville, northwest of the village of Baron-sur-Odon.[81] With the German forces engaged by the Highland Light Infantry, the Argyll and Sutherland Highlanders supported by the 23rd Hussars, were able to advance as far as Colleville with relative ease. There the small German garrison supported by 88 mm guns, inflicted heavy casualties upon the British and denied them the village until the afternoon.[80] With this last obstacle dealt with, the battalion seized the bridge at Tourmauville at around 1700 and a bridgehead was established.[82] By 1900, two depleted squadrons of the 23rd Hussars and a company of the 8th Rifle Brigade had crossed the Odon into the bridgehead.[83]
The remainder of the 15th (Scottish) Infantry Division was positioned around Cheux and Sainte Manvieu and was in the process of being relieved by the 43rd (Wessex) Infantry Division. One battalion of the 43rd,[nb 11] on moving into the outskirts of Cheux found the Scottish infantry had already moved on and the vacated position had been reoccupied by grenadiers of 12th SS Panzer. After battling to recapture the position, at 0930 the battalion was counterattacked by six Panthers of the 2nd Panzer Division.[80] The attack penetrated the outskirts of Cheux, destroying several anti-tank guns before it was beaten off.[nb 12][82] Further attacks by 2nd Panzer were halted[84] but the entire front was "a mass of small engagements".[82] For the rest of the morning and afternoon the Scottish infantry and the 4th and 29th Armoured Brigades expanded the salient north of the Odon and secured the Argyll and Sutherland Highlanders' rear.[85] During late evening the men of the 159th Infantry Brigade (11th Armoured Division) were transported in trucks[49] through the narrow "Scottish Corridor"[86] to Tourville where they dismounted and crossed the Odon on foot to reinforce the bridgehead.[49]
During the night Kampfgruppe Weidinger, a 2,500-strong battle group from the 2nd SS Panzer Division arrived at the front and was placed under the command of the Panzer Lehr.[87]
28 June
During the early hours of 28 June a battle group of the 1st SS Panzer Division, Kampfgruppe Frey, arrived at the front and was placed under the command of the 12th SS Panzer Division. At 0810[8] General Dollmann, commanding the German Seventh Army ordered SS-Obergruppenführer Paul Hausser to divert his II SS Panzer Corps to counterattack south of Cheux.[88] Hausser replied that no counterattack could be launched until the following day as so many of his units had yet to reach the front.[89] Before any plans could be finalised the German command was thrown into disarray by Dollmann's sudden death;[nb 13] Field Marshals Rommel and Gerd von Rundstedt (OB West) were en route to a conference with Hitler and out of touch with the situation.[77] It was not until 1500 that Hausser was appointed commander of the Seventh Army,[89] with Willi Bittrich former commander of the 9th SS Panzer Division replacing him as commander of II SS Panzer Corps (although Hausser was advised to retain control of the Corps until the following morning). Pending the return of Rommel to Normandy, Hausser was also to be supreme commander in the invasion area.[7] At 1700 the command structure was changed again; Seventh Army under Hausser would be responsible for the invasion front facing the American army while General von Schweppenburg's[nb 14] Panzer Group West was to be responsible for the invasion front facing the Anglo-Canadian forces.[7]
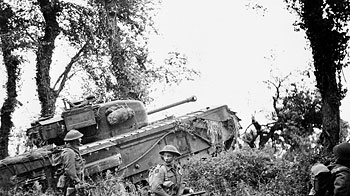
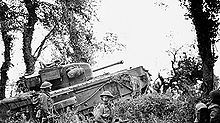 A Churchill tank of 7th Royal Tank Regiment, 31st Tank Brigade, supporting infantry of 8th Royal Scots during Operation Epsom, 28 June 1944.
At 0530 elements of the 15th (Scottish) Infantry Division with tank support launched a new assault to capture the village of Grainville-sur-Odon. After shelling and close quarter street fighting, the Scots secured the village by 1300 hours; German counterattacks followed but were repulsed.[94] At 0600 the Germans began two strong flanking attacks, with the intention of pinching out the British salient. Kampfgruppe Frey on the salient's eastern flank, launched an attack north of the Odon supported by Panzer IVs of the 21st Panzer Division. This reached the villages of Mouen and Tourville but the British counterattacked from the direction of Cheux, resulting in confused heavy fighting throughout the day.[7] Frey's battle group managed to gain control of Mouen;[95] British counterattacks supported by tanks halted any further advance but were unable to retake the village.[12] British patrols found Marcelet partly empty, the German front line having been pulled back towards Carpiquet.[96]
On the western flank, Kampfgruppe Weidinger supported by Panthers tried to recapture Brettevillette, Grainville-sur-Odon and ultimately Mondrainville.[97] The British defenders[nb 15] held their positions, launching local counterattacks to retake lost ground and eventually the German offensive was stopped within 0.6 miles (0.97 km) of linking up with the lead elements of Kampfgruppe Frey.[97]
South of the Odon, at 0900 the Argyll and Sutherland Highlanders advanced out of the bridgehead with the aim of capturing a bridge north of the village of Gavrus. Heavy fighting took place into the afternoon before both village and bridge were in Scottish hands.[96] Meanwhile infantry from the 11th Armoured Division expanded the bridgehead by taking the village of Baron-sur-Odon[75] and the 23rd Hussars with infantry advanced on Hill 112 (49°7′7″N 0°27′34″W / 49.11861°N 0.45944°W). Having secured its northern slope and dislodged the defenders from its crest, they were unable to advance further due to stiff resistance from forces dug in on the hill's reverse slope.[98] Several unsuccessful counterattacks were launched by 12th SS Panzer,[99] and the battered hussars were relieved at 1500 by the 3rd Royal Tank Regiment but neither side was able to take complete control of the hill.[98] The 11th Armoured Division had lost nearly 40 tanks on its slopes by the end of the day and was surrounded on three sides but troops managed to reach and reinforce the position.[100]
29 June
With the weather improving over the United Kingdom and Normandy, Hausser's preparations for his counter stroke came under continual harassment from Allied aircraft and artillery fire, delaying the start of the attack to the afternoon.[101] From the number of German reinforcements arriving in VIII Corps' sector,[102] and aerial reconnaissance,[7] VIII Corps commander Lieutenant-General Richard O’Connor suspected that the Germans were organising a major offensive.[102] XXX Corps was still some way to the north, leaving VIII Corps' right flank vulnerable so O'Connor postponed the attacks by I Corps and ordered VIII Corps onto the defensive.[102] Lieutenant-General Miles Dempsey, commanding the Second Army and privy to ULTRA decrypts of intercepted German signal traffic, knew the counterattack was coming and approved O'Connor's precautions.[7]
VIII Corps began to reorganise in order to meet the attack.[103] Supply echelons for Hausser's divisions were located in the Évrecy–Noyers-Bocage–Villers-Bocage area and were the focus of RAF fighter-bomber attention throughout the morning and early afternoon; the RAF claimed the destruction of over 200 vehicles.[103] VIII Corps also launched spoiling moves. At 0800 1st Battalion Worcestershire Regiment,[104] from the 43rd Division, assaulted Mouen. Without armour but with an artillery barrage, by 1100 the battalion had evicted the 1st SS Panzer Division's panzergrenadiers, following which 7th Battalion Somerset Light Infantry[105] moved up and dug in on the Caen–Villers-Bocage road.[106] The 43rd Division's 129th Brigade swept the woods and orchards around Tourville-sur-Odon before crossing the river north of Baron-sur-Odon and clearing the south bank.[105] Other initiatives were less successful. An attempt by the 15th Division's 44th Brigade to advance towards the Odon and link up with the force holding the Gavrus bridges failed, leaving this position isolated[107] and in the salient the 44th Battalion Royal Tank Regiment failed to capture Hill 113 (49°6′14″N 0°30′45″W / 49.10389°N 0.5125°W), north of Évrecy[108] after clashing with 10th SS Panzer and losing 6 tanks.[109] Trying to strengthen their position, elements of the 11th Armoured Division launched a failed attack to take Esquay-Notre-Dame west of Hill 112[108] but a combined infantry and tank attack by elements of the 8th Battalion The Rifle Brigade and the 3rd Battalion, The Royal Tank Regiment[109] on the southern slope of the hill succeeded in driving the Germans from the position.[109]
 German SS-Panzergrenadiers dug in near Hill 112.
Hausser intended II SS Panzer Corps's 9th SS Panzer Division—with Kampfgruppe Weidinger protecting its left flank—to cut across the British salient north of the Odon, while the 10th SS Panzer Division was to retake Gavrus and Hill 112 south of the river.[110] 9th SS Panzer's attack began at 1400, heavily supported by artillery. The 19th and 20th SS Panzergrenadier Regiments[111] [nb 16] supported by Panthers, Panzer IV's and assault guns attacked Grainville, le Haut du Bosq and le Valtru, aiming for Cheux.[111] A British company was overrun and tanks and infantry penetrated le Valtru where anti-tank guns knocked out four German tanks within the village and artillery fire forced their supporting infantry to withdraw. Heavy and confused fighting, at times hand-to-hand, took place outside Grainville. Panzergrenadiers captured a tactically important wood but were forced back by a British counterattack. The panzergrenadiers claimed they also captured Grainville but no British sources support this and by nightfall British infantry were in firm control of the village.[111]
At around 1600[112] the British captured an officer of the 9th SS Panzer Division[101] who was conducting a reconnaissance.[112] He was found to be carrying a map and notebook containing details of new attacks.[nb 17] Nonetheless at around 1830 the Germans attacked the 15th (Scottish) Infantry Division's right flank.[114] One unit was being relieved and in the confusion German tanks and infantry slipped through the British defences,[111] with some units advancing 2 miles (3.2 km)[115] before running into heavy resistance.[111] By 2300, 9th SS Panzer had been stopped.[116] Additional supporting attacks against the British eastern flank had been planned but the German tank concentrations assembling in the Carpiquet area had been so severely disrupted by RAF fighter-bombers during the afternoon that the attacks never materialised.[117]
The 10th SS Panzer Division launched its attack behind schedule at 1430. Following clashes earlier in the day the British were waiting but after five hours of intense combat the Scottish infantry defending Gavrus had been pushed back into a pocket around the bridge north of the village.[110] An artillery bombardment caused the Germans to withdraw but the British did not reoccupy the village.[116] Moving towards Hill 113, elements of 10th SS Panzer (2nd Grenadier Battalion, Panzergrenadier Regiment 21 and 2nd Battalion, Panzer Regiment 10[118]) ran into British tanks and infantry (44th Battalion The Royal Tank Regiment and 2nd Battalion The King's Royal Rifle Corps) in Évrecy, thwarting their attempt to occupy the hill. Dealing with this obstacle took the remainder of the day so the division's attack on Hill 112 was postponed.[119] The Germans claimed the destruction of 28 tanks while the British record the loss of 12.[120]
Believing the German attacks on 29 June indicated more counterattacks for the following day, Dempsey reinforced the Odon bridgehead with a brigade of the 43rd division and pulled in its perimeter. The 159th Infantry Brigade of the 11th Armoured Division was placed under the command of the 15th (Scottish) Infantry Division,[121] and acceding to O’Connor’s wishes for additional infantry, Dempsey attached the newly arrived 53rd (Welsh) Infantry Division to VIII Corps; the lead brigade arrived near the Epsom start line during the night.[122] In order to retain possession of Hill 112, Dempsey recognised that he would also need to hold Évrecy and Hill 113, which for the moment he did not have the resources.[123] He ordered the 29th Armoured Brigade to abandon the hill.[121] Convinced that the most important position to retain was between Rauray and the Odon,[124] after dark Dempsey withdrew the 29th Armoured Brigade north across the river[117] to be in a position to meet the expected German offensive.[125]
30 June
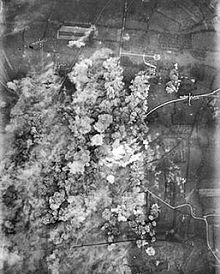 The town of Villers-Bocage, photographed during the bombing raid on 30 June 1944 being attacked by 256 RAF heavy bombers dropping 1,100 tons of bombs.[126]
Willi Bittrich was greatly concerned by the failure of II SS Panzer Corps to reduce the British salient much and he ordered a resumption of the offensive during the night of 29–30 June, hoping to avoid Allied air support. The 19th and 20th Regiments of the 9th SS Panzer Division renewed their attacks against Grainville-sur-Odon and le Valtru in the dark but little progress was made in the face of opposition from the tanks of the 11th Armoured Division—now in position north of the Odon—and heavy artillery bombardments.[127] At 0120 the 10th SS Panzer Division started to move towards Hill 112 and at dawn, covered by a heavy artillery barrage they assaulted the vacated British positions. Unaware that the British had pulled back, panzergrenadiers and tanks of the 10th SS Panzer advanced on the hill from the south and south-west and infantry from 12th SS Panzer attacked from the east and south-east. Meeting no opposition by noon the Germans had firmly installed themselves on the hill[128] but a British counterattack and artillery fire broke up a follow-up attack towards Baron-sur-Odon.[127]
With only limited results achieved, Bittrich called off further offensive action against VIII Corps.[84] In the evening Hausser, commanding the Seventh Army informed Rommel's headquarters that his counterattacks had been temporarily suspended due to "tenacious enemy resistance" and intensive Allied artillery and naval gunfire.[129] Unaware of this and believing that more German attacks would follow, Dempsey closed down Operation Epsom.[84] The front gradually settled down save for skirmishing, although both sides spent the remainder of the day heavily shelling one another.[130] The battleship HMS Rodney contributed by bombarding villages suspected of containing German headquarters; one was later found to have housed the HQ of the I SS Panzer Corps.[131] With no further British offensive moves due, in the afternoon the Gavrus bridges were given up,their Scottish defenders being withdrawn across the Odon.[132] At 2030 the town of Villers-Bocage, a vital traffic centre for the German forces, was destroyed by 250 RAF heavy bombers. It was hoped that German troops would be caught by the bombing but only French civilians were present.[133]
Aftermath
1 July
 A Waffen-SS Soldier reloads a German 81mm mortar. German forces used mortars extensively and they allegedly accounted for 70% of British casualties in Normandy.[92]
The II SS Panzer Corps resumed its counter offensive on 1 July, after spending most of the preceding 24 hours regrouping. Unaware that the British had ended their operation and with overcast weather interfering with Allied air support,[134] Bittrich believed he had an opportunity to prevent the 11th Armoured Division continuing its advance across the Orne.[135]
Before dawn the 10th SS Panzer Division advanced, supported by heavy mortar and artillery fire.[136] The Germans took the village of Baron-sur-Odon quickly but a counterattack by the 31st Tank Brigade retook it by noon.[135] Heavy shelling broke up other attacks by 10th SS Panzer from Hill 112;[137] British patrols later found an estimated 300–400 dead panzergrenadiers on the northern slope of the hill.[136]
The 9th SS Panzer Division spent the day attempting to force the British lines between Rauray and the Odon. Supplemented by panzergrenadiers of the 2nd SS Panzer Division and following a preliminary bombardment, tanks and infantry of 9th SS Panzer advanced behind a smoke screen and broke through the outer British defences. The Germans were stopped by secondary positions in front of Rauray and on high ground to the south-east,[136] although elements penetrated as far as Haut du Bosq.[137] Further German attacks throughout the day were met with intense artillery fire and made no progress and in the early evening a British counterattack using Sherman and flame-throwing Churchill Crocodile tanks restored the original front line. Casualties were heavy on both sides.[136] Thirty German tanks were claimed destroyed, mostly by the 49th (West Riding) Infantry Division; elements of the 12th SS Panzer Division had been repulsed during the morning and artillery fire halted attacks from other formations.[137]
Overall
Having had to commit his last strategic reserves to contain the British offensive, on 29 June Rommel requested permission from Hitler to allow the Seventh Army to begin a fighting withdrawal towards the River Seine; a move which would be mirrored by German forces in southern France to form a new front line along the Seine towards the Swiss border. This was partially endorsed by Hausser, who on 30 June proposed pulling back from Caen. Encouraged by the fighting in the Odon valley, Hitler stated that "we must not allow mobile warfare to develop",[138] committing his troops in Normandy to "a policy of aggressive and unyielding defence".[139] On 2 July Scottish patrols produced the first evidence of this, reporting that south of the Odon the Germans were digging in. Aerial photographs taken two days later showed large numbers of newly dug weapon positions and by 8 July the German forces facing VIII Corps had entrenched themselves.[17] Some local adjustments occurred as both sides sought to improve their tactical positions, with the 12th SS Panzer Division launching a successful attack to capture Fontaine-Étoupefour on 2 July.[140]
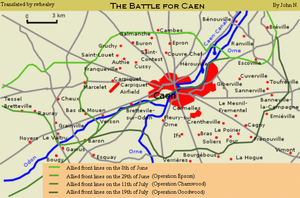 Map showing operations close to Caen.
The increasingly costly static defence led to disputes in the German high command. On the evening of 1 July in a conversation with Wilhelm Keitel, von Rundstedt said "Make peace, you fools."[139] Shortly afterwards, Günther von Kluge replaced him as Commander in Chief West and due to his disagreements with Hitler over how the campaign should be conducted, Heinrich Eberbach replaced von Schweppenburg as commander of Panzer Group West.[93]
During the lull both sides made changes to their dispositions. The 53rd (Welsh) Infantry Division relieved the 15th (Scottish) Infantry Division in the west of the British salient,[141] while the 43rd (Wessex) Infantry Division relieved the infantry of the 11th Armoured Division who were still holding the Odon bridgehead.[142] The Germans moved up the 277th Infantry Division which began to relieve the 9th SS Panzer Division[143] and the battle group of the 2nd SS Panzer Division.[144]
A few days later the British Second Army launched a new offensive, codenamed Operation Charnwood, to take Caen.[145] This incorporated the postponed attack on Carpiquet, originally planned for Epsom as Operation Ottawa[50] but now codenamed Operation Windsor.[142] In a frontal assault the northern half of the city was captured,[145] with the remaining portions being taken during Operations Atlantic and Goodwood in the third week of July.[146] Fighting in the Odon Valley continued. On 10 July Operation Jupiter was launched[147] by VIII Corps to push back the German forces near the village of Baron-sur-Odon, retake Hill 112 and advance to the River Orne.[148] The Second Battle of the Odon began on 15 July to divert German attention from the ground where Operation Goodwood was to take place. The second battle has been called one of the bloodiest encounters of the campaign.[149]
Battle honours
The British and Commonwealth system of battle honours recognised participation in Operation Epsom in 1956, 1957 and 1958 by the award to 34 units of the battle honour Odon, for service on and around the river from 25 June to 2 July 1944. The award was accompanied by honours for four actions during the operation: Fontenay le Pesnil on 26–27 June, Cheux on 26–27 June, Tourmauville Bridge on 27 June and Defence of Rauray on 29 June–2 July.[150]
Analysis
VIII Corps, in battle for the first time had broken through strongly entrenched German positions and advanced nearly six miles.[134] The Germans, throwing in their last reserves,[152] had been able to achieve a defensive success at the operational level, containing the British offensive. Just over 4,000 casualties had been inflicted upon the British[15] but the Germans had suffered more than 3,000 casualties.[16] The German commanders had been forced to commit their armoured reserves piecemeal to meet threats as they developed, counterattacking at a disadvantage.[10] Over 120 German tanks were destroyed,[17] the organisation of their forces was disrupted and their offensive power much reduced.[10] With few infantry divisions to relieve them, the panzer divisions were forced to remain in the front line rather than pulling back into reserve.[153]
Operation Epsom has been analysed to varying degrees by many prominent military historians and commentators. As described by Stephen Ashley Hart, these analyses have passed through a number of stages. The post-war publication of memoirs by Allied generals led to rifts along partisan lines during the 1950s and 1960s, with American historians generally critical of Montgomery and the actions of the Anglo-Canadian forces, while "pro-Montgomery" historians set out to refute these criticisms. Also published during this period were the national official campaign histories which although thoroughly researched, for the most part avoided detailed critical analysis of the 1944–45 north-west European campaign's most controversial issues. During the 1980s, revisionist writers concentrated on the perceived deficiencies of the Allies' performance and from the late 1990s to the present, historians of the campaign in two schools of thought have been revising the revisionists, those attempting to expand on revisionist work by providing a more detailed campaign analysis and those who have attempted to demonstrate that the techniques employed by the Anglo-Canadian forces were appropriate to conditions in Normandy.[154]
According to Carlo D’Este, the most logical point for the British to have launched an attack at this stage of the campaign would have been out of the Orne bridgehead on the extreme eastern flank of the Allied lodgement.[155] An attack in this area had been considered—and vetoed—by Montgomery, Dempsey and O’Connor as unrealistic; instead Second Army turned its attention west of Caen.[36] One of the more contentious points amongst historians is the question of what Operation Epsom was intended to achieve. Some claim that the aim was to gain ground, while others have suggested that the operation had wider objectives. Andrew Williams argues that due to ULTRA intercepts, Montgomery was aware of Rommel's planned attack towards Bayeux and Epsom was launched to forestall it.[35] Chester Wilmot states that the operation was intended to draw the I SS Panzer Corps and the newly arrived II SS Panzer Corps into battle around Caen[156] and Hart notes that Montgomery wanted to keep the operational and strategic initiative to prevent German armoured forces either being redeployed to face the Americans or being relieved and passed into reserve. The arrival of the II SS Panzer Corps acted as powerful incentive to launch Epsom, thus retaining the initiative by forcing the German command to commit the II SS Panzer Corps to battle rather than use it for their attack.[152] These views are dismissed by Max Hastings, who claims that "no sane commander" would mount an attack as big as Epsom without "every hope of breaking through the German defences, or at least of causing the enemy to make substantial withdrawals".[157] D’Este supports this view, stating "No amount of pretence can conceal that the real object had been a short pincer movement to outflank Caen".[158]
Lloyd Clark writes: "On the battlefield, Epsom ended, rather ignominiously, in a sort of draw."[3] The result of the offensive has also seen several conclusions. Clark notes that examining Operation Epsom's results is difficult when there is no agreement about its intentions; although Montgomery's written orders—to advance across the Orne River and capture the high ground south of Caen—were not achieved, he argues that there were also un-stated objectives that had strategic implications which far outweighed the simple capture of ground.[159] Stephen Ambrose sees Operation Epsom veering off-course from its original plan,[160] while D'Este goes so far as to say that Epsom was "an operation of immense intentions which were not attained",[158] calling it a "dismal failure".[158] Simon Trew notes that this 'failure' "took most of six Panzer Divisions to stop Epsom short of its final objectives",[161] with Michael Reynolds adding that without the commitment of these six divisions, it was highly likely that the British offensive would have achieved its goals.[162] Ian Daglish claims that while the original concept of Epsom had failed, the British had nonetheless won a strategic victory.[163] By withdrawing the 11th Armoured Division across the Odon and then into reserve, the 21st Army Group had re-created the threat of an offensive near Caen[164] and by the end of June all German armoured forces in Normandy were concentrated on the Second Army's front.[165][166] Milton Shulman states that with the defeat of its second armoured counterattack during June, the German command had thrown away its most effective troops[167] and Reynolds concedes that while the operation was costly for the British, it also "caused grievous losses" to the German force.[168] VIII Corps, in its final analysis concluded that Epsom failed in its stated goal but "when seen as part of Montgomery's series of rapid and consecutive blows against the German Army in Normandy, the importance of Epsom becomes more apparent and there is little doubt that it did play a significant part in the Allies' eventual success in the region."[169] D'Este dismisses any idea of wider strategic implications, claiming that the losses inflicted on the German army were "purely in terms of men and material".[158]
Terry Copp has tried to explain the varying interpretations of Epsom by suggesting that too much emphasis has been given to analysing the offensive from a win-lose perspective, whereas a cost-benefit approach provides more useful conclusions.[170] Describing the standard German practice of launching local counterattacks when driven from a position and thereby courting losses that could not be readily replaced, he writes: "One such counter-attack on 22 July resulted in 10SS regaining control of the Bon Repas[sic]-Évrecy road, a clear victory in a win-lose narrative but a typical German defeat in any cost–benefit analysis."[170]
Notes
- Footnotes
- ^ Clark claims the total casualties within the 15th (Scottish) Infantry Division as 2,331 casualties (288 killed, 1,638 wounded and 794 missing) between the period of 27 June–2 July. The losses between the 11th Armoured Division and 43rd (Wessex) Infantry Division, throughout the entire operation, are claimed as being a total of 1,256 men, with 257 men killed within 11th Armoured Division. No figures are provided for the 49th (West Riding) Infantry Division, 51st (Highland) Infantry Division or the 8th Armoured Brigade, all of whom conducted preliminary operations and attacks in support of Epsom.[14]
- ^ Between 26 and 30 June VIII Corps suffered 470 men killed, 2,187 wounded and 706 men missing. During 1 July a further 488 men were killed and wounded and 227 men were reported missing. These figures exclude formations conducting preliminary operations and attacks in support of Epsom.[15]
- ^ The overall German casualties during Epsom are claimed as amounting to over 3,000 men. The 9th SS Panzer Division suffered 1,145 casualties, the 10th SS Panzer Division suffered 571 casualties and the 12th SS Panzer Division suffered 1,244 casualties.[16]
- ^ 126 tanks were knocked out between 26 June and midnight 1 July. 41 Panthers and 25 Tigers are claimed within this total.[17]
- ^ "The quick capture of that key city [Caen] and the neighbourhood of Carpiquet was the most ambitious, the most difficult and the most important task of Lieutenant-General J.T. Crocker's I Corps".[20] Wilmot states "The objectives given to Crocker's seaborne divisions were decidedly ambitious, since his troops were to land last, on the most exposed beaches, with the farthest to go, against what was potentially the greatest opposition."[21]
- ^ 552 field guns, 112 medium guns, 48 heavy guns and 24 heavy AA guns. I Corps: 216 field guns, 32 medium guns and 16 heavy guns. VIII Corps: 240 field guns, 16 medium guns, 16 heavy guns and 24 heavy AA guns. XXX Corps: 96 field guns, 64 medium guns and 16 heavy guns.[46]
- ^ 5th Battalion, Queen's Own Cameron Highlanders; 5th Battalion, Seaforth Highlanders; 13th/18th Hussars, with artillery and engineer support.[53]
- ^ No. 83 Group RAF flew over 500 sorties in support of Operation Epsom, despite reduced effectiveness due to the weather.[61]
- ^ Michael Reynolds states that the barrage fired was a creeping barrage[66] Lloyd Clark and Chester Wilmot state it was a rolling barrage.[60][67]
- ^ 6th Battalion, The Royal Scots Fusiliers and the 8th Battalion, The Royal Scots[70]
- ^ 5th Battalion Duke of Cornwall's Light Infantry[82]
- ^ One tank was able to flee, another turned over and four were knocked by PIATs.[80]
- ^ Wilmot states there is no record or suggestion that Dollmann committed suicide and that Dollmann's chief of staff claims he "died of heart failure in his bathroom".[77] Ellis supports this statement.[90] Other authors dismiss this and assert that Dollmann killed himself.[8][89]
- ^ An organisational chart of the German command structure in the West, presented within 'The Struggle for Europe', shows that von Schweppenburg was still in command and not succeeded by Heinrich Eberbach until 2 July.[91] The historians Lloyd Clark and Michael Reynolds both claim that von Schweppenburg was still in command of Panzer Group West during Operation Epsom.[7][8] Chapter IV, footnote 14, in 'Sons of the Reich' states that the RAF attack on von Schweppenburg's headquarters on 10 June only slightly wounded him, although his chief of staff and 16 other staff were killed.[92] The British official history of the fighting in Normandy records that von Schweppenburg was not succeeded by Eberbach until 4 July, after disagreeing with Hitler's wishes on how the campaign should be conducted; he was removed in the dismissals that saw von Kluge replace von Rundstedt.[93]
- ^ In Brettevillette and on Point 110: the 1st Battalion Tyneside Scottish, 11th Battalion Durham Light Infantry (49th (West Riding) Infantry Division) and 4th/7th Dragoon Guards (8th Armoured Brigade). In Grainville-sur-Odon and le Valtru: 7th Battalion Seaforth Highlanders, 9th Battalion Cameronians (Scottish Rifles) and 9th Royal Tank Regiment.[97]
- ^ A German regiment is the equivalent of a British brigade.
- ^ Wilmot claims that this officer was carrying a copy of the II SS Panzer Corps plan of attack.[101] Ellis states this officer was carrying the plans of the counterattack for which he was reconnoitring.[113] Jackson states these captured documents were the plans of the captured officer's brigade (regiment).[112]
- ^ The production of Panzerkampfwagen VI Tiger E was ended in August 1944 after 24 months. The tanks saw service on the battlefield in ever decreasing numbers.[151]
- Citations
- ^ Clark, pp. 22, 96
- ^ a b c d Clark, p. 21
- ^ a b Clark, p. 100
- ^ Clark, p. 104; Copp, p. 18; Daglish, pp. 218–219; Gill, p. 30; Jackson, pp. 59, 114; Wilmot, p. 348
- ^ a b c d Clark, p. 20
- ^ Clark, p. 34
- ^ a b c d e f g h Reynolds, p. 23
- ^ a b c d Clark, p. 73
- ^ a b Clark, p. 27
- ^ a b c Williams, p. 123
- ^ a b c d Clark, pp. 34, 35, 36
- ^ a b Clark, pp. 24, 63, 73
- ^ Clark, p. 28
- ^ Clark, p. 109
- ^ a b Jackson, pp. 37, 40, 44, 53, 55 & 59
- ^ a b Clark, pp. 107–109
- ^ a b c d Jackson, p. 59
- ^ Jackson, p. 28
- ^ Williams, p. 24
- ^ Ellis, p. 171
- ^ Wilmot, p. 273
- ^ Ellis, p. 78
- ^ Ellis, p. 81
- ^ Wilmot, pp. 284–286
- ^ Ellis, p. 247
- ^ a b Forty, p. 36
- ^ Ellis, p. 250
- ^ Ellis, p. 254
- ^ Taylor, p. 10
- ^ Taylor, p. 76
- ^ Forty, p. 97
- ^ Ellis, p. 255
- ^ a b c Williams, p. 114
- ^ Wilmot, p. 322
- ^ a b Williams, p. 113
- ^ a b Hart, pp. 131–132
- ^ a b c Williams, p. 118
- ^ a b Wilmot, p. 334
- ^ Reynolds, p. 13
- ^ Wilmot, map p. 321
- ^ Williams, p. 112
- ^ Ellis, p. 271
- ^ a b c Clark, pp. 20–21
- ^ Jackson, pp. 12, 22, 27
- ^ a b c d e Clark, pp. 31–32
- ^ a b c d Jackson, pp. 30–31
- ^ Clark, p. 29
- ^ Jackson, p. 29
- ^ a b c Jackson, p. 40
- ^ a b Stacey, p. 150
- ^ Jackson, p. 22
- ^ Clark, p. 24
- ^ Ellis, pp. 274–275
- ^ Ellis, p. 275
- ^ Clark, p. 37
- ^ Clark, p. 39
- ^ Williams, pp. 115–116
- ^ a b Meyer, p. 244
- ^ Clark, p. 40
- ^ a b c Clark, p. 45
- ^ a b Ellis, p. 277
- ^ Clark, p. 42
- ^ Clark, pp. 42–43
- ^ Clark, p. 43
- ^ Jackson, p. 32
- ^ Reynolds, pp. 19–20
- ^ a b Wilmot, p. 343
- ^ a b c Jackson, pp. 32–33
- ^ Reynolds, p. 20
- ^ a b Jackson, p. 33
- ^ a b c Ellis, p. 278
- ^ Clark, pp. 46–47
- ^ a b c d Jackson, pp. 34–35
- ^ Clark, p. 51
- ^ a b Fortin, p. 15
- ^ a b Wilmot, pp. 343–344
- ^ a b c Wilmot, p. 344
- ^ Clark, p. 65
- ^ Clark, pp. 65–67
- ^ a b c d Clark, p. 68
- ^ Clark, p. 67
- ^ a b c d Jackson, p. 39
- ^ Saunders, p. 20
- ^ a b c Clark, p. 96
- ^ Jackson, pp. 39–40
- ^ Clark, p. 72
- ^ Reynolds, p. 21
- ^ Williams, pp. 111–112
- ^ a b c Reynolds, p. 22
- ^ Ellis, p. 296
- ^ Wilmot, p. 735
- ^ a b Reynolds, p. 32
- ^ a b Ellis, pp. 320–322
- ^ Clark, p. 74
- ^ Clark, p. 79
- ^ a b Jackson, p. 42
- ^ a b c Clark, p. 80
- ^ a b Jackson, p. 41
- ^ Saunders, pp. 27–30
- ^ Saunders, p. 32
- ^ a b c Wilmot, p. 345
- ^ a b c Jackson, p. 44
- ^ a b Jackson, p. 45
- ^ Clark, p. 87
- ^ a b Clark, p. 88
- ^ Clark, pp. 87–88
- ^ Clark, p. 89
- ^ a b Clark, p. 90
- ^ a b c Jackson, p. 49
- ^ a b Clark, p. 92
- ^ a b c d e Reynolds, p. 25
- ^ a b c Jackson, p. 50
- ^ Ellis, p. 283
- ^ Williams, p. 121
- ^ Williams, p. 122
- ^ a b Reynolds, p. 27
- ^ a b Jackson, p. 51
- ^ Reynolds, pp. 27, 28, 32
- ^ Clark, p. 93
- ^ Reynolds, pp. 27–28
- ^ a b Ellis, pp. 284–285
- ^ Jackson, p. 52
- ^ Hart, pp. 140–141
- ^ Hart, p. 141
- ^ Ellis, p. 285
- ^ Reynolds, p. 26
- ^ a b Clark, p. 95
- ^ Reynolds, p. 28
- ^ Wilmot, pp. 345–346
- ^ Clark, pp. 95–98
- ^ Jackson, p. 55
- ^ Clark, p. 98
- ^ Jackson, p. 56
- ^ a b Jackson, p. 57
- ^ a b Clark, p. 101
- ^ a b c d Reynolds, p. 30
- ^ a b c Jackson, p. 58
- ^ Wilmot, p. 346
- ^ a b Wilmot, p. 347
- ^ Clark, pp. 101–102
- ^ Clark, p. 102
- ^ a b Jackson, p. 60
- ^ Jackson, pp. 60–61
- ^ Reynolds, p. 35
- ^ a b Williams, p. 131
- ^ Trew, p. 48
- ^ Clark, p. 103
- ^ Jackson, p. 61
- ^ Copp, p. 135
- ^ Rodger, pp. 242–243
- ^ Hart, Sherman Firefly vs Tiger, p. 19
- ^ a b Hart, p. 108
- ^ Williams, p. 124
- ^ Hart, pp. 16–17
- ^ D’Este, p. 233
- ^ Wilmot, p. 342
- ^ Hastings, p. 171
- ^ a b c d D'Este, p. 245
- ^ Clark, p. 104
- ^ Ambrose, p. 428
- ^ Trew, p. 28
- ^ Reynolds, p. 31
- ^ Daglish, pp. 218–219
- ^ Wilmot, p. 348
- ^ Gill, p. 30
- ^ Jackson, p. 53
- ^ Shulman, pp. 132–133
- ^ Reynolds, p. 33
- ^ Jackson, p. 114
- ^ a b Buckley (Editor), p. 18. Chapter 1 by Terry Copp
References
- Ambrose, Stephen E. (2001) [1971]. The Supreme Commander: The War Years of Dwight D. Eisenhower. Roundhouse Publishing. ISBN 1-57806-206-3.
- Buckley (editor), John; et al. (2007) [2006]. The Normandy Campaign 1944: Sixty Years on. Routledge. ISBN 0-415-44942-1.
- Clark, Lloyd (2004). Operation Epsom. Battle Zone Normandy. The History Press Ltd. ISBN 0-7509-3008-X.
- Copp, Terry (2004) [2003]. Fields of Fire: The Canadians in Normandy. Toronto: University of Toronto Press. ISBN 0-8020-3780-1. OCLC 56329119.
- Daglish, Ian (2007). Operation Epsom. Over the battlefield. Pen & Sword Military. ISBN 1-84415-562-5.
- D'Este, Carlo (2004) [1983]. Decision in Normandy: The Real Story of Montgomery and the Allied Campaign. London: Penguin Books Ltd. ISBN 0-14-101761-9. OCLC 44772546.
- Ellis, Major L.F.; with Allen R.N., Captain G.R.G. Allen; Warhurst, Lieutenant-Colonel A.E. & Robb, Air Chief-Marshal Sir James (2004) [1st. pub. HMSO, 1962]. Butler, J.R.M. ed. Victory in the West, Volume I: The Battle of Normandy. History of the Second World War United Kingdom Military Series. Uckfield, East Sussex: Naval & Military Press Ltd. ISBN 1-84574-058-0. OCLC 276814706.
- Fortin, Ludovic (2004). British Tanks In Normandy. Histoire & Collections. ISBN 2-915239-33-9.
- Forty, George (2004). Villers Bocage. Battle Zone Normandy. Sutton Publishing. ISBN 0-7509-3012-8.
- Gill, Ronald; Groves, John (2006) [1946]. Club Route in Europe: The History of 30 Corps from D-Day to May 1945. MLRS Books. ISBN 978-1-905696-24-6.
- Hart, Stephen Ashley (2007) [2000]. Colossal Cracks: Montgomery's 21st Army Group in Northwest Europe, 1944-45. Mechanicsburg: Stackpole Books. ISBN 0-8117-3383-1. OCLC 70698935.
- Hart, Stephen Ashley (2007). Sherman Firefly Vs Tiger: Normandy 1944 (Duel): Normandy 1944. Osprey Publishing. ISBN 1-84603-150-8.
- Hastings, Max (2006) [1985]. Overlord: D-Day and the Battle for Normandy. New York: Vintage Books USA; Reprint edition. ISBN 0-307-27571-X. OCLC 62785673.
- Jackson, G.S.; Staff, 8 Corps (2006) [1945]. 8 Corps: Normandy to the Baltic. Smalldale: MLRS Books. ISBN 978-1-905696-25-3.
- Meyer, Kurt (2005) [1957]. Grenadiers: The Story of Waffen SS General Kurt "Panzer" Meyer. Stackpole Books, U.S.; New Ed edition. ISBN 0-8117-3197-9.
- Reynolds, Michael (2002). Sons of the Reich: The History of II SS Panzer Corps in Normandy, Arnhem, the Ardennes and on the Eastern Front. Havertown: Casemate Publishers and Book Distributors. ISBN 0-9711709-3-2. OCLC 50208471.
- Rodger, Alexander (2003). Battle Honours of the British Empire and Commonwealth Land Forces. Marlborough: The Crowood Press. ISBN 1-86126-637-5.
- Saunders, Tim. Hill 112: Battles of the Odon - 1944. Battleground Europe. Pen & Sword Books Ltd; Reprint edition. ISBN 0-85052-737-6.
- Shulman, Milton (2004) [1947]. Defeat in the West. Cassell. ISBN 0-304-36603-X.
- Stacey, Colonel Charles Perry; Bond, Major C.C.J. (1960). "Official History of the Canadian Army in the Second World War: Volume III. The Victory Campaign: The operations in North-West Europe 1944–1945" (PDF). The Queen's Printer and Controller of Stationery Ottawa. http://www.dnd.ca/dhh/collections/books/files/books/Victory_e.pdf. Retrieved 2008-08-20.
- Taylor, Daniel (1999). Villers-Bocage Through the Lens. Old Harlow: Battle of Britain International. ISBN 1-870067-07-X. OCLC 43719285.
- Trew, Simon; Badsey, Stephen (2004). Battle for Caen. Battle Zone Normandy. Stroud: Sutton Publishing. ISBN 0-7509-3010-1. OCLC 56759608.
- Williams, Andrew (2004). D-Day to Berlin. London: Hodder. ISBN 0-340-83397-1. OCLC 60416729.
- Wilmot, Chester; Christopher Daniel McDevitt (1997) [1952]. The Struggle for Europe. Ware, Hertfordshire: Wordsworth Editions Ltd. ISBN 1-85326-677-9. OCLC 39697844.
Categories:- Battle for Caen
- Battles of World War II involving the United Kingdom
- Battles of World War II involving Germany


Wikimedia Foundation. 2010.