- Battle of Marston Moor
-
Battle of Marston Moor Part of English Civil War 
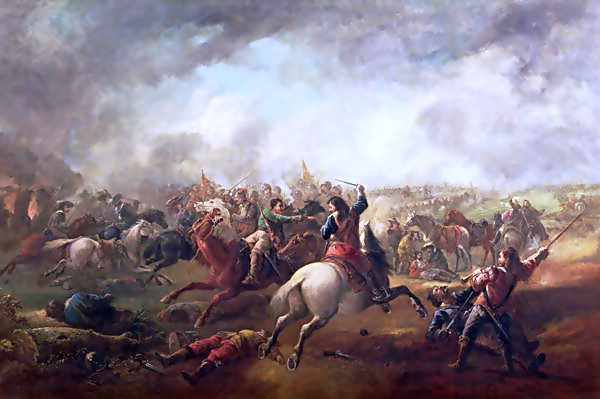
The Battle of Marston Moor, by J. BarkerDate 2 July 1644 Location near Long Marston, North Yorkshire Result Decisive Parliamentarian and Scottish Covenanter victory Belligerents Parliamentarians,
Scottish CovenantersRoyalists Commanders and leaders Earl of Leven,
Earl of Manchester,
Lord FairfaxPrince Rupert of the Rhine,
Marquess of NewcastleStrength 22,500+:
7,000+ horse,
500+ dragoons,
15,000+ foot,
30 – 40 guns17,000:
6,000 horse,
11,000 foot,
14 gunsCasualties and losses 300 killed 4,000 killed,
1,500 prisoners1st Hull – Powick Bridge – Edgehill – Aylesbury – Brentford – Turnham Green – Braddock Down – 1st Middlewich – Hopton Heath – Seacroft Moor – Camp Hill – Reading – Sourton Down – Stratton – Chalgrove Field – Adwalton Moor – Lansdowne – Roundway Down – Bristol – Gainsborough – Gloucester – Aldbourne Chase – 1st Newbury – 2nd Hull – Heptonstall – Winceby – Olney – Basing House – Alton – 2nd Middlewich – Nantwich – Lincoln – Lathom – Newark – Boldon Hill – Cheriton – York – Bolton – Cropredy Bridge – Marston Moor – Lostwithiel – 2nd Newbury – Taunton – Naseby – Langport – Chester – Rowton Heath – Torrington – Stow-on-the-Wold – OxfordMarston Moor – Tippermuir – Aberdeen – Inverlochy – Auldearn – Carlisle – Alford – Kilsyth – Philiphaugh – Rhunahaorine Moss – Dunaverty – Mauchline Muir – Preston – Stirling – Inverness – Carbisdale – Dunbar – Inverkeithing – Worcester – Royalist rising of 1651 to 1654 – Tullich – DalnaspidalThe Battle of Marston Moor was fought on 2 July 1644, during the First English Civil War of 1642–1646. The combined forces of the Scottish Covenanters under the Earl of Leven and the English Parliamentarians under Lord Fairfax and the Earl of Manchester defeated the Royalists commanded by Prince Rupert of the Rhine and the Marquess of Newcastle.
During the summer of 1644, the Covenanters and Parliamentarians had been besieging York, which was defended by the Marquess of Newcastle. Prince Rupert had gathered an army which marched through the northwest of England to relieve the city, gathering fresh recruits on the way. The convergence of these forces made the ensuing battle the largest of the Civil Wars.
On 1 July, Rupert outmanoeuvred the Scots and Parliamentarians to relieve the city. The next day, he sought battle with them even though he was outnumbered. He was dissuaded from attacking immediately and during the day both sides gathered their full strength on Marston Moor, an expanse of wild meadow west of York. Towards evening, the Scots and Parliamentarians themselves launched a surprise attack. After a confused fight lasting two hours, Parliamentarian cavalry under Oliver Cromwell routed the Royalist cavalry from the field and annihilated the remaining Royalist infantry.
After their defeat the Royalists effectively abandoned the north of England. They lost much of the manpower from the Northern Counties of England which were strongly Royalist in sympathy, and access to the continent of Europe through the ports on the North Sea coast. Although they partially retrieved their fortunes with victories later in the year in the south of England, the loss of the North was to prove a fatal handicap the next year, when they tried unsuccessfully to link up with the Scottish Royalists under Montrose.
Contents
Background
The Civil War in the North
In Northern England, the Royalists had the advantage in numbers and local support, except in parts of Lancashire and the West Riding of Yorkshire, where the Parliamentarians had support from the clothing-manufacturing towns which "naturally maligned the gentry".[1] On 30 June 1643, the Royalists commanded by the Marquess of Newcastle defeated the Parliamentarian army of Lord Fairfax at the Battle of Adwalton Moor near Bradford. Fairfax and his son, Sir Thomas Fairfax, fled with their remaining forces to the port of Hull, which was held for Parliament.
Newcastle sent some of his army south into Lincolnshire, as part of a planned "three-pronged" advance on London, but was forced to besiege Hull with most of his forces. The siege failed, as the Parliamentarian navy could supply and reinforce the port and the garrison flooded wide areas around the city, while the Royalist detachments sent into Lincolnshire were defeated at the Battle of Winceby.
In late 1643, the English Civil War widened. King Charles I negotiated a "cessation" in Ireland, which allowed him to reinforce his armies with English regiments which had been sent to Ireland following the Irish Rebellion of 1641,[2] but Parliament took an even greater step by signing the Solemn League and Covenant, sealing an alliance with the Scottish Covenanters.
Early in 1644, a Covenanter army under the Earl of Leven invaded the north of England on behalf of Parliament.[3] The Marquess of Newcastle was forced to divide his army, leaving a detachment under Sir John Belasyse to watch the Parliamentarians under Lord Fairfax in Hull, while he led his main body north to confront Leven.[4]
Siege of York
During March and early April, the Marquess of Newcastle fought several delaying actions as he tried to prevent the Scots from crossing the River Tyne and surrounding the city of Newcastle upon Tyne.[5] Meanwhile, a Parliamentarian cavalry force under Sir Thomas Fairfax, which had been campaigning in Cheshire and Lancashire during the winter, crossed the Pennines and entered the West Riding of Yorkshire. To prevent Sir Thomas rejoining Lord Fairfax in Hull, Belasyse occupied the town of Selby which lay between them. On 11 April, Sir Thomas Fairfax's force, reinforced by infantry under Sir John Meldrum, stormed Selby, capturing Belasyse and most of his force.[6]
Hearing the news, Newcastle realised that the city of York was threatened. York was the principal city and bastion of Royalist power in the north of England, and its loss would be a serious blow to the Royalist cause.[7] He hastily retreated there to forestall the Fairfaxes. Leven left a detachment to mask the Royalist garrison of Newcastle upon Tyne, and followed Newcastle's army with his main body. On 22 April, Leven and the Fairfaxes joined forces at Wetherby, about 14 miles (23 km) west of York. Together, they began the Siege of York. Initially, the siege was a rather loose blockade as the Scots and Parliamentarians concentrated on capturing smaller Royalist garrisons which threatened their communications with Hull. On 3 June, they were reinforced by the Parliamentarian army of the Eastern Association under the Earl of Manchester. York was now completely encircled and siege operations began in earnest. Leven was accepted as Commander in Chief of the three combined allied armies before York (referred to by Parliament as the "Army of Both Kingdoms"). It was politic to make the Scots pre-eminent in the north and the Scots were the largest single contingent in the Army, but Leven was also a respected veteran of the Thirty Years' War.[8]
Relief moves
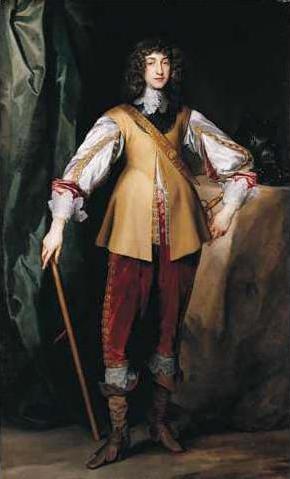
 Prince Rupert of the Rhine (1619–1682) – Prince Rupert was tasked with retaking the north from Parliament and their Scottish allies
News of the siege soon reached Oxford, where King Charles had his wartime capital. From 24 April to 5 May, he held a council of war attended by his nephew and most renowned field commander, Prince Rupert. It was settled that while Charles attempted to play for time in Oxford, Rupert would relieve York.[9]
Rupert set out from Shrewsbury with a small force on 16 May. His first moves were intended to gather reinforcements along the way to bolster his army, and secure Lancashire for the troops heading over from Ireland for the Royalist cause. He assumed the direction of a small Royalist army, based on Chester and commanded by Lord John Byron, raising his force to 2,000 horse and 6,000 foot. Having forced a crossing of the River Mersey at Stockport, he stormed Bolton, allegedly killing 1,600 of the Parliamentarian defenders and citizens.[10] Resting at Bury nearby, Rupert was joined by the Marquess of Newcastle's cavalry under Lord George Goring, which had broken out of York early in the siege, with a small contingent from Derbyshire, and several regiments which were being freshly raised in Lancashire by the Earl of Derby. Having sidestepped the Parliamentarian stronghold of Manchester, Prince Rupert approached Liverpool on 6 June and wrested control of the city from Parliament after a five-day siege.[11]
Rupert now hesitated, unsure whether to proceed to the relief of York or remain to consolidate the Royalist hold on Lancashire, securing more reinforcements in the process. He also distrusted some of the members of Charles’s council of war and was wary of being so far from the King's side. On 16 June, he received a dispatch from the King which contained troubling news. The King's advisors on the council of war had overturned Rupert’s defensive policies, sending the garrisons of Reading and Abingdon on an offensive in the West Country. This had left Oxford exposed to a sudden threat from the Parliamentarian armies commanded by the Earl of Essex and Sir William Waller and forced the King to leave the city in haste and head to Worcester, where he was still in danger.[12] Together with this unfortunate news, the letter contained some ambiguous orders regarding Rupert's northern offensive and future plans:
But now I must give the true state of my affairs, which, if their condition be such as enforces me to give you more peremptory commands than I would willingly do, you must not take it ill. If York be lost I shall esteem my crown little less; unless supported by your sudden march to me; and a miraculous conquest in the South, before the effects of the Northern power can be found here. But if York be relieved, and you beat the rebels' army of both kingdoms, which are before it, then (but otherwise not) I may possibly make a shift upon the defensive to spin out time until you come to assist me. Wherefore I command and conjure you, by the duty and affection that I know you bear me, that all new enterprises laid aside, you immediately march according to your first intention, with all your force to the relief of York. But if that be either lost, or have freed themselves from the besiegers, or that for want of powder, you cannot undertake that work, that you immediately march with your whole strength, directly to Worcester to assist me and my army; without which, or you having relieved York by beating the Scots, all the successes you can afterwards have must infallibly be useless onto me.[13]Rupert understood the letter to be an order both to relieve York and defeat the allied army before heading south once more to aid the King.[14] By this time Rupert's army numbered nearly 14,000. He set out from Liverpool to Preston, which surrendered without a fight. From there he proceeded via Clitheroe and crossed the Pennines to Skipton, where he paused for three days from 26 June to 28 June to "fix arms" and await some final reinforcements from Cumberland and Westmoreland.[15] He arrived at the Royalist garrison at Knaresborough Castle 14 miles (23 km) northwest of York on 30 June.
Relief of York
The allies were aware of Rupert's approach and had been hoping that reinforcements from the Midlands under Sir John Meldrum and the Earl of Denbigh could ward off this threat, but they learned that these forces could not intervene in time.[16] The allied armies around York were separated from each other by rivers, and if Rupert attacked them in their siege lines he could destroy any one army before the other two could intervene. Therefore they abandoned the siege on the night of 30 June, and concentrated their forces near the village of Hessay before taking position on Marston Moor, where they blocked Rupert's expected direct march to York (along the old Roman road named Ermine Street, the modern A59), and could easily move to their left to prevent Rupert making any move to the south via Wetherby.[17]
Early on 1 July, some Royalist cavalry advanced from Knaresborough and appeared on the Moor, and the allies prepared for battle.[18] However, Rupert had made a 22-mile (35 km) flank march to the northeast with his main body, crossing the River Ure at Boroughbridge and the River Swale at Thornton Bridge. These two rivers merge to form the River Ouse, which Rupert had successfully put between himself and the allied armies. Later that day, his forces defeated the Earl of Manchester's dragoons, who had been left to guard a bridge of boats across the Ouse at the village of Poppleton a few miles north of York.[19] This had been the only crossing available to the allies above another bridge of boats at Acaster Malbis 5 miles (8.0 km) south of York, and its capture prevented the allies crossing the Ouse to engage Rupert.
More of Rupert's cavalry arrived at York to gain touch with the garrison. With York definitely relieved, Newcastle sent Rupert a fulsome letter of welcome and congratulations. Rupert replied, not in person but through Goring, with a peremptory demand for Newcastle to march his forces to Rupert's assistance on the following morning.[20]
Battle
Prelude
On learning that they had been outmanoeuvred, the allied commanders debated their options. They decided to march south to Tadcaster and Cawood, where they could both protect their own supply lines from Hull, and also block any move south by Rupert on either side of the Ouse.[21] The Parliamentarian foot (infantry), ordnance and baggage set off early on 2 July, leaving the cavalry and dragoons, commanded by Sir Thomas Fairfax, as rearguard. At about 9 am, the allied generals learned that Rupert's army had crossed the captured bridge of boats at Poppleton, and was advancing onto Marston Moor. The Scottish and Parliamentarian foot, some of whom had already reached Tadcaster, were hastily recalled.[22]
Around midday, Rupert was joined on Marston Moor by Newcastle, accompanied by a mounted troop of "Gentleman Volunteers" only. Rupert greeted him by saying, "My Lord, I wish you had come sooner with your forces, but I hope we shall yet have a glorious day." Newcastle was strongly opposed to a pitched battle.[23] He counselled that the allied army would eventually dissolve, and also suggested waiting for a force of 3,000 under Colonel Clavering and collected garrisons amounting to another 2,000 to join the Royalist army.[24] Rupert was adamant that the King's letter (which he never showed to Newcastle) was a command to engage and defeat the enemy immediately.[25] Furthermore, Rupert wished to compensate for the Royalists' numerical inferiority by catching the enemy unawares, and before further Parliamentarian reinforcements could increase their superiority in numbers.[23]
However, Newcastle's soldiers in York had refused to fight unless given their delayed payment. A number were also absent, pillaging the abandoned allied siege works and encampments outside the city, and had yet to return.[23] Rupert's own infantry were exhausted from their long march on the previous day. Rupert therefore did not attack, and the odds against him lengthened as the day wore on and the Scots and Parliamentarians returned from their aborted move south and took position. There were brief cannonades and skirmishes, but neither side attacked.
At about 4:00 pm, the contingent from York belatedly arrived, accompanied by Newcastle's Lieutenant General, Lord Eythin. Rupert and Eythin already knew and disliked each other. Both had fought at the Battle of Vlotho in 1638, where Rupert had been captured and held prisoner for several years. Rupert blamed Eythin's caution for the defeat on that occasion, while Eythin blamed Rupert's rashness. On the Moor, Eythin criticised Rupert's dispositions as being drawn up too close to the enemy. His main concern was that a fold in the ground between the ridge on which the allied forces were drawn up and the track between Long Marston and Tockwith concealed the front line of the allied infantry from both view and artillery fire, allowing them to attack suddenly from a comparatively close distance.[26] When Rupert proposed to either attack or move his army back as Eythin suggested, Eythin then pontificated that it was too late in the day for such a move.[27] The Royalist army prepared to settle down for the night, close to the allied armies.
Deployment
Further information: Marston Moor order of battleScots and Parliamentarians
 Alexander Leslie, 1st Earl of Leven (1580–1661) – Leslie commanded the Covenanter and Parliamentarian armies
The Covenanters and Parliamentarians occupied Marston Hill, a low but nevertheless prominent feature in the flat Vale of York, between the villages of Long Marston and Tockwith. They had the advantage of elevation, but cornfields stretching between the two villages hampered their deployment.
At some point in the day, the Royalists attempted to seize a rabbit warren to the west of the cornfields from where they might enfilade the Parliamentarian position, but they were driven off and the Parliamentarian left wing of horse occupied the ground.[28] The wing was under the command of Manchester's Lieutenant General Oliver Cromwell. The first two lines consisted of over 3,000 cavalry from the Eastern Association, including Cromwell's own Regiment of Ironsides. They were deployed in eleven divisions of three or four troops of cavalry each, with 600 "commanded" musketeers deployed as platoons between them.[29] The use of musketeers to disrupt attacking cavalry or dragoons was a common practice in the Swedish army of the Thirty Years' War, and was adopted by both the Parliamentarians and Royalists at Marston Moor.[30][31] No surviving map or account states who commanded the second line, but Colonel Bartholomew Vermuyden was Manchester's Commissary General, or second in command of the Eastern Association horse. Three regiments of Scots horse, numbering 1,000 and mounted on lighter ponies, formed a third line to Cromwell's rear under Sir David Leslie. Five hundred Scottish dragoons under Colonel Hugh Fraser were deployed on the extreme left.[32]
The centre, under the three generals-in-chief with no overall commander, consisted of over 14,000 foot, with 30 to 40 pieces of artillery. The various regiments had been hastily deployed as they returned to the field and were considerably mixed up,[33] but most of Manchester's infantry under Sergeant Major General Lawrence Crawford were on the left of the front line, and Lord Fairfax's in the centre. Two Scots brigades, the "Vanguard" of their army, made up the right of the front line under Lieutenant General William Baillie. The second line consisted of four Scots brigades, their "Main Battle" or simply "Battle", under Sergeant Major General James Lumsden. The weaker third and fourth lines consisted of some of Fairfax's infantry, a single Scots brigade and an incomplete Scottish regiment, and the Earl of Manchester's own Regiment of Foot.
The right wing was commanded by Sir Thomas Fairfax, with John Lambert as his second in command. He had at least 2,000 horse from Yorkshire and Lancashire, deployed in nine divisions, and 600 musketeers, with three regiments of Scots horse, numbering about 1,000, to his rear.[34]
Royalists
The Royalists occupied the low-lying moor, behind a drainage ditch that Rupert noted as an effective obstacle for a cavalry charge. There is some dispute over the course of ditch at the time of the battle. Some contemporary accounts support the contention by later historians that it was non-existent on the Royalists' right wing. On the other hand, a near-contemporary plan of the Royalist dispositions by Rupert's chief engineer, Bernard de Gomme, shows the ditch in its present-day alignment.[26] It is generally accepted that the ditch was at least less of an obstacle on the Royalist right.
The Royalist left wing was commanded by Lord Goring. It consisted of 2,100 cavalry, mainly from the Marquess of Newcastle's cavalry, the "Northern Horse", and 500 musketeers. The first line was commanded by Goring and the second by Sir Charles Lucas.[35]
Their centre was nominally commanded by Eythin. A brigade numbering 1,500 and consisting of Rupert's and Byron's regiments of foot under Colonel Robert Napier of Byron's regiment[36] was deployed at the ditch, at the junction of the right wing and centre. To their left, a forlorn hope of musketeers lined the ditch. Behind them, the first line was formed by the remaining infantry units of Rupert's army, numbering 7,000 less Napier's detachment, under Rupert's Sergeant-Major General Henry Tillier. The 3,000 infantry from Newcastle's army under Sergeant Major General Francis Mackworth formed behind the right of the front line when they arrived, and a brigade of 600 "Northern Horse" under Sir William Blakiston was deployed behind their left. There were a total of 14 field guns deployed in the centre.[35] It has been suggested that some at least of Mackworth's infantry had not taken up their assigned positions when the battle began, leaving the right of the Royalist centre understrength.[26]
The right wing was commanded by Lord Byron, with 2,600 horse and 500 musketeers. The second line, which included Prince Rupert's Regiment of Horse but also some comparatively inexperienced regiments, was commanded by Lord Molyneux, although the experienced but unprincipled Sir John Hurry apparently acted as Byron's second in command.[37]
Unlike the Scots and Parliamentarians, Rupert retained a reserve of 600 cavalry, including his elite Lifeguard of Horse, under his personal command. This reserve was situated behind the centre.[35]
Main Action
Delayed by the late arrival of the York garrison, it was late evening before the Royalists were fully deployed. A flurry of rain showers and the discouragement of Newcastle and Eythin persuaded Rupert to delay his attack until the next day. From the ranks of the allied army he could hear the singing of psalms. As the Royalist troops broke ranks for their supper, Leven noted the lack of preparation among his opponents, and ordered his men to attack at shortly after 7:30 pm, just as a thunderstorm broke out over the moor.[38]
On the allied left, Cromwell's horse quickly defeated Byron's wing. Though under orders to stand his ground and rely on the ditch and musket fire to slow and disorganize an enemy attack, Byron instead ordered a hasty counter-charge which disordered his own troops and prevented his musketeers and four "drakes" (field guns) attached to Napier's brigade[39] firing without fear of hitting their own cavalry.[40] In the clashes which followed, Byron's front line regiments were put to flight. Cromwell was slightly wounded in the neck, by a pistol ball in most accounts, and briefly left the field to have the wound dressed.
Noting the setback on this flank, Rupert led his reserve towards the right, rallying his own fleeing Regiment of Horse and leading them in a counter-attack.[41] A Parliamentarian officer wrote:
Cromwell's own division had a hard pull of it; for they were charged by Rupert's bravest men both in front and flank; they stood at the sword's point a pretty while, hacking one another; but at last (it so pleased God) he [Cromwell] brake through them, scattering them before him like a little dust.[42]—Scoutmaster-General Watson to Henry Overton, quoted in Young, Marston Moor 1644Sir David Leslie's Scots eventually swung the balance for Cromwell. Rupert's right wing and reserve were routed and he himself narrowly avoided capture by hiding in a nearby bean field.[43]
In the centre, Crawford's, Lord Fairfax's and most of Baillie's foot initially succeeded in crossing the ditch, capturing at least three pieces of artillery. On the right, Sir Thomas Fairfax's wing fared worse. Sir Thomas Fairfax himself later wrote:
Our Right Wing had not, all, so good success, by reason of the whins and ditches which we were to pass over before we could get to the Enemy, which put us into great disorder: notwithstanding, I drew up a body of 400 Horse. But because the intervals of Horse, in this Wing only, were lined with Musketeers; which did us much hurt with their shot; I was necessitated to charge them. We were a long time engaged with one another, but at last we routed that part of their Wing ... [I] myself only returned presently, to get to the men I left behind me. But that part of the Enemy which stood, perceiving the disorder they were in, had charged and routed them, before I could get to them.[44]—Sir Thomas Fairfax, quoted in Young (1970)Fairfax wrote that his second-in-command, Major-General Lambert, could not get up to him, and so charged in another place. A lane, the present-day Atterwith Lane, crossed the ditch on this flank, and some accounts suggest that several units were easy targets for the Royalist musketeers as they advanced along the lane only four abreast.[45] When a small embankment alongside the ditch at this point was removed in the 1960s, several hundred musket balls were recovered.[26]
When Goring launched a counter-charge, the disorganised Parliamentarians were routed, although some of the Scottish cavalry behind them resisted stoutly for some time.[46] Most of Goring's victorious wing either scattered in pursuit, or fell out to loot the Allied baggage train, but some of them under Sir Charles Lucas wheeled to attack the right flank of the Allied infantry. Meanwhile, some of Newcastle's foot counter-attacked Lord Fairfax's foot in the centre of the allied front line and threw them into confusion. Following up this advantage, Blakiston's brigade of horse (with its numbers probably augmented by a troop of "Gentleman Volunteers" under Newcastle himself) charged the allied centre. Under these assaults in the confusion and the gathering darkness, over half the Scots infantry and all of Fairfax's infantry fled. The Scottish Sergeant-Major General Lumsden stated that "These that ran away shew themselves most baselie."[47] Leven and Lord Fairfax also left the field, believing all was lost.[48] Manchester remained on the battlefield, but effectively commanded only his own Regiment of Foot near the allied rear.
One isolated Scottish brigade which had been at the right of their front line and consisted of the regiments of the Earl of Crawford-Lindsay and Viscount Maitland stood firm against Lucas, who launched three charges against them. In the third charge, Lucas's horse was killed, and he was taken prisoner.[48] Behind them, Sergeant Major General Lumsden managed to re-form part of the allied centre, using two Scottish brigades which had stood fast. Behind them in turn, the Earl of Manchester's regiment repulsed and scattered Blakiston's brigade of Royalist cavalry.[46]
By now it was nearly fully dark, although the full moon was rising. The countryside for miles around was covered with fugitives from both sides. A messenger from Ireland riding in search of Prince Rupert wrote:
In this horrible distraction did I coast the country; here meeting with a shoal of Scots crying out, 'Weys us, we are all undone'; and so full of lamentation and mourning, as if their day of doom had overtaken them, and from which they knew not whither to fly; and anon I met with a ragged troop reduced to four and a Cornet; by and by with a little foot officer without hat, band, sword, or indeed anything but feet and so much tongue as would serve to enquire the way to the next garrisons, which (to say the truth) were well filled with the stragglers on both sides within a few hours, though they lay distant from the place of the fight 20 or 30 miles.[49]—Mr. Arthur Trevor to the Marquess of Ormonde, quoted in Young (1970)With no general present in command of either side, a drawn battle might have resulted, but Cromwell's disciplined horsemen had rallied behind the Royalist right. Sir Thomas Fairfax, finding himself alone in the midst of Goring's men, removed the "Field Sign" (a handkerchief or slip of white paper which identified him as a Parliamentarian) from his hat, and made his way to Cromwell's wing to relate the state of affairs on the allied right flank.[44] Cromwell now led his cavalry, with Leslie's Scots horse still in support and Crawford's foot on his right flank, across the battlefield to attack Goring's cavalry.
By this time, Goring's troops were tired and disorganised, and several of his senior officers were prisoners.[50] They nevertheless marched down the hill from the Parliamentarian baggage to occupy roughly the same position which Sir Thomas Fairfax's cavalry had held at the start of the battle, which most contemporary accounts stated to be a position of disadvantage.[51] When Cromwell attacked, Goring's outnumbered troops were driven from the field.
The triumphant allies now turned on the remains of the Royalist centre, overrunning successive units and cutting down many fugitives. Finally some of Newcastle's foot, the "Whitecoats", gathered for a last stand in a ditched enclosure. This has been suggested to be White Sike Close, in the rear of the Royalists' original position, but it is more probable that the enclosure was Fox Covert, a mile north of Long Marston on the natural line of retreat towards York.[26] The Whitecoats refused quarter and repulsed constant cavalry charges until infantry and dragoons were brought up to break their formation. The last 30 survivors finally surrendered.[52]
Casualties
Approximately 4,000 Royalist soldiers had been killed, many in the last stand of the "Whitecoats", and 1,500 captured, including Charles Lucas and Major General Henry Tillier. The Royalists lost all their guns, with many hundreds of weapons and several standards also falling into the hands of the allied forces. The allied generals' dispatch, and other Parliamentarian accounts, stated that 300 of their soldiers were killed.[53]
One of those mortally wounded among the Parliamentarians was Sir Thomas Fairfax's brother, Charles.[44] Another was Cromwell's nephew, Valentine Walton, who was struck by a cannon ball early in the day. Cromwell was present when he died afterwards, and wrote a famous letter to the soldier's father, Cromwell's brother-in-law, also named Valentine Walton, which briefly described the battle and then informed the father of the son's last words and death.[54]
Outcome and Aftermath
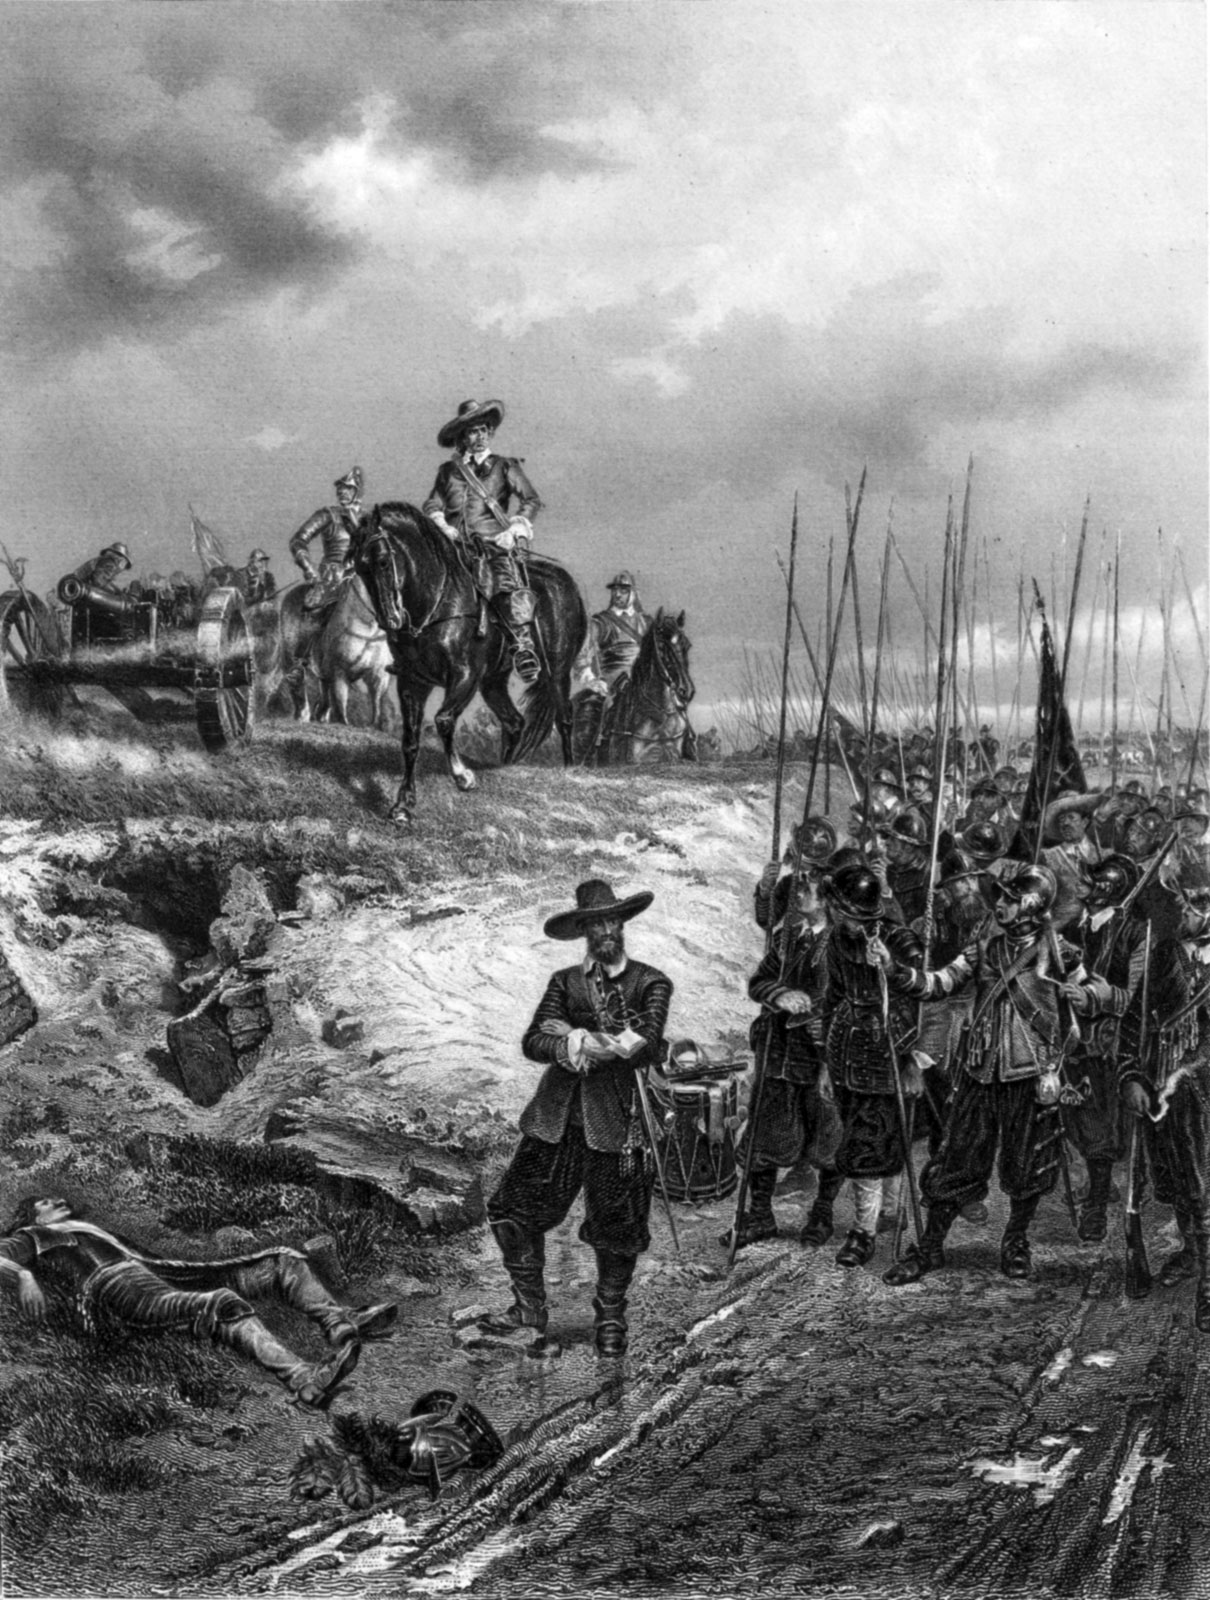
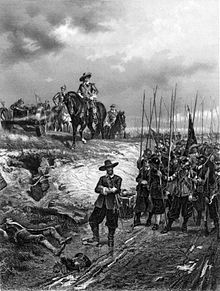 Oliver Cromwell at the Battle of Marston Moor (1599–1658). Cromwell's reputation as an effective cavalry commander and leader was cemented by his success at Marston Moor.
Late at night, the Royalist generals reached York, along with many routed troops and stragglers. The Governor of York, Sir Thomas Glemham, allowed only those who were part of the garrison (in effect, only a few officers who had participated in the battle as volunteers) into the city, in case Parliamentarian cavalry entered the city on the heels of the fleeing Royalists. Many fugitives, including wounded, crowded the streets before Micklegate Bar, the gate into the city.
Newcastle, having seen his forces broken and having spent his entire fortune in the Royalist cause, resolved that he would not endure the "laughter of the court". He departed for Scarborough on 3 July and went into exile in Hamburg, with Eythin and many of his senior officers.[43] Two days after the battle, Rupert rallied 5,000 cavalry and a few hundred infantry whom he mounted on spare horses. He considered that, rather than attempt to restore Royalist fortunes in the north, he was required to return south to rejoin the King. Leaving York by way of Monk Bar on the north east side, he marched back over the Pennines, making a detour to Richmond to escape interception. Goring, who had accompanied him this far, headed for Scotland to aid the Royalists there under Montrose. With the departure of Newcastle and Rupert, the Royalists effectively abandoned the north.
The victorious allies regrouped, although too slowly to intercept Rupert as he left York. Leven had fled to Leeds, nearly 20 miles (32 km) from the battlefield, and was greatly surprised to learn of the victory. Once the allied army had reformed, they resumed the siege of York. Under the agreement that no Scottish soldiers were to be garrisoned in the city, the garrison surrendered on honourable terms on 16 July.[55] The allied army soon dispersed. Leven took his troops north to besiege Newcastle upon Tyne and Carlisle, while Manchester's army returned to Lincolnshire and eventually moved into the south of England.[43]
Over the next few months the Scots and Parliamentarians slowly eliminated the remaining Royalist garrisons throughout northern England. The Royalist cavalry from the area, the "Northern Horse", continued to fight for King Charles under Sir Marmaduke Langdale, and even made several forays from the south to relieve Royalist garrisons in south Yorkshire, but they became increasingly undisciplined and licentious, turning many former sympathisers away from the Royalist cause.[56]
The defeat at Marston Moor was a serious blow to the Royalist cause. Prince Rupert had been decisively beaten for the first time in the war and lost his reputation for invincibility. He was deeply affected by the defeat, and kept the King's ambiguous dispatch close to him for the remainder of his life.[55] He had suffered an additional blow through the death during the battle of his dog "Boye", who had been a constant companion by his side throughout his campaigns. Parliamentarian propaganda made much of this, treating Boye almost as a Devil's familiar.[57]
By contrast, Oliver Cromwell's reputation as a cavalry commander was firmly established. It was acknowledged that the discipline he had instilled into his troops and his own leadership on the battlefield had been crucial to the victory. Cromwell would later declare that Marston Moor was "an absolute victory obtained by God's blessing".[58] From this moment, he was to exert increasing influence both in the House of Commons and in the Parliamentarian armies in the field.[58]
References
Notes
- ^ Churchill, Winston. A History of the English-speaking Peoples. 2. The New World. London: Cassell. p. 186. ISBN 0-304-29501-9. Quote from Clarendon
- ^ Royle, p.212
- ^ Royle, p.279
- ^ Newman and Roberts, p.13
- ^ Royle, p.283
- ^ Newman and Roberts, pp.15–16
- ^ Newman and Roberts, p.11
- ^ Young (1970), p.69
- ^ Woolrych, pp.55–59
- ^ Kenyon, p.101
- ^ Newman and Roberts, pp.23–25
- ^ Royle, p.289
- ^ Warburton, 2nd vol.
- ^ Royle, p.290
- ^ Young and Holmes (2000) p.192
- ^ Young (1970), p.80
- ^ Woolrych, p.66
- ^ Young (1970), p.82
- ^ Newman and Roberts, pp.47–48.
- ^ Woolrych, p.65
- ^ Young (1970), p.92
- ^ Account by Thomas Stockdale to John Rushworth, Clerk's Assistant at the House of Commons. Quoted in Young (1970), p.214
- ^ a b c Royle, p.293
- ^ Egan, p.170
- ^ Account of the Duchess of Newcastle. Quoted in Young (1970), p.203
- ^ a b c d e "Battle of Marston Moor". English Heritage. http://www.english-heritage.org.uk/content/imported-docs/k-o/marston.pdf. Retrieved 21 April 2011.
- ^ Young (1970), p.106
- ^ Young (1970), p.103
- ^ Young (1970), pp.86, 89, 93
- ^ Young (1970), p.86
- ^ Egan, p.172
- ^ Young (1970), p.96
- ^ Young (1970), p.93
- ^ Young (1970), pp.96–97
- ^ a b c Young (1970), pp.86–90
- ^ Young (1970), p.87
- ^ Young (1970), p.68
- ^ Royle, p.295
- ^ Egan, p.176
- ^ Newman and Roberts, p.81
- ^ Young (1970), p.113
- ^ Scoutmaster-General Lion. Watson to Henry Overton, quoted in Young (1970), pp.209–213
- ^ a b c Royle, p.298
- ^ a b c Sir Thomas Fairfax, quoted in Young (1970), pp.218–221
- ^ Young (1970), p.109
- ^ a b Young (1970), p.110
- ^ Young (1970), p.115
- ^ a b Royle, p.296
- ^ Mr. Arthur Trevor to the Marquess of Ormonde, quoted in Young (1970), pp.206–208
- ^ Young (1970), p.121
- ^ Young (1970), p.122
- ^ Newman and Roberts, pp.105–109
- ^ Young (1970), pp.217–218
- ^ Fraser, Antonia. Cromwell the Lord Protector. New York: Primus. pp. 129–31. ISBN 0-917657-90-X.
- ^ a b Royle, p.299
- ^ Plant, David. "Sir Marmaduke Langdale, 1st Baron Langdale, c.1598–1661". British Civil Wars and Commonwealth Web Site. http://www.british-civil-wars.co.uk/biog/langdale.htm. Retrieved 9 November 2007.
- ^ Royle, p.173
- ^ a b Royle, p.300
Bibliography
- Dodds, Glen Lyndon (1996). Battles in Britain, 1066–1746. Arms and Armour.
- Egan, Geoffrey (1987). Someone had blundered. London: B.T. Batsford. ISBN 0-7134-5008-8.
- Kenyon, John (1988). The Civil Wars of England. Weidenfeld and Nicolson. ISBN 0-297-79351-9.
- Newman, P.R; Roberts, P.R. (2003). Marston Moor 1644: The Battle of the Five Armies. Pickering: Blackthorn. ISBN 0-9540535-2-4.
- Royle, Trevor (2004). Civil War: The Wars of the Three Kingdoms 1638–1660. London: Abacus. ISBN 0-349-11564-8.
- Warburton, Eliot (2003). Memoirs of Prince Rupert and the Cavaliers. 2. London. ISBN 978-1-4212-4940-7.
- Woolrych, Austin (1961). Battles of the English Civil War. London: B.T. Batsford Ltd.
- Young, Peter (1970). Marston Moor 1644: The Campaign and the Battle. Kineton: Roundwood. ISBN 1-900624-09-5.
- Young, Peter; Holmes, Richard (2000). The English Civil War. Ware: Wordsworth Editions. ISBN 1-84022-222-0.
External links
- British Civil War site
- "Battle of Marston Moor". English Heritage. http://www.english-heritage.org.uk/server/show/conBattleField.21. Retrieved 8 May 2007.
Categories:- Battles of the English Civil Wars
- Military history of Yorkshire
- History of North Yorkshire
- 1644 in England
- Conflicts in 1644
- Registered historic battlefields in England
Wikimedia Foundation. 2010.