- Operation Coburg
-
Operation Coburg (24 January − 1 March 1968) was an Australian military action during the Vietnam War. The operation saw heavy fighting between the 1st Australian Task Force (1 ATF) and North Vietnamese Army and Viet Cong during the wider fighting around Long Binh and Bien Hoa. American and South Vietnamese intelligence reports had indicated that an imminent communist offensive during the Tet New Year festival was likely, and in response the Australians were deployed away from their base in Phuoc Tuy Province to bolster American and South Vietnamese forces defending the Long Binh–Bien Hoa complex north-east of Saigon. 1 ATF deliberately established fire support bases astride the communist lines of communication in the vicinity of the village of Trang Bom, expecting that they would attempt to destroy them. The Australians subsequently clashed with the Viet Cong during early patrols in Area of Operations (AO) Columbus, while later Fire Support Base (FSB) Andersen was repeatedly subjected to major ground assaults.
Although the operation was mounted too late to prevent the attacks on Saigon, the Australians successfully disrupted the communist lines of communication, limiting their freedom of manoeuvre to attack the Long Binh–Bien Hoa complex, while they were also able to successfully interdict their withdrawal, causing heavy casualties. The operation was also significant as it was the first deployment of 1 ATF outside its Tactical Area of Responsibility (TAOR) in Phuoc Tuy, and in this it set a precedent for later operations outside the province. Meanwhile, the remaining Australian forces in Phuoc Tuy Province also successfully repelled repeated Viet Cong attacks against Ba Ria and Long Dien, as part of the Tet Offensive that had engulfed population centres across South Vietnam.
Contents
Background
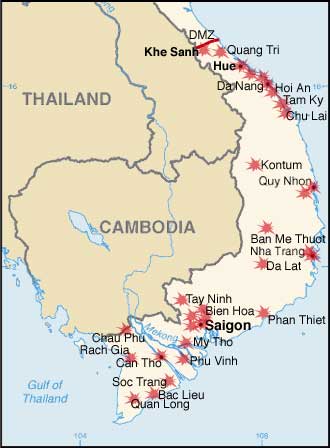
Main articles: Tet Offensive and Military history of Australia during the Vietnam WarSee also: First Battle of Saigon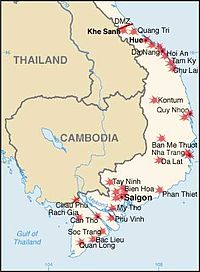 Major South Vietnamese population centres and installations targeted by the Viet Cong during the 1968 Tet Offensive.
At 18:00 on 29 January 1968, South Vietnamese forces began a 36-hour ceasefire in celebration of the arrival of the Year of the Monkey. Earlier, the communists had declared a seven-day ceasefire as part of the Tet festival, that was normally a period of truce and for community gatherings and family reunions in Vietnamese society.[1] Unbeknown to the South Vietnamese and their allies however, the North Vietnamese leadership had decided to use the cease-fire to launch a large offensive in the south in order to break the deadlock that had developed in the conflict—despite the reluctance of Democratic Republic of Vietnam President Ho Chi Minh and Defence Minister General Vo Nguyen Giap.[1] Primarily the brainchild of General Nguyen Chi Thanh, the upcoming offensive would be timed to provoke a popular general uprising among the South Vietnamese people against the government and its American supporters.[2] Regardless, prudence required that the South Vietnamese maintained 50 per cent of their forces on standby, while American and allied forces under General William Westmoreland—the Free World Military Forces—remained on full alert.[1] However, despite such measures the fighting at Khe Sanh had largely succeeded in diverting American resources and attention away from Saigon and towards the demilitarized zone.[3]
After some communist forces mistakenly began the planned offensive against South Vietnam a day early—attacking several towns in I and II Corps on the morning of 30 January—the President of the Republic of Vietnam, Nguyen Van Thieu, subsequently cancelled the ceasefire in response.[4] The offensive proper began in the early hours of 31 January when 85,000 to 100,000 North Vietnamese and Viet Cong troops simultaneously assaulted population centres and allied installations across South Vietnam.[1][2] Intelligence reports of the impending attacks had afforded some forewarning, and although some failures had caught allied units unprepared, they were not a complete surprise.[1] Indeed the growing threat had earlier prompted Lieutenant General Frederick Weyand, commander of III Corps Tactical Zone, to request the use of 1 ATF—now at full strength with three infantry battalions—outside of their usual base in Phuoc Tuy Province in order to defend the vital bases in the Long Binh–Bien Hoa complex north-east of Saigon.[Note 1][Note 2] The request was subsequently approved, although the Australians only agreed on the basis that one of their battalions—3 RAR—would remain at Nui Dat.[5]
Prelude
On 24 January 1968, 1 ATF headquarters under the command of Brigadier Ron Hughes inserted by air in to their new area of operations, between Bien Hoa and Long Khanh provinces east of Bien Hoa, approximately 55 kilometres (34 mi) from Nui Dat.[5] Initially the force would consist of two battalions—2 RAR/NZ (ANZAC) and 7 RAR—with armour from A Squadron, 3rd Cavalry Regiment, 105-millimetre (4.1 in) M2A2 Howitzers from 106 Battery and 108 Battery, 4th Field Regiment, as well as aviation assets in support; while later elements of 3 RAR would also be committed.[6] Coincidentally they would be operating in the same area that 1RAR had fought in as part of the US 173rd Airborne Brigade in November 1965. On that occasion 1 RAR had encountered heavy resistance in a series of bunker systems protecting key communist supply lines at Gang Toi.[5] This time 1 ATF would establish itself astride the communist's lines of communication in the expectation of provoking an aggressive response from the North Vietnamese and Viet Cong. Within days the Australians would establish a fire support base in order to deny the communists access to suitable sites for launching 122-millimetre (4.8 in) rocket attacks on the important allied bases and installations in the Long Binh–Bien Hoa complex, including the airbase at Bien Hoa and the large Long Binh Logistics Depot.[6]
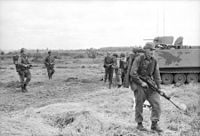
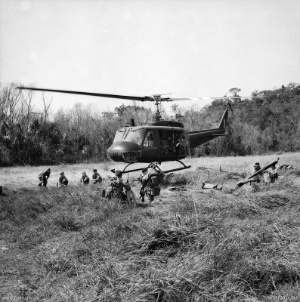
 Australian Iroquois helicopter from No. 9 Squadron RAAF inserting troops during the battle.
As part of the plan to protect these bases a combined US-Australian force would establish a screen to interdict movement along the northern approaches to Long Binh–Bien Hoa. 1 ATF was subsequently allocated the north-eastern sector, into a new area of operations named AO Columbus.[7] Only sparsely inhabited, AO Columbus was situated east of Long Binh between Highway 1 to the south, and the Song Dong Nai river to the north. Rectangular in shape, it measured 26 kilometres (16 mi) from east to west and 17 kilometres (11 mi) from north to south. The west of the AO was mainly covered in jungle, whilst grassland predominated in the east.[7] Meanwhile, Bien Hoa airbase itself would be defended by US 199th Light Infantry Brigade, occupying AO Uniontown to the west. Across the Song Dong Nai the US 101st Airborne Division occupied AO Manchester, while the South Vietnamese 18th Infantry Division defended its TAOR to the north-west.[8]
The concept of operations for Operation Coburg called for two infantry companies from 7 RAR to move by road with the rear echelon units in order to secure FSB Andersen, that had been established 1 kilometre (0.62 mi) north of Trang Bom for easy access to Route 1.[9] The remainder of the battalion was deployed by helicopter along with 2 RAR/NZ, while 4 Field Regiment was inserted by road.[10] The Task Force Maintenance Area was subsequently located at Andersen, with 1 ATF re-supplied throughout the operation by elements of 1st Australian Logistics Support Group deployed forward in Long Binh.[11] FSB Harrison was located 10 kilometres (6.2 mi) to the west of Andersen[9] with both bases positioned so that each could support the other in the event of attack.[12] A small number of SASR patrols would be used to provide reconnaissance for the task force.[13]
North Vietnamese Army and Viet Cong units identified in AO Columbus were mainly from the Viet Cong 5th Division, including a battalion group from 274 VC Regiment, a battalion of 84A Artillery (Rocket) Regiment (NVA) and a small element of the Dong Nai Regiment, as well as elements of 273 VC Regiment from the Viet Cong 9th Division. Local force elements included a number of company and platoon strength units in addition to various district and village guerrilla forces. These forces were believed to be lying in wait to attack the nearby American bases as part of the planned offensive.[5][14]
Battle
Patrolling in AO Columbus, 24 January − 16 February 1968
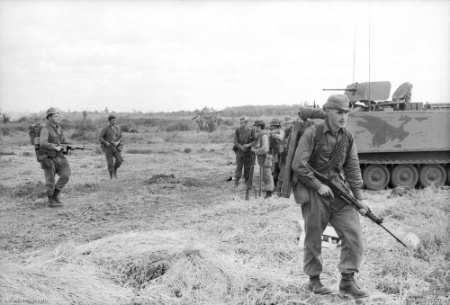
 New Zealanders from W Coy, 2 RAR/NZ patrolling during Operation Coburg.
The Australians began an intensive patrol program in AO Columbus[6] and were soon fighting up to platoon-sized Viet Cong units in a series of bunker complexes.[5] Between 25−29 January the Australians conducted reconnaissance-in-force operations and a series of minor patrol clashes followed up to the end of January.[6][15] On 26 January B Company, 2 RAR/NZ fought a two-hour action against about 25 Viet Cong entrenched in a bunker system. While on the same day C Company, 2 RAR/NZ also assaulted and occupied a camp of similar strength. On 27 January there were heavier contacts still, resulting in 14 Australians wounded and one Viet Cong killed.[16]
Although 1 ATF was well placed to deny the communists the use of its AO, it was increasingly obvious that there was little role for the SAS. Indeed the heavy presence of Viet Cong prevented them from operating normally, and the first attempt to insert a patrol was called off due to the presence of hostile forces in the vicinity of the landing zone; two Viet Cong were subsequently killed and the patrol was extracted after only 30 minutes.[13] A second attempt lasted only fifteen minutes longer, and they were also extracted following a brief contact. Finally, two patrols were joined together in an effort to provide more protection, and on 29 January they patrolled out from 7 RAR battalion headquarters. After only 30 minutes the Australians encountered a small party of Viet Cong however; they tried again two hours later but were detected. The following day they tried for a third time and were contacted. Unable to operate effectively, the SAS patrols were withdrawn and returned to Nui Dat on 1 February.[17]
On 29 January D Company, 7 RAR contacted a battalion concentrating in bunkers during a two and half hour battle[5] that saw nine Australian casualties, including one killed, while seven Viet Cong were also killed.[16] On 31 January Viet Cong overran the village of Trang Bom, just 1,500 metres (1,600 yd) south-west of FSB Andersen. The Australians reclaimed it that afternoon only for the communists to attack again the next day. Once again the Australians recaptured it, this time in savage house-to-house fighting involving D Company, 2 RAR/NZ and A Squadron, 3 CAV.[18] C Company, 3 RAR was subsequently inserted to assist with the protection of FSB Harrison.[16]
In response to the attack on Trang Bom, D Company, 7 RAR was dispatched forward to search the area. The lead platoon advanced on a Viet Cong camp—later found to be battalion-size—and was almost destroyed in the ensuing fire-fight. With half the platoon soon becoming casualties, another platoon was moved forward to aid their extraction. Close support from artillery protected the Australians from further casualties however, and the Viet Cong was eventually forced to withdraw.[19] Six Australians had been killed and 36 wounded in the engagements up to that point, while one New Zealander had also died and one wounded. More than 40 Viet Cong had been killed and nine wounded.[20]
In the early hours of 31 January key installations in the Long Binh–Bien Hoa complex in AO Uniontown had come under heavy attack by 5th Viet Cong Division, as part of the second prong of the communist attacks against Saigon.[20][21] With the Tet offensive erupting across South Vietnam, Bien Hoa airbase received heavy rocket fire that caused extensive damage to buildings, aircraft, and facilities, while the Long Binh Logistics Depot and the prisoner of war camp were also hit.[20] Over the next three days the US 199th Light Infantry Brigade—later reinforced by the 11th Armored Cavalry Regiment and an infantry battalion from 101st Airborne Division—were forced into heavy combat fending off communist indirect fire and ground attacks. By 1 February the Americans had gained the upper hand however, winkling out the last remaining Viet Cong following a sweep of Bien Hoa that cleared the town.[22]
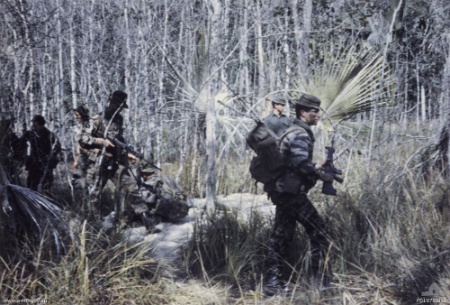
 An Australian SASR patrol.
The attacks on Bien Hoa forced a change in tactics for the Australians, and 1 ATF's mission was quickly changed from reconnaissance-in-force to a blocking operation designed to intercept withdrawing communist forces.[23] Between 31 January and 1 February, the Australian battalions moved into company blocking positions and a number of minor contacts occurred, resulting in some Viet Cong casualties and the capture of more weapons and equipment. Once in position, the intensity of these clashes increased as the Australians sprung platoon ambushes.[20] Indeed during early February, the nature of contacts in AO Columbus began to change, with the Australians increasingly faced by larger company-sized Main Force units located in static defensive positions.[6] During the first week of February the Viet Cong began streaming through the AO, retreating from Saigon in the wake of heavy losses during Tet. Although the Viet Cong managed to avoid becoming decisively engaged, around 90 were killed and five captured, as the Australians maintained their blocking positions.[24]
C Company, 7 RAR had been detached in order to protect the task force headquarters as well as to act as a reserve, and was particularly heavily engaged during this phase. The force had been gradually patrolling, when 6 kilometres (3.7 mi) north of Trang Bom on the morning of 5 February, it contacted a large Viet Cong force consisting of a regimental headquarters and three companies in a well constructed defensive position defended by several heavy machine-guns. The Australians assaulted the position on three occasions over the next three days in vicious fighting supported by airstrikes, artillery and helicopter gunships.[20] During one such attack on 7 February, Lieutenant Mark Moloney—one the company's platoon commanders—charged forward with six M72 rocket launchers to attack a series of bunkers single handed. Moloney succeeded in destroying several before he fell badly wounded; he survived, and for his actions was recommended for a Victoria Cross. Moloney's award was never made however, although Gunner Michael Williams and Corporal Graham Griffith were both awarded the Military Medal for their actions under fire.[25][Note 3] The battle continued for seven hours, with the Australians eventually routing the bunker system in a battle later hailed as "probably one of the most brilliant actions ever fought by an Australian rifle company."[20] However, amidst the confusion of Tet such efforts went largely unnoticed.[20]
Meanwhile, Tet had also engulfed Phuoc Tuy province and although stretched thin the remaining Australian forces there were soon drawn in to heavy combat as Viet Cong units simultaneously attacked the main provincial towns. Dunstan was forced to dispatch the Task Force reaction force from Nui Dat, with A Company, 3 RAR under the command of Major Brian Howard moving to reinforce South Vietnamese government forces following an attack by a 600-strong force from D445 VC Battalion on Ba Ria, the provincial capital, before first light on 1 February.[26] Fighting from street to street in a series of firefights at close quarters the Australians successfully repelled the attack, killing 40 Viet Cong.[27] Later, on 3 February, D Company, 3 RAR spoiled a harassing attack on Long Dien, and conducted a sweep of Hoa Long.[28] Overall, the fighting in Phuoc Tuy between 1−9 February resulted in 50 Viet Cong killed, 25 wounded and one prisoner. Five Australians were killed and 24 wounded.[29]
While the Australians in AO Columbus had successfully interrupted the pre-positioning of communist forces on one of the main approaches to Saigon, in hindsight they had been deployed too late to interfere seriously with the offensive.[5] Over the period 9−12 February 1 ATF redeployed, moving south back towards the fire support bases. The remaining companies of 3 RAR subsequently relieved 7 RAR and moved north on 11 February, while 2RAR/NZ returned to Nui Dat on 13 February. FSB Harrison was abandoned and all command and support elements concentrated at FSB Andersen.[29] Contact was minimal during this period, with just three Viet Cong killed.[30]
Fighting at FSB Andersen, 17−28 February 1968
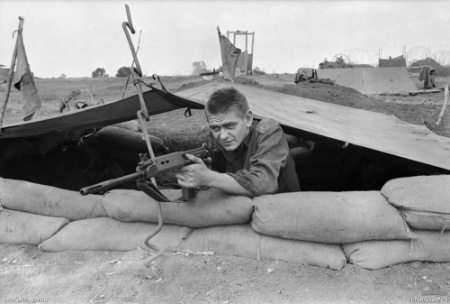
 Defensive position at FSB Andersen, South Vietnam 1968.
The Australian defence of FSB Andersen was left to 3 RAR, a troop of M113 armoured personnel carriers from A Squadron, 3 CAV and a troop of engineers from 1st Field Squadron. Artillery support was provided by 161 Field Battery, Royal New Zealand Artillery and the American medium howitzers of B Battery, 2/35th Artillery. A radar detachment from 131st Divisional Locating Battery was also attached as were elements of 161 Reconnaissance Flight.[31] A Company, 3 RAR together with the supporting arms was left to defend the base, while the other three rifle companies continued reconnaissance-in-force operations throughout the AO.[31] Airstrikes and artillery also targeted known Viet Cong base areas, however the number of ground contacts was limited.[32]
Late on the evening of 17−18 February the Viet Cong and North Vietnamese Army launched an assault on FSB Andersen.[6][33] The first attack was preceded by a heavy rocket and mortar barrage in the early hours of the morning, followed by two waves of infantry each of company size. The attack focused on the south-west of the perimeter manned by 3 RAR's echelon and mortar platoon, as well as an American medium artillery battery. The perimeter wire was subsequently breached, but the attack was repulsed by mortar counter-battery fire, Claymore mines and the heavy weight of machine-gun fire from armoured personnel carriers and the American gunners.[6] The communist barrage had had a devastating effect, falling among the American and New Zealand gun positions, the mortar lines and the battalion echelon, as well as scoring a direct hit on an Australian engineer standing patrol.[34] A second attack shortly after, this time from the north, was repelled by small-arms fire from the forward Australian pits.[6] Total Viet Cong casualties were unknown, although four bodies were found on the wire at dawn, while numerous bloodstains and bandages were found during a later sweep of the perimeter and a suspected mortar base-plate location.[34] Seven Australians and one American were killed, while 22 Australians and three Americans were wounded.[33]
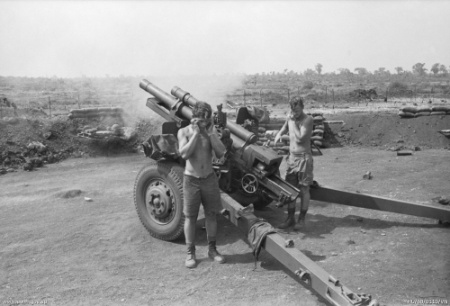
 A 105 mm M2A2 Howitzer from 161 Battery, Royal New Zealand Artillery (RNZA), fires during Operation Coburg.
As a result of the growing threat to the Australian base, the decision was made to reinforce FSB Andersen, with C Company, 3 RAR flown in by the time of the second attack two nights later.[6] The APCs had also been redeployed to cover the south-east ridge and the southern approach from Trang Bom.[34] The communist assault commenced just before midnight on 19 February, this time focussing on the south-east, and was preceded by heavy machine-gun fire. The attack was stopped short of the wire, regardless the forward pits were hit by rifle grenades, while the Assault Pioneer positions were attacked with satchel charges.[6] The only casualties were four Viet Cong killed.[33]
The final attack on 28 February also began with a mortar attack, but the communist assault wave was broken up by mortar fire, and was forced to withdraw to the east.[6] Three Americans were wounded.[33] A clearing patrol later revealed that the Viet Cong had inserted a mortar team to the edge of the rubber trees by night in a Lambretta and a cart and had then manhandled the tubes into position.[34] 3 RAR's defence of FSB Andersen was the first occasion in the history of their operations in Vietnam that an Australian fire support base had been subjected to a ground assault[34] while during all three attacks the cavalry and artillery in support had played a key role in the defence.[35] Throughout the later part of the operation the patrolling rifle companies had systematically searched the AO and although contact was infrequent the patrols had been effective in denying the subsequent use of the area to launch rocket attacks against the bases in Long Binh and Bien Hoa.[34]
Aftermath
Operation Coburg ended on 1 March 1968 with 3 RAR redeploying to Nui Dat by air. The fighting had cost the Australians 17 killed and 61 wounded, while allied casualties included two New Zealanders and one American killed, and eight New Zealanders and six Americans wounded.[36][37][Note 4] Communist casualties included at least 145 killed, 110 wounded and 5 captured, with many more removed from the battlefield.[33][Note 5] Large quantities of weapons and equipment were also captured by the Australians.[33] Overall, Coburg was considered a success by the Australians and Americans. Although they had been inserted too late to prevent the attacks during Tet, 1 ATF had successfully disrupted the communist lines of communication, limiting their freedom of manoeuvre to attack the Long Binh–Bien Hoa complex, while the Australians had also successfully interdicting the Viet Cong withdrawal, causing heavy casualties.[38] The operation was also significant because it had also been the first deployment of 1 ATF outside Phuoc Tuy, and in this it set a precedent for later operations outside the province.[39] The Royal Australian Regiment and the 3rd Cavalry Regiment were subsequently awarded the battle honour "Bien Hoa", one of only five awarded to Australian units during the war.[33]
At the strategic level the general uprising never eventuated, and in late February the communist offensive collapsed. Suffering more than 45,000 killed—against South Vietnamese and allied losses of only 6,000 men—it had been a tactical disaster for the communists.[40][41] Regardless, the offensive was a turning point in the war. Prior to Tet American commanders and politicians had talked confidently about winning the war, arguing that Westmoreland's strategy of attrition had reached the point where the communists were losing soldiers and equipment faster than they could be replaced.[40] Yet the scale of the fighting, and the surprise and violence with which the offensive was launched, had shocked the public, contradicting such predictions of imminent victory. Confidence in the military and political leadership collapsed, as did public support for the war in America. Ultimately, Tet was a publicity and media triumph for the communists, and Hanoi emerged with a significant political victory.[29][42] In its wake President Lyndon Johnson announced that he would not to seek a second term in office.[43]
Tet had a similar effect on Australian public opinion, and caused growing uncertainty in the government about the determination of the United States to remain militarily involved in Southeast Asia.[44] Amid the initial shock, Prime Minister John Gorton unexpectedly declared that Australia would not increase its military commitment in Vietnam beyond the current level of 8,000 personnel.[45] The war continued without respite however, and between May and June 1968 1 ATF was again deployed away from Phuoc Tuy in response to intelligence reports of another impending offensive. The Australians subsequently took up positions north-east of Saigon during Operation Toan Thang I to interdict communist lines of communication, fighting a series of significant actions over a 26-day period that became known as the Battle of Coral-Balmoral.[46]
Notes
- Footnotes
- ^ With the war continuing to escalate following further American troop increases, 1 ATF was heavily reinforced in late-1967. A third infantry battalion arrived in December 1967, while a squadron of Centurion tanks and additional Iroquois helicopters would also be added in early 1968. In all a further 1,200 men were deployed, taking the total Australian troop strength to over 8,000 men, its highest level during the war. This increase effectively doubled the combat power available to the task force commander. See McNeill and Ekins 2003, p. 249 and Kuring 2004, pp. 331–332.
- ^ Long Binh was located in the 9th district on the north-eastern edge of the capital Saigon, while Bien Hoa was further out in the same direction, outside the city boundary. There was a major air base in Bien Hoa.
- ^ Despite being recommended for the VC by his battalion commander, Lieutenant Colonel Eric Smith, Moloney received no award at all due to procedural reasons related to the temporary detachment of his company. See Ham 2007, p. 649.
- ^ There are significant discrepancies in the Australian casualty figures in the After Action Report and these are repeated in the Official History, neither of which are consistent with the operational reports nor the narrative. An examination of the AWM Roll of Honour as well as the histories of the battalions and units deployed during Operation Coburg supports the higher casualty figures listed here. See Stuart, O'Brien and Newman.
- ^ Included in the Viet Cong wounded figures were 52 believed killed in airstrikes and another 24 killed by artillery.
- Citations
- ^ a b c d e Horner 2008, p. 196.
- ^ a b McNeill and Ekins 2003, p. 287.
- ^ Ham 2007, p. 349.
- ^ McNeill and Ekins 2003, p. 297.
- ^ a b c d e f g Horner 2008, p. 197.
- ^ a b c d e f g h i j k Coulthard-Clark 2001, p. 287.
- ^ a b McNeill 2003, p. 294.
- ^ McNeill 2003, p. 296.
- ^ a b O'Brien 1995, p. 103.
- ^ McNeill 2003, p. 291.
- ^ McNeill and Ekins 2003, p. 447.
- ^ Andersen 2002, p. 79.
- ^ a b Horner 2002, p. 231.
- ^ McNeill and Ekins 2003, p. 293.
- ^ McNeill and Ekins 2003, p. 295.
- ^ a b c McNeill and Ekins 2003, p. 296.
- ^ Horner 2002, pp. 231−232.
- ^ Ham 2007, p. 351.
- ^ Ham 2007, p. 352.
- ^ a b c d e f g McNeill and Ekins 2003, p. 299.
- ^ Van Thai 2002, p. 221.
- ^ Starry 1989, pp. 122−127.
- ^ McNeill 2003, p. 299.
- ^ McNeill and Ekins 2003, p. 301.
- ^ Ham 2007, pp. 352−353.
- ^ Horner 2008, pp. 197–198.
- ^ Horner 2008 2008, p. 198.
- ^ McNeill and Ekins 2003, pp. 308–309.
- ^ a b c McNeill and Ekins 2003, p. 310.
- ^ AWM 95-1-4-86 Operation Coburg After Action Report, p. 9.
- ^ a b Stuart 1968, p.22.
- ^ McNeill and Ekins 2003, pp. 301−303.
- ^ a b c d e f g McNeill and Ekins 2003, p. 303.
- ^ a b c d e f Stuart 1968, p. 24.
- ^ Andersen 2002, p. 96.
- ^ Veterans Advocacy and Support Service Australia Inc. "1968 Vietnam War Timeline". http://www.ausvets.com.au/vietnam/1968/ops1968.htm. Retrieved 2009-08-08.
- ^ AWM 95-1-4-86 Operation Coburg After Action Report, p. 24.
- ^ McNeill 2003, p. 304.
- ^ McNeill 2003, p. 303.
- ^ a b Ham 2007, p. 345.
- ^ McNeill and Ekins 2003, p. 311.
- ^ Ham 2007, pp. 358–359.
- ^ Ham 2007, p. 362.
- ^ Edwards 1997, p. 193.
- ^ Edwards 1997, p. 196.
- ^ Coulthard-Clark 2001, pp. 288−289.
References
- "AWM 95-1-4-86 Operation Coburg After Action Report" (pdf). Headquarters 1st Australian Task Force. http://www.awm.gov.au/cms_images/AWM95/1/AWM95-1-4-86.pdf. Retrieved 2009-08-08.
- Andersen, Paul (2002). When the Scorpion Stings: The History of the 3rd Cavalry Regiment, Vietnam, 1965−1972. Crows Nest, New South Wales: Allen and Unwin. ISBN 1865087432.
- Coulthard-Clark, Chris (2001). The Encyclopaedia of Australia's Battles (Second ed.). Crows Nest, New South Wales: Allen and Unwin. ISBN 1865086347.
- Edwards, Peter (1997). A Nation at War: Australian Politics, Society and Diplomacy during the Vietnam War 1965–1975. The Official History of Australia's Involvement in Southeast Asian Conflicts 1948–1975. St Leonards, New South Wales: Allen and Unwin. ISBN 1864482826.
- Ham, Paul (2007). Vietnam: The Australian War. Sydney, New South Wales: Harper Collins. ISBN 9780732282370.
- Horner, David; ed (2008). Duty First: A History of the Royal Australian Regiment (Second ed.). Crows Nest, New South Wales: Allen and Unwin. ISBN 9781741753745.
- Horner, David (2002). Phantoms of War: A History of the Australian Special Air Service (Second ed.). Crows Nest, New South Wales: Allen and Unwin. ISBN 1865086479.
- Kuring, Ian (2004). Redcoats to Cams: A History of Australian Infantry 1788–2001. Loftus, New South Wales: Australian Military Historical Publications. ISBN 1876439998.
- McNeill, Ian; Ashley Ekins (2003). On the Offensive: The Australian Army and the Vietnam War 1967–1968. The Official History of Australia's Involvement in Southeast Asian Conflicts 1948–1975. St Leonards, New South Wales: Allen and Unwin. ISBN 1863733043.
- Newman, K.E. (1995). The ANZAC Battalion: A Record of the tour of 2nd Battalion, the Royal Australian Regiment and 1st Battalion, the Royal New Zealand Infantry Regiment (The ANZAC Battalion) in South Vietnam, 1967–68 (Second ed.). Swanbourne, Western Australia: John Burridge Military Antiques. ISBN 0646258249.
- O'Brien, Michael (1995). Conscripts and Regulars: With the Seventh Battalion in Vietnam. St Leonards, New South Wales: Allen and Unwin. ISBN 186373967X.
- Starry, Donn A. (1978). Mounted Combat in Vietnam. Washington D.C.: Department of the Army. ISBN 0160015693.
- Stuart, R.R. (1968). 3RAR in South Vietnam 1967–1968. Brookvale, New South Wales: Printcraft Press. OCLC 500218701.
- Van Thai, Hoang (ed) (2002) [1988]. Victory in Vietnam: The Official History of the People's Army of Vietnam, 1954–1975, translated by Merle L. Pribbenow (English ed.). Lawrence, Kansas: University Press of Kansas. ISBN 0700611754.
Categories:- Conflicts in 1968
- 1968 in Vietnam
- Battles involving Vietnam
- Battles and operations of the Vietnam War
- Battles of the Vietnam War involving Australia
- Battles of the Vietnam War involving the United States
- Battles of the Vietnam War involving New Zealand
Wikimedia Foundation. 2010.