- Operation Brevity
-
Coordinates: 31°34′51″N 25°3′8″E / 31.58083°N 25.05222°E
Operation Brevity Part of the Western Desert Campaign 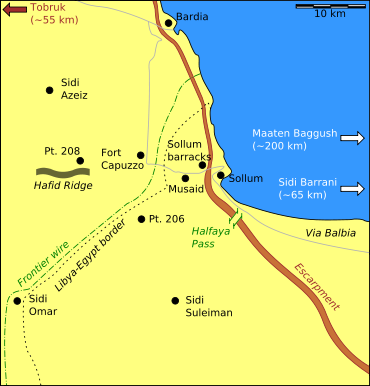
Date 15–16 May 1941 Location Egyptian and Libyan border area Result Inconclusive Belligerents  United Kingdom
 Australia
 Germany
 Italy
ItalyCommanders and leaders Archibald Wavell
William Gott Erwin Rommel
Maximilian von HerffStrength 3 Infantry Battalions[1]
53 tanks[1]Elements of several battalions
30-50 tanks[1]Casualties and losses a206+ casualties[2]
5 tanks destroyed[2]
6 aircraft destroyed[2]a605+ casualties[3]
3 tanks destroyed[3]aMore detailed information is available in the 'Aftermath' section Invasion of Egypt – Compass – Bardia – Kufra – Sonnenblume – Bardia raid – Tobruk – Brevity – Skorpion – Battleaxe – Flipper – Crusader – Gazala – (Bir Hakeim) – 1st Alamein – Alam Halfa – Agreement – 2nd Alamein – El AgheilaOperation Brevity was a limited offensive conducted in mid-May 1941, during the Western Desert Campaign of the Second World War. Conceived by the commander-in-chief of the British Middle East Command, General Archibald Wavell, Brevity was intended to be a rapid blow against weak Axis front-line forces in the Sollum–Capuzzo–Bardia area of the border between Egypt and Libya. Although the operation got off to a promising start, throwing the Axis high command into confusion, most of its early gains were lost to local counterattacks, and with German reinforcements being rushed to the front the operation was called off after one day.
Egypt had been invaded by Libyan-based Italian forces in September 1940, but by February of the following year a British counter-offensive had advanced well into Libya, destroying the Italian 10th Army in the process. British attention then shifted to Greece, which was under the threat of Axis invasion; while Allied divisions were being diverted from North Africa, the Italians were being reinforced with the German Afrika Korps under General Erwin Rommel. Rapidly taking the offensive against his distracted and over-stretched opponent, by April 1941 Rommel had driven the British and Commonwealth forces in Cyrenaica back across the Egyptian border. Although the battlefront now lay in the border area, the port city of Tobruk—100 mi (160 km) inside Libya—had resisted the Axis advance, and its substantial Australian and British garrison constituted a significant threat to Rommel's lengthy supply chain. He therefore committed his main strength to besieging the city, leaving the front line only thinly held.
Wavell defined Operation Brevity's main objectives as the acquisition of territory from which to launch a further planned offensive toward Tobruk, and the depletion of German and Italian forces in the region. With limited battle-ready units to draw on in the wake of Rommel's recent successes, on 15 May Brigadier William Gott attacked in three columns with a mixed infantry and armoured force. The strategically important Halfaya Pass was taken against stiff Italian opposition, and deeper inside Libya Fort Capuzzo was captured, but German counterattacks regained the fort during the afternoon causing heavy casualties amongst its defenders. Gott—concerned that his forces were in danger of being caught by German armour in open ground—conducted a staged withdrawal to the Halfaya Pass on 16 May, and Brevity was closed down. The importance of the Halfaya Pass as a safe supply route was highlighted to Rommel, and 11 days later it was recaptured by a German counterattack.
Contents
Background
In early September 1940, Italian forces based in Libya invaded Egypt, and three months later the British and Commonwealth troops of the Western Desert Force began a counter-offensive, codenamed Operation Compass. In two months, the Allies advanced 500 mi (800 km), occupying the Italian province of Cyrenaica and destroying the Italian 10th Army, but the operation was halted in February 1941 to give priority to the Battle of Greece.[4] Renamed XIII Corps[5] and reorganised under HQ Cyrenaica Command, the troops of the former Western Desert Force adopted a defensive posture. Over the next few months, HQ Cyrenaica lost its commander, Lieutenant-General Sir Henry Maitland Wilson, and the New Zealand 2nd and Australian 6th infantry divisions when they were redeployed to Greece. The British 7th Armoured Division, with virtually no serviceable tanks left after Compass, was also withdrawn and sent to the Nile Delta for rest and refitting.[6][7] In recompense, Wilson was replaced by Lieutenant-General Philip Neame and the British 2nd Armoured and Australian 9th Infantry Divisions were deployed to Cyrenaica, but both formations were inexperienced, ill-equipped, and in the case of the 2nd Armoured, under strength.[8][9]
 British Marmon-Herrington Mk II armoured car, as operated by the 11th Hussars
The Italians responded by despatching their Ariete and Trento Divisions to North Africa,[10] and beginning in February 1941 and continuing until early May, Operation Sonnenblume saw the German Afrika Korps arrive in Tripoli to reinforce their Italian allies. Commanded by General Erwin Rommel and consisting of the 5th Light and 15. Panzerdivisions, the Afrika Korps' mission was to block Allied attempts to drive the Italians out of the region. However, Rommel seized on the weakness of his opponents and, without waiting for his forces to fully assemble, rapidly went on the offensive.[11][12] In March-April, he destroyed the 2nd Armoured Division and forced the British and Commonwealth forces into retreat.[nb 1][14] Adding to the Allied discomfiture, Neame and the General Officer Commanding British Troops Egypt—Lieutenant-General Richard O'Connor—were captured, and the British and Commonwealth command structure had to be reorganised. HQ Cyrenaica was dissolved on 14 April, and its command functions taken over by the reactivated HQ Western Desert Force under Lieutenant-General Noel Beresford-Peirse. The Australian 9th Infantry Division fell back to the fortress port of Tobruk,[15] and the remaining British and Commonwealth forces withdrew a further 100 mi (160 km) east to Sollum on the Libyan–Egyptian border.[16] With Tobruk under siege from the main German-Italian force, a small battlegroup (Kampfgruppe) commanded by Maximilian von Herff continued to press eastward. Capturing Fort Capuzzo and Bardia in passing, it then advanced into Egypt, and by the end of April had taken Sollum and the tactically important Halfaya Pass. Rommel garrisoned these positions, reinforcing the battlegroup and ordering it onto the defensive.[1][17]
Tobruk's garrison—although isolated by land—continued to receive supplies and support from the Royal Navy, and Rommel was unable to take the port. This failure was significant; his front line positions at Sollum were at the end of an extended supply chain that stretched back to Tripoli and was threatened by the Tobruk garrison,[18] and the substantial commitment required to invest Tobruk prevented him from building up his forces at Sollum, making further advances into Egypt impractical.[nb 2][20][21] By maintaining possession of Tobruk, the Allies had regained the initiative.[21]
Preparations for battle
Further information: Operation Brevity order of battle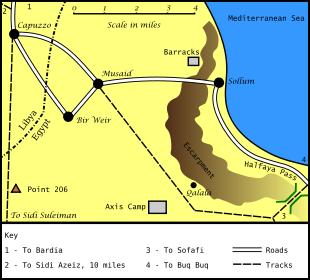 The battlefield over which Operation Brevity was fought
General Archibald Wavell—the commander-in-chief of the British Middle East Command—conceived Operation Brevity as a rapid blow in the Sollum area. Wavell intended to create advantageous conditions from which to launch Operation Battleaxe, the main offensive that he was planning for June. Operation Brevity's primary objectives were to recapture the Halfaya Pass, to drive the enemy from the Sollum and Capuzzo areas, and to deplete Rommel's forces. A secondary objective was to advance toward Tobruk, although only as far as supplies would allow, and without risking the force committed to the operation.[22][23]
Allied force
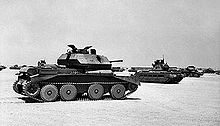
Operation Brevity would be carried out by the 22nd Guards Brigade and elements of the 7th Armoured Division. Its armoured component consisted of 29 cruiser tanks of the 2nd Royal Tank Regiment (2RTR) and 24 infantry tanks of the 4th Royal Tank Regiment (4RTR).[nb 3] The Royal Air Force (RAF) allocated all available fighters and a small force of bombers to the operation.[25][26]
 British A13 cruiser (foreground) and Matilda infantry tanks
Brigadier William Gott—in command of all Allied front-line forces since the retreat—was to lead the operation in the field, and his plan was to advance in three parallel columns.[1] On the desert flank to the south, the 7th Armoured Brigade group was to move 30 mi (48 km) from Bir el Khireigat to Sidi Azeiz destroying any opposition encountered en route. This group included three small mobile forces ("Jock columns") of the 7th Support Group, the cruiser tanks of 2RTR, and the armoured cars of the 11th Hussars, whose task was to patrol the open desert on the left flank and monitor the Sidi Azeiz–Bardia road.[27] In the centre, the 22nd Guards Brigade group was to clear the top of the Halfaya Pass, secure Bir Wair, Musaid, and Fort Capuzzo, and conduct a company-sized probe toward Bardia. The group included the infantry battalions of the 1st Durham Light Infantry and 2nd Scots Guards, and the infantry tanks of 4RTR.[1][28] In the north, the "coast group" was to advance along the coast road, capturing the lower Halfaya Pass, Sollum barracks, and the town of Sollum. The group included elements of the 2nd Battalion The Rifle Brigade, and the 8th Field Regiment Royal Artillery.[1]
Axis force
The principle Axis opposition was Kampfgruppe von Herff, positioned on the desert plateau. It included 30–50 tanks of the 2nd Battalion Panzer Regiment 5, an Italian motorised infantry battalion of the Trento Division, and supporting arms. The frontline area around Halfaya Pass was defended by two companies of Bersaglieri—well trained Italian motorised infantry—with artillery support.[1][29]
On 9 May, the Germans intercepted a British weather report over the radio. The Afrika Korps war diary noted that "In the past, such reports had always been issued prior to the important enemy offensives to capture Sidi Barrani, Bardi, Tobruk, and the Gebel."[26] Rommel's response was to strengthen the eastern side of his cordon around Tobruk as a precaution against sorties from the garrison, and to order Kampfgruppe von Herff to adopt a more aggressive posture. On 13 May, Axis aircraft bombed British tank concentrations, and von Herff expected an imminent British attack. However, the following day aircraft were unable to locate the British, and it was reported that the "enemy intentions to attack were not known".[30]
British advance
On 13 May, Wavell's infantry battalions began to concentrate at their start lines, followed by the tank regiments during the early hours of 15 May. At 06:00, the three columns began their advance, supported overhead by a standing patrol of Hawker Hurricane fighters.[1][28][31]
Centre column
Reaching the top of the Halfaya Pass, the 22nd Guards Brigade group ran into heavy opposition from an Italian Bersaglieri infantry company with anti-tank gun support. At the cost of seven tanks, the position was quickly taken by C Squadron 4RTR and G Company 2nd Scots Guards,[1][28][31] and the brigade group pushed on towards the Bir Wair-Musaid road. At around 08:00, it received the surrender of a large German-Italian camp, and by 10:15 Bir Wair and Musaid had been taken in the face of limited opposition.[31][32]
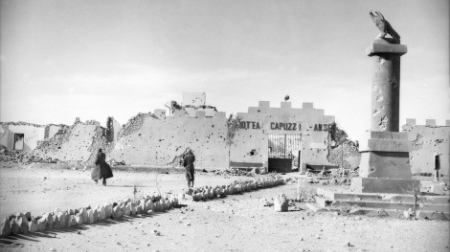
 Fort Capuzzo, the focal point of much of the day's fighting.
A Squadron 4RTR and the 1st Durham Light Infantry (1DLI) continued the advance toward Fort Capuzzo. Concealed in hull down positions behind a ridge near the fort were 20-30 German tanks, supported by anti tank guns. These engaged A Squadron, disabling five tanks, but were forced to withdraw as the squadron pressed its attack. On the final approach to Fort Capuzzo, contact was lost between 4RTR's tanks and 1DLI's leading C Company, and the attack on the fort began without armoured support. The fort was vigorously defended, and it was not until just before midday that C Company, reunited with A Squadron 4RTR and reinforced by A and B Companies 1DLI, eventually took the position.[33][34][35] D Company 1DLI—which had been in reserve during the attack—then made a wide left hook to capture a small landing ground to the north of the fort.[34][35]
In the afternoon, one company of the 2nd Scots Guards probed toward Bardia, the infantry coming under heavy machine gun fire from three positions as they neared Sollum barracks. A group of universal carriers—commanded by Sergeant F. Riley—charged the gun positions and quickly neutralised them, but one carrier was disabled when the group was subsequently engaged by anti-tank guns. Riley executed a second charge, silencing these too and taking their crews prisoner. His carrier was hit three times; for his actions Riley was awarded the Military Medal, the battalion's first decoration of the war.[nb 4]
Desert column
On the desert flank, 2RTR advanced with the 7th Armoured Brigade group. During the morning, reports were received of up to 30 German armoured vehicles operating nearby, and A Squadron 2RTR moved to investigate. Most of the German force had pulled back, but three tanks were located and brought under fire. One Panzer IV was disabled and the other two driven off, for the loss of one British tank due to mechanical failure. A second force of 15 German tanks was engaged by two tanks of No 2 Troop, destroying a Panzer III and forcing the remainder to withdraw. By midday, the brigade group had reached a position west of Fort Capuzzo,[37] and in the afternoon the nine remaining cruisers of A Squadron 2RTR began a reconnaissance patrol towards Sidi Azeiz.[38]
Coastal column
The advance along the coastal road—which lacked tank support—was held up all morning by determined Italian resistance at the bottom of Halfaya Pass.[1][36] This objective was finally achieved toward evening when S Company 2nd Rifle Brigade—supported by Australian anti-tank gunners fighting as infantry—overran the Italian positions taking around 130 prisoners.[39][40]
Axis reactions
Although the German and Italian commands in North Africa knew that a British offensive was imminent, Operation Brevity nevertheless caught them unprepared, and Rommel recorded in his diary that the initial attacks had caused him considerable losses.[41] By midday on 15 May, Axis command was showing signs of confusion. It was erroneously believed that the offensive involved more than 100 tanks, and repeated requests were made to both the Luftwaffe and the Regia Aeronautica for a concerted effort to defeat it. Forces around Tobruk were redeployed east of the besieged city, to block any attempt at relief and to prevent the garrison from breaking out to meet the British advance.[42] Lieutenant-Colonel Hans Cramer was sent to reinforce Kampfgruppe von Herff with a tank battalion from Panzer Regiment 8 and a battery of 88 mm (3.46 in) FlaK guns,[43] and additional reinforcements under General von Esebeck were despatched the following day.[44]
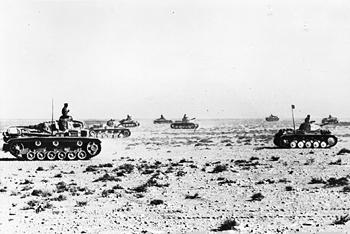
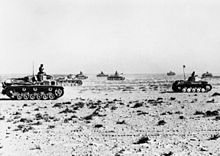 A Panzer II (right) and a Panzer III (left), the main tanks in use by the Afrika Korps during 1941, advance across the open desert.
The Germans concentrated their riposte against the central column. Von Herff—who had been prepared to fall back—instead launched a local counterattack toward Fort Capuzzo during the afternoon of 15 May with the 2nd Battalion Panzer Regiment 5.[45] At around 13:30, D Company 1DLI at the landing ground was overrun, and with no anti-tank support more capable than the Boys anti-tank rifle, the remaining troops of 1DLI were forced to fall back toward Musaid. A fortuitous dust cloud aided their withdrawal, but by 14:45 Panzer Regiment 5 was reporting that it had recaptured Capuzzo, inflicting heavy casualties on the British and taking 70 prisoners.[35][45][46]
On the desert flank, A Squadron 2RTR's patrol toward Sidi Azeiz was being monitored by Panzer Regiment 5, but the Germans misidentified the light cruiser tanks as heavily armoured Matilda infantry tanks, and reported that an attack was not possible. Col. von Herff—believing the British had two divisions operating in the area—had grown uneasy. A Squadron's patrol was interpreted as an attempt to concentrate south of Sidi Azeiz, in preparation for a thrust north the next day; such a move threatened to sweep aside von Herff's force and completely unhinge the German front in the Sollum–Bardia area.[41] In response, von Herff broke contact with the British; his plan was to join up with Cramer's Panzer Regiment 8 to mount a concentrated counterattack the following morning.[39][41][47]
British withdrawal
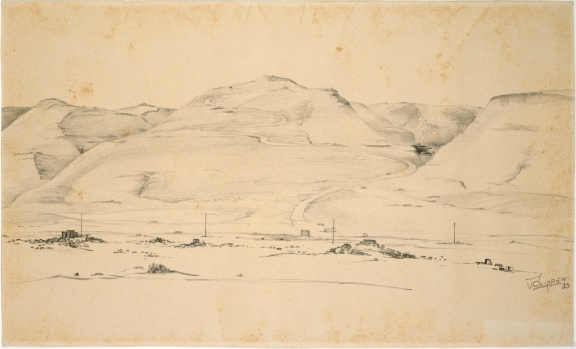
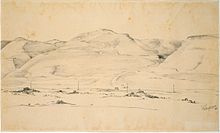 Pencil drawing of Halfaya Pass by New Zealand artist, Jack Crippen
Realising that the 22nd Guards Brigade group would be vulnerable to German armoured counterattacks in the open ground around Bir Wair and Mussaid, Brigadier Gott withdrew it during the early hours of the morning of 16 May. By 10:00, the infantry had taken up new positions back at Halfaya Pass,[39][44] although the 7th Armoured Brigade group was ordered to remain west of Fort Capuzzo for the time being.[39][48]
Cramer's reinforcements arrived in the Sidi Azeiz area at 03:00 and reached Fort Capuzzo at 06:30. At around 08:00, he made contact with Kampfgruppe von Herff, but by mid-morning both groups had run out of fuel. The German advance resumed at 16:00 before being stopped by around 17 tanks of 2RTR. The British reported one German tank set alight and another disabled, and that an advance of up to 50 tanks had been halted, while the Germans believed that they had repulsed a strong British tank attack. As nightfall approached, von Herff broke off the action and went on to the defensive. He intended to repair his damaged machines, reorganise, and resume offensive operations on 18 May.[49] However, 2RTR pulled back to Bir el Khireigat, initially followed by two German tanks, one of which withdrew after the other was destroyed. The regiment arrived at Bir el Khireigat, from where it had set out two days previously, at around 02:30 on 17 May.[39][50]
Aftermath
Operation Brevity failed to achieve most of its objectives, ultimately succeeding only in retaking the Halfaya Pass.[51] The British lost five tanks and at least 206 men killed, wounded, or captured. German casualties numbered three tanks and 258 men killed, wounded, or captured.[nb 5] Losses among the Italian forces are unknown, but Allied accounts record the capture of 347 men.[36][40]
On 5 August, Col. von Herff praised the Bersaglieri, who had defended Halfaya Pass. The British received plaudits from Winston Churchill, who sent a telegram to Wavell betraying his ignorance of events by stating: "Without using the Tiger cubs you have taken the offensive, advanced 30 miles (48 km), captured Halfaya and Sollum, taken 500 German prisoners and inflicted heavy losses in men and tanks. For this twenty I tanks and 1000 or 1500 casualties do not seem too heavy a cost."[56] Churchill ended the message by asking Wavell "What are your dates for bringing Tiger cubs into action?", in reference to the reinforcements that had arrived at Alexandria on 12 May as part of a convoy code-named Operation Tiger.[56] The 11th Hussar's regimental history notes that "it was clear that no further offensive action would be possible before 7[th] Arm[oured Division] was fully prepared".[48] The Tiger convoy brought 238 tanks[nb 6] and made it possible to refit the 7th Armoured Division, which had been out of action since February as a result of the losses it sustained during Operation Compass.[nb 7] Preparations could now be made for Operation Battleaxe and the relief of Tobruk.[60] In the system of British and Commonwealth battle honours, units that served in the Halfaya Pass area between 15 and 27 May were awarded the honour Halfaya 1941 in 1957.[61]
Historian Thomas Jentz suggests that Brevity could have ended in victory for the British. While their tank forces were fighting ineffectively, the "gutsy" actions by 2RTR and their patrol toward Sidi Azeiz had convinced the Germans that the battle was lost by the evening of 15 May.[53] Because of their failure to engage 2RTR late that day, several German commanders from Panzer Regiment 5, including its commanding officer, were removed from their posts after the battle.[62] Jentz notes that a feint by the 1st and 7th RTR out of Tobruk might have caused a realignment of the Axis forces, weakening their overall position and perhaps even forcing them to give up the Sollum area.[53]
Operation Brevity highlighted to Rommel the importance of the Halfaya Pass; whichever side held it would have a "comparatively safe route for his supplies" during subsequent offensives in the area. On 27 May, he launched Operation Skorpion, during which von Herff recaptured the pass and reversed the last British territorial gain from Brevity.[63]
See also
Notes
Footnotes
- ^ Only ten British tanks were lost due to enemy action; the remaining losses were caused by breakdowns and lack of fuel.[13]
- ^ Tripoli was the main supply base and all supplies then had to be shipped along the coast or driven to the front.[19]
- ^ The cruiser tanks were six Mk.Is, seventeen Mk.IIAs and seven Mk.IVAs, although one of these thirty tanks was in a field depot under repair. The infantry tanks were Matilda Mk IIs. The Allied force was organised into informal brigade groups, with individual units of the 7th Armoured Division detached to different brigade groups according to their mission. As well as specific units identified in this article, brigade groups included supporting arms such as artillery batteries, and additional units which played no significant part in the operation. The full order of battle is listed in Operation Brevity order of battle.[24]
- ^ Erskine states "the Company was in an exposed position at the time, and there is no doubt that Sergeant Riley’s speed and dash saved it from suffering heavy casualties."[36]
- ^ A detailed breakdown of British casualties comprises: 196 men of the 1st Durham Light Infantry killed, wounded, or captured; one killed and four wounded from the 2nd Scots Guards; 1 killed from the 3rd Coldstream Guards; four wounded from the 11th Hussars. As well as the 5 tanks destroyed, 13 tanks were damaged, but the tank regiments suffered no losses in personnel. Losses among the 2nd Rifle Brigade are unknown. On the German side, detailed casualties comprise 12 killed, 61 wounded, and 185 captured. As well as the three tanks destroyed (a Panzer II and two Panzer IIIs), several more suffered minor damage.[36][52][53][54][55]
- ^ The convoy lost 57 tanks when the Empire Song struck a mine and sunk, but not before her crew was taken off.[57] The tank reinforcements comprised 21 Mark VI light tanks, 82 Cruiser tanks (including 50 of the new Crusader tanks) and 135 Infantry tanks.[58]
- ^ Many of the division's personnel had also been dispersed to other tasks, meaning the division would also have to reorganize and retrain to become battle ready.[59]
Citations
- ^ a b c d e f g h i j k Playfair (1956), p. 160
- ^ a b c Erskine, p. 79; Howard, p. 388; Playfair (1956), p. 162; Ward, p. 485; The 11th Hussars, (Prince Albert's Own). "11 Hussar war diary entry for 15/05/1941". http://warlinks.com/armour/11_hussars/11huss_41.html.
- ^ a b Erskine, p. 79; Jentz, p. 142
- ^ Playfair (1954), pp. 362-366, 371-376
- ^ Playfair (1954), p. 289
- ^ Playfair (1956), p. 2
- ^ Jentz, p. 85
- ^ Playfair (1956), pp. 2-5
- ^ Rommel, p. 104, editorial comment made by Liddell-Hart
- ^ Bauer, p.121
- ^ Jentz, p. 82
- ^ Rommel, p. 109
- ^ Jentz, p. 101
- ^ Playfair (1956), pp. 19-40
- ^ Latimer, pp. 43-45
- ^ Playfair (1956), pp. 33-35
- ^ Jentz, pp. 128-129, 131
- ^ Latimer, pp. 48-64
- ^ Rommel, p. 134
- ^ Playfair (1956), p. 41
- ^ a b Jentz, p. 128
- ^ Chant, p. 21
- ^ Playfair (1956), pp. 159-160
- ^ Jentz, p. 136
- ^ Playfair (1956), p. 159
- ^ a b Jentz, p. 130
- ^ Clarke, p. 169
- ^ a b c Erskine, p. 78
- ^ Jentz, pp. 128–129
- ^ Jentz, pp. 131-133, 142
- ^ a b c Jentz, p. 134
- ^ Erskine, pp. 78-79
- ^ Jentz, pp. 134, 137
- ^ a b Ward, p. 484
- ^ a b c Rissik, pp. 56–57
- ^ a b c d Erskine, p. 79
- ^ Jentz, pp. 136-137
- ^ Jentz, pp. 137-138
- ^ a b c d e Playfair (1956), p. 162
- ^ a b Hastings, p. 70
- ^ a b c Rommel, p. 136
- ^ Jentz, pp. 132-133
- ^ Jentz, p. 132
- ^ a b Jentz, p. 140
- ^ a b Playfair (1956), p. 161
- ^ Jentz, p. 133
- ^ Jentz, pp. 139-140
- ^ a b Clarke, p. 170
- ^ Jentz, pp. 140-141
- ^ Jentz, pp. 141-142
- ^ Playfair (1956), pp. 159, 162
- ^ Howard, p. 388
- ^ a b c Jentz, p. 142
- ^ Ward, p. 485
- ^ The 11th Hussars, (Prince Albert's Own). "11 Hussar war diary entry for 15 May 1941". http://warlinks.com/armour/11_hussars/11huss_41.html.
- ^ a b Neilands, p. 68
- ^ Playfair (1956), pp. 116, 119
- ^ Pitt, p. 294
- ^ Playfair (1956), pp. 1-2, 32, 163-164
- ^ Playfair (1956), pp. 163-164
- ^ Rodger, pp. 275
- ^ Carver, p. 24
- ^ Rommel, pp. 136-137
References
- Bauer, Eddy; Young, Peter (general editor) (2000) [1979]. The History of World War II (Revised edition ed.). London, UK: Orbis Publishing. ISBN 1-85605-552-3.
- Carver, Michael (1964). Tobruk. British battles series. London: Batsford. OCLC 231745159.
- Chant, Christopher (1986). The Encyclopedia of Code Names of World War II. London: Routledge & Kegan Paul. ISBN 0-7102-0718-2.
- Clarke, Dudley (1952). The Eleventh at War: Being the Story of the XIth Hussars (Prince Albert's Own) through the Years 1934-1945. London: Michael Joseph. OCLC 222891295.
- Erskine, David (2001) [1956]. The Scots Guards 1919-1955. Naval & Military Press Ltd. ISBN 1-84342-061-9.
- Hastings, R.H.W.S. (1950). The Rifle Brigade in the Second World War 1939-1945. Aldershot, UK: Gale & Polden. OCLC 6190324.
- Howard, Michael; Sparrow, John (1951). The Coldstream Guards, 1920-1946. London: Oxford University Press. OCLC 9151069.
- Jentz, Thomas L. (1998). Tank Combat in North Africa: The Opening Rounds, Operations Sonnenblume, Brevity, Skorpion and Battleaxe, February 1941 - June 1941. Schiffer Publishing Ltd. ISBN 0-7643-0226-4.
- Latimer, Jon (2001). Tobruk 1941: Rommel's Opening Move. Osprey. ISBN 0-275-98287-4.
- Rissik, David (2004) [1952]. The D.L.I. at war: History of the Durham Light Infantry 1939-1945. Naval & Military Press Ltd. ISBN 1-84574-144-7.
- Neillands, Robin (2004). Eighth Army: From the Western Desert to the Alps, 1939-1945. John Murray Publishers Ltd. ISBN 0-7195-5647-3.
- Pitt, Barrie (2001) [1982]. The Crucible of War: Wavell's Command Volume I. Weidenfeld Military; New Ed edition. ISBN 0-304-35950-5.
- Playfair, Major-General I.S.O.; with Stitt R.N., Commander G.M.S.; Molony, Brigadier C.J.C. & Toomer, Air Vice-Marshal S.E. (2004) [1st. pub. HMSO 1954]. Butler, J.R.M. ed. The Mediterranean and Middle East, Volume I The Early Successes Against Italy (to May 1941). History of the Second World War, United Kingdom Military Series. Naval & Military Press. ISBN 1-84574-065-3.
- Playfair, Major-General I.S.O.; with Flynn R.N., Captain F.C.; Molony, Brigadier C.J.C. & Toomer, Air Vice-Marshal S.E. (2004) [1st. pub. HMSO 1956]. Butler, J.R.M. ed. The Mediterranean and Middle East, Volume II The Germans come to the help of their Ally (1941). History of the Second World War, United Kingdom Military Series. Naval & Military Press. ISBN 1-84574-066-1.
- Rodger, Alexander (2003). Battle Honours of the British Empire and Commonwealth Land Forces. Marlborough: The Crowood Press. ISBN 1-86126-637-5.
- Rommel, Erwin; Liddell-Hart, Basil (editor) (1982) [1953]. The Rommel Papers. Da Capo Press. ISBN 0-306-80157-4.
- Wake, Hereward; Deeds, William F. (1949). Swift and bold: The story of the King's Royal Rifle Corps in the Second World War 1939-1945. Aldershot, UK: Gale & Polden. OCLC 4089194.
- Ward, S.G.P.; Poett, Nigel (2005) [1963]. Faithful: The story of the Durham Light Infantry. Naval & Military Press Ltd. ISBN 1-84574-147-1.
- 11th Hussars (Prince Albert’s Own). "History War Diaries of the 11 Hussars (Prince Albert's Own)". http://warlinks.com/armour/11_hussars/11huss_41.html. Retrieved 2008-04-01.
External links
- Chant, Christopher. The Encyclopedia of Code Names of World War II, entry on Operation Brevity. http://books.google.co.uk/books?id=MNcNAAAAQAAJ&pg=PA21&lpg=PA21&dq=Operation+Brevity&source=web&ots=_OUCGtLAIl&sig=PC-bCMGGdVMxB4mLhV8kmpI8uk0&hl=en. Retrieved 2008-10-03.
- Maughan, Barton (1966). Official History of Australia in the Second World War Volume III – Tobruk and El Alamein. Chapter 7. Series 1 - Army. Canberra: Australian War Memorial. http://www.awm.gov.au/histories/chapter.asp?volume=19. Retrieved 2008-10-03.
- Paterson, Ian A. "History of the British 7th Armoured Division: Operation Brevity". http://www.btinternet.com/~ian.a.paterson/battles1941.htm#Brevity. Retrieved 2008-10-03.
- Wavell, Archibald (1946). Operations in the Middle East from 7th February to 15th July 1941. Wavell's Official Despatches. published in the London Gazette: (Supplement) no. 37638. pp. 3423–3444. 2 July 1946.
Categories:- North African Campaign
- Western Desert Campaign
- Egypt in World War II
- Libya in World War II
- Battles of World War II involving Australia
- Battles involving the United Kingdom
- Battles involving Italy
- Conflicts in 1941
- 1941 in Egypt
- Military operations of World War II involving Germany


Wikimedia Foundation. 2010.