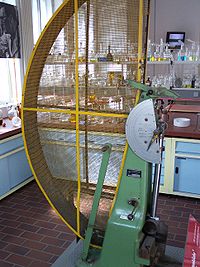
- Charpy impact test
-
Materials failure modes Buckling · Corrosion · Creep · Fatigue ·
Fouling · Fracture · Hydrogen embrittlement ·
Impact · Mechanical overload ·
Stress corrosion cracking · Thermal shock · Wear · YieldingThe Charpy impact test, also known as the Charpy v-notch test, is a standardized high strain-rate test which determines the amount of energy absorbed by a material during fracture. This absorbed energy is a measure of a given material's toughness and acts as a tool to study temperature-dependent brittle-ductile transition. It is widely applied in industry, since it is easy to prepare and conduct and results can be obtained quickly and cheaply. But a major disadvantage is that all results are only comparative.[1]
The test was developed in 1905 by the French scientist Georges Charpy. It was pivotal in understanding the fracture problems of ships during the Second World War. Today it is used in many industries for testing building and construction materials used in the construction of pressure vessels, bridges and to see how storms will affect materials used in building.[2]
Contents
Definition
The apparatus consists of a pendulum axe swinging at a notched sample of material. The energy transferred to the material can be inferred by comparing the difference in the height of the hammer before and after a big fracture.
The notch in the sample affects the results of the impact test,[3] thus it is necessary for the notch to be of regular dimensions and geometry. The size of the sample can also affect results, since the dimensions determine whether or not the material is in plane strain. This difference can greatly affect conclusions made.[4]
The "Standard methods for Notched Bar Impact Testing of Metallic Materials" can be found in ASTM E23[5], ISO 148-1[6] or EN 10045-1[7], where all the aspects of the test and equipment used are described in detail.
Quantitative results
The quantitative result of the impact tests the energy needed to fracture a material and can be used to measure the toughness of the material and the yield strength. Also, the strain rate may be studied and analyzed for its effect on fracture.
The ductile-brittle transition temperature (DBTT) may be derived from the temperature where the energy needed to fracture the material drastically changes. However, in practice there is no sharp transition and so it is difficult to obtain a precise transition temperature. An exact DBTT may be empirically derived in many ways: a specific absorbed energy, change in aspect of fracture (such as 50% of the area is cleavage), etc.[1]
Qualitative results
The qualitative results of the impact test can be used to determine the ductility of a material.[8] If the material breaks on a flat plane, the fracture was brittle, and if the material breaks with jagged edges or shear lips, then the fracture was ductile. Usually a material does not break in just one way or the other, and thus comparing the jagged to flat surface areas of the fracture will give an estimate of the percentage of ductile and brittle fracture.[1]
Sample sizes
According to ASTM A370,[9] the standard specimen size for Charpy impact testing is 10mm×10mm×55mm. Subsize specimen sizes are: 10mm×7.5mm×55mm, 10mm×6.7mm×55mm, 10mm×5mm×55mm, 10mm×3.3mm×55mm, 10mm×2.5mm×55mm. Details of specimens as per ASTM A370 (Standard Test Method and Definitions for Mechanical Testing of Steel Products).
According to EN 10045-1,[7] standard specimen sizes are 10mmx10mmx55mm. Subsize specimens are: 10mmx7.5mmx55mm and 10mmx5mmx55mm.
See also
Notes
- ^ a b c Meyers Marc A, Chawla Krishan Kumar (1998). Mechanical Behaviors of Materials. Prentice Hall. ISBN 9780132628174.
- ^ Jacobs James A, Kilduff Thomas F (2005). Engineering Materials Technology (5th ed.). Pearson Prentice Hall. pp. 153–155. ISBN 9780130481856.
- ^ Kurishita H, Kayano H, Narui M, Yamazaki M, Kano Y, Shibahara I (1993). "Effects of V-notch dimensions on Charpy impact test results for differently sized miniature specimens of ferritic steel". Materials Transactions - JIM (Japan Institute of Metals) 34 (11): 1042–52. ISSN 0916-1821.
- ^ Mills NJ (February 1976). "The mechanism of brittle fracture in notched impact tests on polycarbonate". Journal of Materials Science 11 (2): 363–75. Bibcode 1976JMatS..11..363M. doi:10.1007/BF00551448.
- ^ ASTM E23 Standard Test Methods for Notched Bar Impact Testing of Metallic Materials
- ^ ISO 148-1 Metallic materials - Charpy pendulum impact test - Part 1: Test method
- ^ a b EN 10045-1 Charpy impact test on metallic materials. Test method (V- and U-notches)
- ^ Mathurt KK, Needleman A, Tvergaard V (May 1994). "3D analysis of failure modes in the Charpy impact test". Modeling and Simulation in Materials Science Engineering 2 (3A): 617–35. Bibcode 1994MSMSE...2..617M. doi:10.1088/0965-0393/2/3A/014.
- ^ ASTM A370 Standard Test Methods and Definitions for Mechanical Testing of Steel Products
External links
- Charpy Impact Testing module at steeluniversity.org, including a fully interactive simulation
- Online Curvefitting Calculator for Charpy Impact Testing
Categories:
Wikimedia Foundation. 2010.

