- Montenotte Campaign
-
Montenotte Campaign Part of French Revolutionary Wars 
View of the Battle of Mondovi by Guiseppe Pietro Bagetti (1764-1831)Date 10 April-28 April 1796 Location Piedmont, in present-day Italy Result French victory Belligerents  First French Republic
 Austria
 Kingdom of Sardinia
Commanders and leaders Napoleon Bonaparte Johann Beaulieu
Michelangelo ColliStrength 43,000 Austrians: 32,000
Sardinians: 17,000Casualties and losses 6,000 Austrians: 5,000-6,000
Sardinians: unknownWar of the First CoalitionVerdun – Avesnes-le-Sec – Valmy – Jemappes – 1st Mainz – Neerwinden – Raismes – Famars – 1st Arlon – Bellegarde – Hondshoote – Dunkirk – Méribel – Peyrestortes – Truillas – 1st Wissembourg – Wattignies – Kaiserslautern – San Pietro and Sant'Antioco – Toulon – 2nd Wissembourg – Martinique – Guadeloupe – Saint-Florent – Bastia – 2nd Arlon – Villers-en-Cauchies – Saorgio – Beaumont – Mouscron – Boulou – Tourcoing – Tournay – 3rd Arlon – Ushant – Fleurus – Calvi – Vosges – Fort-Dauphin – Baztan –San-Lorenzo – 1st Dego – Black Mountain – Roses – Gulf of Roses – Genoa – Luxembourg – Groix – Quiberon – Hyères – 2nd Mainz – Loano – Montenotte – Millesimo – 2nd Dego – Mondovì – Fombio – Lodi – Borghetto – Ettlingen – Lonato – Castiglione – Neresheim – Amberg – Würzburg – Rovereto – 1st Bassano – Biberach – Emmendingen – Schliengen – 2nd Bassano – Calliano – Caldiero – Arcole – Newfoundland - Expédition d'Irlande – Kehl – Rivoli – Mantua – Faenza – Fishguard – Neuwied – Veronese Easters – Camperdown
War in the Vendée – War of the Pyrenees – Flanders Campaign – Anglo-Spanish WarSaorgio – 1st Dego - Loano – Montenotte – Millesimo – 2nd Dego – Ceva – Mondovì – Fombio – Lodi – Borghetto – Lonato – Castiglione – Rovereto – 1st Bassano – 2nd Bassano – Calliano – Caldiero – Arcole – Rivoli – 1st Mantua – Faenza (it) – Veronese Easters – Magnano – Cassano – Trebbia – 2nd Mantua – Novi – Genoa – Montebello – Marengo – PozzoloThe Montenotte Campaign began on 10 April 1796 with an action at Voltri and ended with the Armistice of Cherasco on 28 April. In his first army command, Napoleon Bonaparte's French army separated the army of the Kingdom of Sardinia-Piedmont under Michelangelo Alessandro Colli-Marchi from the allied Austrian army led by Johann Peter Beaulieu. The French defeated both Austrian and Sardinian armies and forced Sardinia to quit the First Coalition. The campaign formed part of the Wars of the French Revolution. Montenotte, now called Cairo Montenotte is a municipality in the Ligurian Alps of northwest Italy.
In the spring of 1796, Bonaparte planned to launch an offensive against the combined armies of Sardinia and Austria. However, the Austrian army moved first, attacking the French right flank at Voltri, near Genoa. In response, Bonaparte counterattacked the center of the enemy array, striking the boundary between the armies of his adversaries. Winning at Montenotte, the budding military genius strove to drive the Piedmontese west and the Austrians northeast. Victories at Millesimo over the Sardinians and at Dego over the Austrians began to drive a deep wedge between them. Leaving a division to observe the stunned Austrians, Bonaparte's army chased the Piedmontese west after a second clash at Ceva. A week after the French drubbed the Sardinians at Mondovì the Sardinian government signed an armistice and withdrew from the war. In two and a half weeks, Bonaparte had overcome one of France's enemies, leaving the crippled Austrian army as his remaining opponent in northern Italy.
Contents
Background
See Montenotte 1796 Campaign Order of Battle for a list of French, Austrian, and Sardinian units and organizations.
Forces and Geography
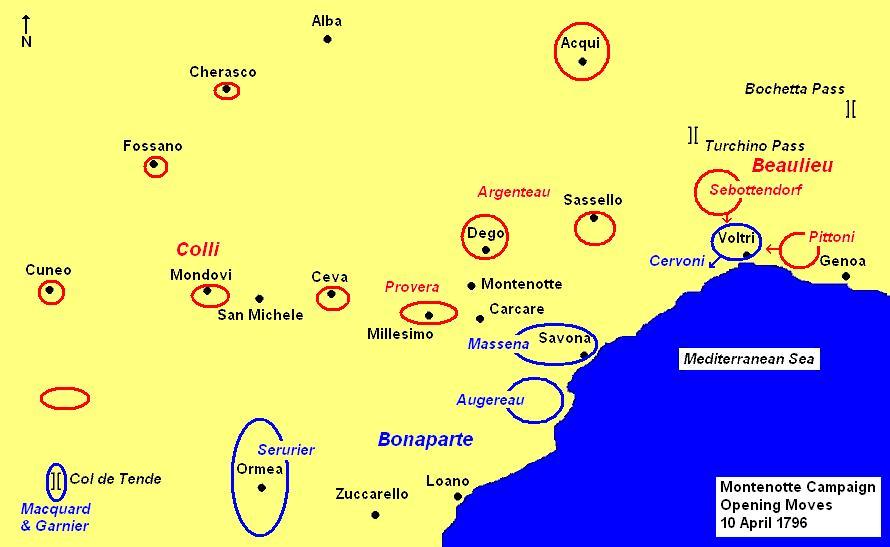
The government of the First French Republic wished to drive Sardinia-Piedmont out of the First Coalition. To achieve this aim, the French Army of Italy first had to defeat Michelangelo Alessandro Colli-Marchi's 21,000-man Sardinian army (including 4,000 Austrians) and Johann Peter Beaulieu's 28,000-strong Austrian army.[1] For this purpose, Bonaparte had a field force of 43,000, while 22,000 more troops guarded his vulnerable supply line along the Italian and French Riviera.[2]
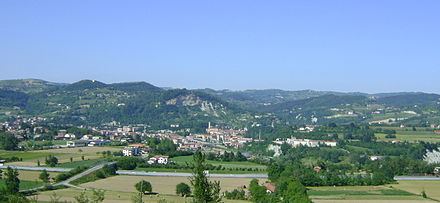 Ceva, as viewed from the south
The town of Savona lies on the coast, about 40 kilometres (25 mi) west of Genoa. Going west-northwest from Savona, a road crosses the Cadibona Pass and reaches Carcare on the Bormida River, 16 kilometres (10 mi) from Savona. Continuing in roughly the same direction from Carcare, the road passes through Millesimo after another 7 kilometres (4 mi). Crossing a divide near the hamlet of Montezemolo, the highway descends into the Tanaro River valley at the small fortress of Ceva. From Millesimo to Ceva is about 15 kilometres (9 mi) and from Ceva to Mondovì is a distance of 20 kilometres (12 mi). Once past Mondovì, the road exits the mountains and enters the plains around the fortress of Cuneo (Coni). Cuneo is 30 kilometres (19 mi) west of Mondovì.
At Carcare, a road branches north to reach Montenotte, 5 km distant. Continuing a further 6 kilometres (4 mi) to the northwest, the road reaches Dego. Acqui, lies about 35 kilometres (22 mi) to the northeast of Dego. From Dego a road goes east toward Sassello. A north-south road across the Colle di Giovo connects Sassello and Savona, 20 kilometres (12 mi) apart. Imperia lies on the coast about 60 kilometres (37 mi) southwest of Savona. An important road connects Imperia, Ormea and Ceva. Farther west is the Col de Tende, an easily defensible pass that connects Cuneo with Nice on the Mediterranean coast. Voltri, now a suburb of Genoa, is on the coast only 13 kilometres (8 mi) west of that great port and accessible from the north via the Turchino Pass. Further east, Genoa may be reached from the north by the Bochetta Pass.[3] The theater of operations stretched from the Col de Tende on the west to Voltri on the east.
Allied and French Plans
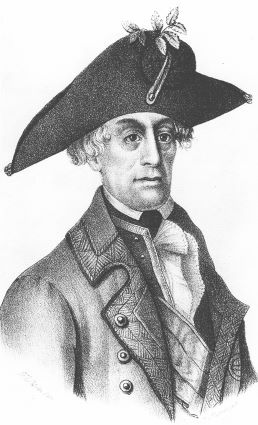
 Johann Peter Beaulieu
Beaulieu planned for Karl Philipp Sebottendorf's Left Wing to attack the exposed French right flank. After smashing the French right, Sebottendorf would join Eugène-Guillaume Argenteau's 9,000-man Right Wing in crushing Bonaparte's main body near Savona. Beaulieu ordered Argenteau, based at Acqui, to attack Savona by way of Montenotte and Sassello. Though the Austrian field army numbered 32,000 infantry, 5,000 cavalry, and 148 cannon,[4] four battalions guarded Lombardy, others were marching to the front from their winter quarters in the Po River valley, and thousands were sick. Available strength may have been as low as 25,000 soldiers.[5]
The Austrian government feared that Piedmont wanted to drop out of the alliance and even change sides. Therefore, Beaulieu received secret instructions not to fully trust his ally. Consequently, he neglected to fully inform the Sardinians of his plans.[6] Colli deployed his army between Dego and Cuneo, with his main weight to the west guarding the Col de Tende. He posted two battalions at Dego and part of Giovanni Marchese di Provera's Austrian brigade at Millesimo.[7] Meanwhile, François Christophe de Kellermann's French Army of the Alps and the Prince of Corrigan's Sardinian army, each about 20,000 strong, glared at each other in the mountains west of Cuneo and Turin.
The French government found it useful to keep Jean-Baptiste Cervoni's brigade at Voltri in order to secure supplies from the nearby city-state of Genoa, which was neutral. Amedee Emmanuel Francois Laharpe stationed one brigade each on the Sassello and Carcare roads. Bonaparte posted Jean Meynier's division at Savona and Pierre Augereau's division farther west, with troops in the mountains. Jean-Mathieu-Philibert Sérurier's division held Ormea, while Francois Macquard and Pierre Garnier's small divisions covered the Col de Tende. About half of Henri Christian Michel de Stengel's cavalry was with the army, while the rest were en route from France. On 5 April Bonaparte received intelligence that Austrian troops were advancing on Voltri, Sassello and Dego. He placed his army on alert, but did not make any other changes.[8]
Bonaparte rejected the Ormea route as too difficult and the Col de Tende route as too distant for his planned offensive. After a meticulous study of maps he determined to lunge across the Cadibona Pass from Savona to seize Carcare. This town was the vital point linking the Austrian army to the east with the Sardinian army to the west.[9] Bonaparte planned to commit André Masséna's corps (Laharpe and Meynier) and Augereau to the main attack, while Sérurier threatened Ceva. He ordered Macquard and Garnier to make a feint in the Col di Tende area. The French offensive was set to begin on 15 April.[10]
Campaign
Voltri and Montenotte
 Montenotte Campaign, Action of Voltri, 10 April 1796
In the event, Beaulieu moved first. On 10 April, the Austrian army commander accompanied Sebottendorf and 3,200 men as they advanced across the Turchino Pass to attack Cervoni's 5,000 Frenchmen at Voltri.[11] At the same time, Philipp Pittoni's 4,000-strong column traversed the Bochetta Pass. "The attack was badly organized, poorly coordinated, and used a surprisingly small number of troops."[12] Outnumbered, Cervoni "conducted a masterly withdrawal to the west" avoiding a trap.[13] On 11 April, Beaulieu paused to await news from his Right Wing.
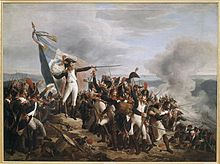 Rampon Defending the Monte Legino Redoubt by René Berthon (1776-1859)
A day late, Argenteau and Mathias Rukavina von Boynograd assembled 4,000 soldiers near Montenotte on the morning of the 11th. This force advanced southeast toward 2,000 French soldiers at Monte Negino (Monte Legino). Meanwhile, a second Austrian brigade occupied Sassello. Antoine-Guillaume Rampon repulsed several Austrian attacks at Monte Negino during the day. Bonaparte ordered Laharpe to attack Argenteau the next day with two brigades while Masséna enveloped the Austrian flank with the third brigade. He also directed Augereau and Meynier to concentrate at Carcare.[14] Beaulieu found himself in a strategic dead-end at Voltri and directed Josef Philipp Vukassovich to march through the hills to Sassello while ordering the rest of the troops back to Acqui.
On 12 April, Bonaparte's French army defeated Argenteau's soldiers at the Battle of Montenotte. While Laharpe mounted a frontal attack with 7,000 troops from Monte Negino, Masséna moved north with 4,000 men to turn Argenteau's weak right flank. Masséna's flanking movement broke through and Argenteau's efforts to plug the gap failed. The Austrian pulled back and the French mauled his outnumbered force. Argenteau withdrew his battered force to Dego, complaining that he could rally only 700 men to the colors.[15]
Millesimo, Dego, and Ceva
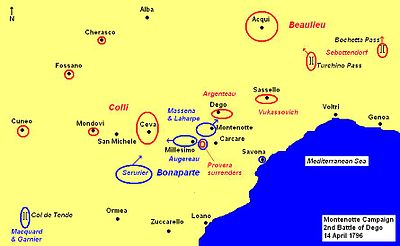 Montenotte Campaign, Battle of Dego, 14 April 1796
Bonaparte turned west against Colli's army on 13 April. Augereau's division easily pushed back Provera's weak brigade in the Battle of Millesimo. To cover the retreat, Provera and 1,000 picked troops occupied a ruined hilltop castle. Instead of bypassing this obstacle, Bonaparte ordered Cosseria castle to be stormed. For the rest of the day, the Austro-Sardinians repelled several assaults with heavy French casualties. Provera surrendered the following morning when its defenders ran out of food, water, and ammunition.[16]
On 14 April, Bonaparte directed Masséna and Laharpe to attack Argenteau in the Second Battle of Dego. After inflicting 1,500 French casualties, most of the outnumbered Austrians were killed, wounded or captured. Argenteau led the remnant of his force back to Acqui. Bonaparte left Masséna and one of Meynier's brigades to hold Dego and ordered Laharpe back to Carcare.[17]
Beaulieu ordered Vukassovich's brigade to Dego on the 14th but a poorly written order caused his subordinate to be a day too late. At dawn on 15 April, Vukassovich surprised Meynier's brigade in the act of looting the town and routed the French. Masséna hastily recalled Laharpe to retake Dego. Several hours later, the heavily reinforced French retook the town after a tough fight, with Bonaparte supervising the assault. Vukassovich retreated to Acqui.[18]
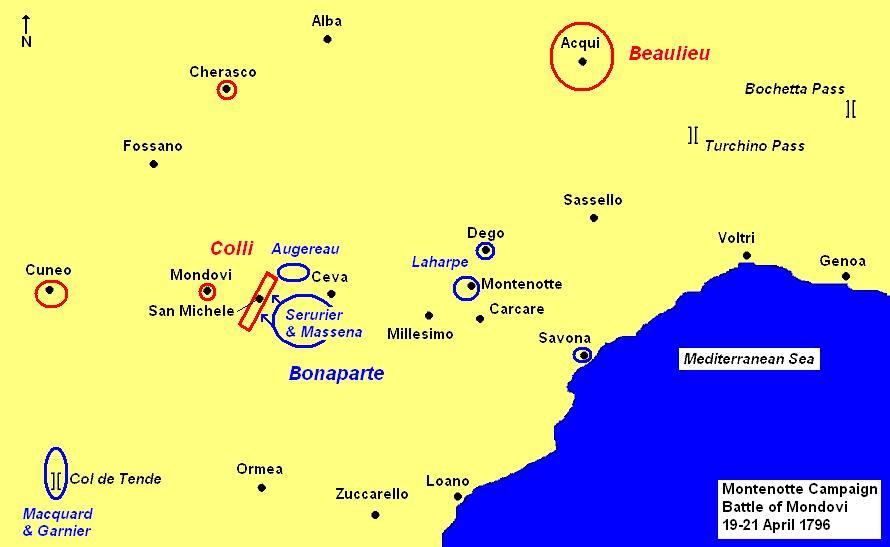
After a clash between Augereau and Colli at Montezemolo, the Sardinians pulled back to Ceva. On 16 April, Augereau attacked the Sardinians and was repulsed in the Battle of Ceva. Fearing that Sérurier, who was approaching from Ormea, might attack him in the rear, Colli withdrew to the Corsaglia River at San Michele Mondovi. He left a battalion behind to hold Ceva's small fortress. Bonaparte ordered Laharpe to scout Sassello to determine Beaulieu's whereabouts. Meynier reported sick, so Masséna took direct command of his division, which remained near Dego.[19]
Mondovì and Cherasco
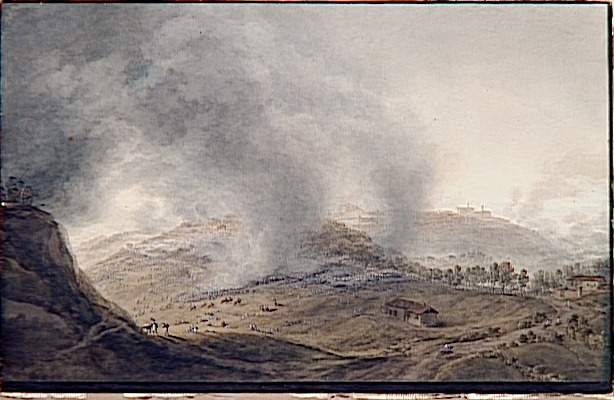
 Montenotte Campaign, Battle of Mondovì, 21 April 1796
Laharpe returned to Dego, reporting no enemy activity. Meanwhile, Beaulieu reassembled his battered army near Acqui and Colli directed Jean-Gaspard Dichat de Toisinge with 8,000 soldiers and 15 cannon to defend the Corsaglia position.[20] On 19 April, Bonaparte ordered Sérurier to attack San Michele while Augereau flanked the river line from the north. Augereau's effort failed due to high water. Sérurier's soldiers fought their way across the river, but then dispersed in search of food and plunder. Colli counterattacked and threw the French back.[21] That day, Bonaparte switched his supply line from the exposed Cadibona Pass to a safer route via Imperia and Ormea. Bonaparte called up Masséna to make a three division attack on the San Michele position. Laharpe guarded the army's rear against an Austrian attack.[22]
Faced with a heavy French concentration, Colli abandoned the Corsaglia River line on the night of 20/21 April. But the vigorous French pursuit soon overran the Sardinian rearguard. Colli barely had time to arrange his troops before Sérurier attacked him in the Battle of Mondovì. The French general formed his least experienced troops into three columns and covered them with his veterans in open order. Then, leading his central column, Sérurier launched a charge with Masséna's division in support. Brushing aside spotty resistance, the French broke the Sardinian lines and forced them to abandon Mondovì.[23] Dichat was killed. Stengel received a mortal wound while leading a force of dragoons in pursuit.
After forcing Mondovì's municipal authorities to hand over a large quantity of provisions, Bonaparte launched his pursuit.[24] On the evening of 23 April, the French army commander received a letter from Colli requesting an armistice. Ruthlessly, Bonaparte urged his men forward to conquer as much territory as possible. Since his ragged and hungry soldiers reached the plains it was relatively easy for them to forage for food, unlike the situation in the mountains. By 25 April, Masséna held Cherasco and Augereau occupied Alba, with Laharpe and Sérurier defending the flanks. Bonaparte shifted his supply line again, this time to the secure Col de Tende.
By the Armistice of Cherasco, signed on 28 April, territory east of the Stura di Demonte and Tanaro Rivers passed under French control. The fortresses of Cuneo, Ceva, and Tortona acquired French garrisons. In addition, the Sardinians granted the French army permission to cross its territory if it wished. A secret clause allowed Bonaparte to cross the Po River at the city of Valenza. Ratification of the armistice and the signing of a formal treaty was left to the French government. Bonaparte dispatched Joachim Murat to Paris with the details.[25]
Results
Succeeding where earlier armies had failed, Bonaparte and his soldiers knocked Sardinia out of the war in a single brief campaign. The French suffered 6,000 casualties during the campaign.[26] Total Austrian losses stood between 5,000 and 6,000,[27] while the Sardinians lost a few thousand. With Sardinia-Piedmont pacified, the French were free to direct their attentions on their major enemy, Austria. Soon Bonaparte launched a new offensive, which resulted in victories over Beaulieu at the battles of Fombio and Lodi in May.
Commentary
Historian Martin Boycott-Brown lists the reasons for Bonaparte's victory,
...not just the disastrous separation between Beaulieu and Argenteau, but also to that between the Austrian and Piedmontese armies. If the Austrians had chosen to concentrate closer to the Piedmontese positions, as Colli had wanted, it would have been less easy for Bonaparte to effect their separation. The defeat of the Piedmontese became almost inevitable from the moment Bonaparte managed to drive a wedge between the allies and obliged the Piedmontese to draw ever further from their only source of help by threatening to outflank them. It would be easy to heap the blame for this on Beaulieu, but as we have said before, he was given a difficult hand to play, and if he came off second best in a contest with one of the greatest strategists in the history of war, it is not surprising.[28]
Notes
- ^ Fiebeger, p 5
- ^ Fiebeger, p 8
- ^ Chandler, Campaigns, p 60
- ^ Boycott-Brown, p 167
- ^ Boycott-Brown, p 138
- ^ Boycott-Brown, p 137
- ^ Fiebeger, p 5
- ^ Fiebeger, p 4
- ^ Chandler, Campaigns, p 63
- ^ Chandler, Campaigns, p 63-64
- ^ Smith, p 111. Smith says there were 10,000 Austrians and 3,500 French. Boycott-Brown's numbers are used here.
- ^ Boycott-Brown, p 194
- ^ Chandler, Dictionary, p 470
- ^ Fiebeger, p 5
- ^ Chandler, Dictionary, p 285
- ^ Chandler, Campaigns, p 71
- ^ Fiebeger, p 6
- ^ Chandler, Dictionary, p 117
- ^ Fiebeger, p 6
- ^ Boycott-Brown, p 265
- ^ Rooney, p 444
- ^ Chandler, Campaigns, p 74
- ^ Rooney, p 452
- ^ Boycott-Brown, p 272
- ^ Chandler, Campaigns, p 75
- ^ Chandler, Campaigns, p 76
- ^ Chandler, Campaigns, p 77
- ^ Boycott-Brown, p 283
References
- Boycott-Brown, Martin. The Road to Rivoli. London: Cassell & Co., 2001. ISBN 0-304-35305-1
- Chandler, David. Dictionary of the Napoleonic Wars. New York: Macmillan, 1979. ISBN 0-02-523670-9
- Chandler, David. The Campaigns of Napoleon. New York: Macmillan, 1966.
- Chandler, David (ed). Rooney, David D. "Serurier: The Virgin of Italy," Napoleon's Marshals. New York: Macmillan, 1987. ISBN 0-02-905930-5
- Fiebeger, G. J. (1911). The Campaigns of Napoleon Bonaparte of 1796–1797. West Point, New York: US Military Academy Printing Office. http://www.archive.org/details/campaignsnapole00unkngoog.
- Smith, Digby. The Napoleonic Wars Data Book. London: Greenhill, 1998. ISBN 1-85367-276-9
External links
Categories:- Battles of the French Revolutionary Wars
- Battles involving France
- Battles involving Austria
- Battles involving Italy
- Conflicts in 1796
- 1796 in France
- 1796 in Austria
- 1796 in Italy


Wikimedia Foundation. 2010.