- Meyer hardness test
-
The Meyer hardness test is a rarely used hardness test based upon projected area of an impression. This is a more fundamental measurement of hardness than other hardness tests which are based on the surface area of an indentation. The principle behind the test is that the mean pressure required to test the material is the measurement of the hardness of the material. The mean pressure is calculated by dividing the load by the projected area of the indentation. The result is called the Meyer hardness, which has units of megapascals (MPa).[1]
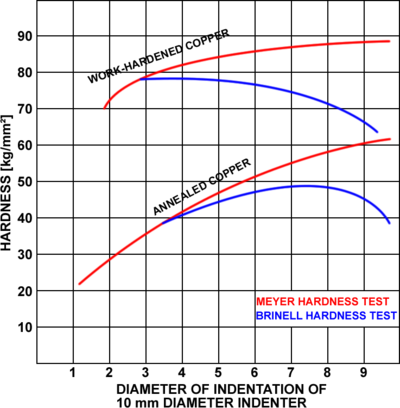
An advantage of the Meyer test is that it is less sensitive to the applied load, especially compared to the Brinell hardness test. For cold worked materials the Meyer hardness is relatively constant and independent of load, whereas for the Brinell hardness test it decreases with higher loads. For annealed materials the Meyer hardness increases continuously with load due to strain hardening.[1]
Based on Meyer's law hardness values from this test can be converted into Brinell hardness values, and vice-versa.[2]
See also
- Leeb Rebound Hardness Test
- Rockwell scale
- Vickers hardness test
References
- ^ a b Hardness Testing, http://www.keytometals.com/page.aspx?ID=CheckArticle&site=kts&NM=140, retrieved 2008-10-07.
- ^ Tabor, p. 10.
Bibliography
- Tabor, David (2000), The Hardness of Metals, Oxford University Press, ISBN 0198507763, http://books.google.com/?id=b-9LdJ5FHXYC.

This article about a mechanical engineering topic is a stub. You can help Wikipedia by expanding it.

