- Vickers hardness test
-
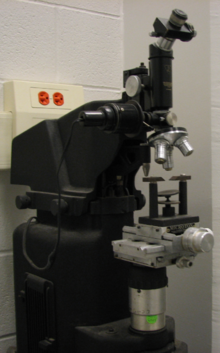
The Vickers hardness test was developed in 1924 by Smith and Sandland at Vickers Ltd as an alternative to the Brinell method to measure the hardness of materials.[1] The Vickers test is often easier to use than other hardness tests since the required calculations are independent of the size of the indenter, and the indenter can be used for all materials irrespective of hardness. The basic principle, as with all common measures of hardness, is to observe the questioned material's ability to resist plastic deformation from a standard source. The Vickers test can be used for all metals and has one of the widest scales among hardness tests. The unit of hardness given by the test is known as the Vickers Pyramid Number (HV) or Diamond Pyramid Hardness (DPH). The hardness number can be converted into units of pascals, but should not be confused with a pressure, which also has units of pascals. The hardness number is determined by the load over the surface area of the indentation and not the area normal to the force, and is therefore not a pressure.
The hardness number is not really a true property of the material and is an empirical value that should be seen in conjunction with the experimental methods and hardness scale used.
When doing the hardness tests the minimum distance between indentations and the distance from the indentation to the edge of the specimen must be taken into account to avoid interaction between the work-hardened regions and effects of the edge. This minimum distances are different for ISO 6507-1 and ASTM E384 standards.
Standard Distance between indentations Distance from the center of the indentation to the edge of the specimen ISO 6507-1 > 3·d for steel and copper alloys and > 6·d for light metals 2.5·d for steel and copper alloys and > 3·d for light metals ASTM E384 2.5·d 2.5·d If HV is expressed in SI units the Ultimate Tensile strength of the material can be approximated as:

where c is a constant determined by geometrical factors usually ranging between 2 and 4.[citation needed]
Contents
Implementation
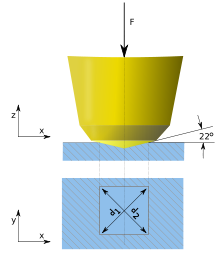
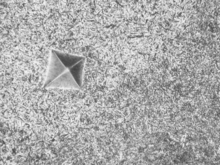
It was decided that the indenter shape should be capable of producing geometrically similar impressions, irrespective of size; the impression should have well-defined points of measurement; and the indenter should have high resistance to self-deformation. A diamond in the form of a square-based pyramid satisfied these conditions. It had been established that the ideal size of a Brinell impression was 3/8 of the ball diameter. As two tangents to the circle at the ends of a chord 3d/8 long intersect at 136°, it was decided to use this as the included angle of the indenter. The angle was varied experimentally and it was found that the hardness value obtained on a homogeneous piece of material remained constant, irrespective of load.[2] Accordingly, loads of various magnitudes are applied to a flat surface, depending on the hardness of the material to be measured. The HV number is then determined by the ratio F/A where F is the force applied to the diamond in kilograms-force and A is the surface area of the resulting indentation in square millimeters. A can be determined by the formula
which can be approximated by evaluating the sine term to give
where d is the average length of the diagonal left by the indenter in millimeters. Hence,[3]
where F is in kgf and d is in millimeters.
The corresponding units of HV are then kilograms-force per square millimeter (kgf/mm²). To calculate Vickers hardness number using SI units one needs to convert the force applied from kilogram-force to newtons by multiplying by 9.806 65 (standard gravity) and convert mm to m. To do the calculation directly, the following equation can be used:[4]
where F is newtons and d is millimeters.
Vickers hardness numbers are reported as xxxHVyy, e.g. 440HV30, or xxxHVyy/zz if duration of force differs from 10 s to 15 s, e.g. 440Hv30/20, where:
- 440 is the hardness number,
- HV gives the hardness scale (Vickers),
- 30 indicates the load used in kg.
- 20 indicates the loading time if it differs from 10 s to 15 s
Vickers values are generally independent of the test force: they will come out the same for 500 gf and 50 kgf, as long as the force is at least 200 gf.[5]
Examples of HV values for various materials[6] Material Value 316L stainless steel 140HV30 347L stainless steel 180HV30 Carbon steel 55–120HV5 Iron 30–80HV5 Example of use
The fin attachment pins and sleeves in the Convair 580 airliner were specified by the aircraft manufacturer to be hardened to a Vickers Hardness specification of 390HV5, the '5' meaning five kiloponds. However on the aircraft flying Partnair Flight 394 the pins were later found to have been replaced with sub-standard parts, leading to rapid wear and finally loss of the aircraft. On examination, accident investigators found that the sub-standard pins had a hardness value of only some 200-230HV5. [7]
See also
- Leeb Rebound Hardness Test
- Hardness comparison
- Knoop hardness test
References
Notes
- ^ R.L. Smith & G.E. Sandland, "An Accurate Method of Determining the Hardness of Metals, with Particular Reference to Those of a High Degree of Hardness," Proceedings of the Institution of Mechanical Engineers, Vol. I, 1922, p 623–641.
- ^ http://www.ukcalibrations.co.uk/vickers_htm.html
- ^ ASTM E384-10e2
- ^ ISO 6507-1:2005
- ^ Vickers Test. Instron website.
- ^ Smithells Metals Reference Book, 8th Edition, ch. 22
- ^ http://www.aibn.no/aviation/reports/1993-02-eng
Bibliography
- Meyers and Chawla (1999). "Section 3.8". Mechanical Behavior of Materials. Prentice Hall, Inc.
Further reading
- ASTM E92: Standard method for Vickers hardness of metallic materials (Withdrawn and replaced by E384-10e2)
- ASTM E384: Standard Test Method for Knoop and Vickers Hardness of Materials
- ISO 6507-1: Metallic materials - Vickers hardness test - Part 1: Test method
- ISO 6507-2: Metallic materials - Vickers hardness test - Part 2: Verification and calibration of testing machines
- ISO 6507-3: Metallic materials - Vickers hardness test - Part 3: Calibration of reference blocks
- ISO 6507-4: Metallic materials - Vickers hardness test - Part 4: Tables of hardness values
External links
- Vickers hardness test
- Conversion table - Vickers, Brinell, and Rockwell scales
Categories:- Hardness tests
Wikimedia Foundation. 2010.


